Table of Contents [expand]
Last updated January 13, 2026
Apache Kafka Connectors are packaged applications designed for moving and modifying data between Apache Kafka and other systems or data stores. They’re built using the Apache Kafka Connect framework. The Apache Kafka Connect framework makes it easier to build and bundle common data transport tasks such as syncing data to a database. It does this by handling the functions that aren’t unique to the task so that the developer can focus on what is unique to their use case. This article is focused on considerations for running pre-built Connectors on Heroku. If you plan to build a custom Connector, you can follow the Connector Developer Guide, while keeping in mind the considerations in this article to ensure your Connector runs smoothly on Heroku.
Heroku Enterprise customers with Premier or Signature Success Plans can request in-depth guidance on this topic from the Customer Solutions Architecture (CSA) team. Learn more about Expert Coaching Sessions here or contact your Salesforce account executive.
Connector Types
Connectors come in two varieties:
Source Connectors - these connectors are used to send data to Apache Kafka
Sink Connectors - these connectors are used to retrieve data from Apache Kafka
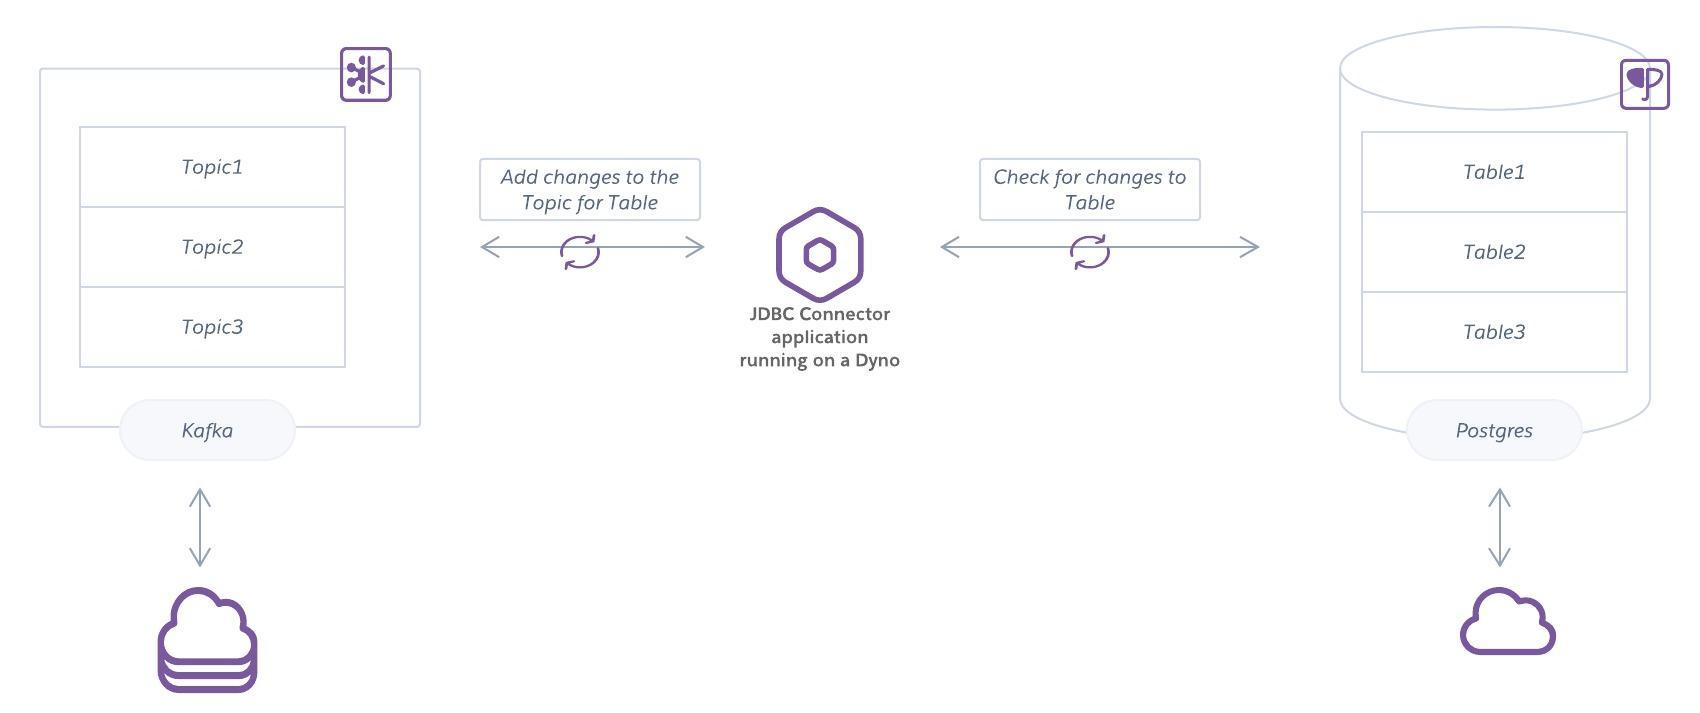
Many Connectors can act as either a Source or Sink depending on the configuration. Following is an example of a database Connector that watches for changes in Postgres and then adds them to a corresponding topic in Apache Kafka. This Connector could also work in the other direction and add changes from Apache Kafka to a table in Postgres.

Pre-built Connectors for Apache Kafka
You can find Connectors for common tasks on GitHub and via the Apache Kafka Ecosystem page.
Ensure that both the license and the technical requirements for existing Connectors are suitable for your application. Some Connectors have licensing restrictions or are intended for an environment that you manage directly, rather than a cloud environment where Kafka is managed for you. In particular, let’s look at some considerations for running a Connector on Heroku.
Running Connectors on Heroku
In Heroku, Connectors are applications that talk to your Apache Kafka cluster, using the Kafka Connect API to produce or consume data.
Compatibility
Before running a Connector on Heroku, evaluate it against these criteria:
Long-term local storage
Heroku Dynos have an ephemeral filesystem; local data doesn’t exist beyond 24 hours. Connectors that require long-term local storage are incompatible, though some can be configured to change this requirement.
Automatic topic creation
Some Connectors automatically create Topics to manage state, but Apache Kafka on Heroku doesn’t currently support automatic topic creation. To use a Connector that requires certain topics, pre-create them, and disable first-write creation in the Connector. Connectors with a hard requirement of automatic Topics aren’t compatible with Heroku.
Operator-level cluster access
Connectors that require operator-level access to an Apache Kafka cluster, such as changing cluster configuration, aren’t compatible with Apache Kafka on Heroku. Apache Kafka on Heroku is a managed service where Heroku is responsible for updates, uptime, and maintenance.
Operator-level access to other systems
Connectors that require operator-level access to connected systems, such as PostgreSQL, aren’t compatible with Apache Kafka on Heroku. For example, the Debezium PostgreSQL Connector requires installing an output plugin on the PostgreSQL server. This would require access beyond what is allowed on the managed Heroku PostgreSQL service.
Operation
When operating a Connector on Heroku, follow these guidelines:
Scaling tasks
If your Connector supports and is configured for running multiple instances (distributed workers) you can scale it in the same way as any other application would on Heroku.
Monitoring tasks
One consideration is also how resilient you need your tasks to be. For example, as mentioned in the documentation, “When a task fails, no rebalance is triggered as a task failure is considered an exceptional case. As such, failed tasks aren’t automatically restarted by the framework and must be restarted via the REST API.” This means if you aren’t monitoring the tasks, things don’t happen as expected. You can monitor the Connector application like you would another application on Heroku e.g. with New Relic or a similar service.
Managing configuration
Some Connectors store configuration in property files. On Heroku, follow 12-Factor architecture, which specifies that configuration must be stored in the environment as Config Vars.
To use a Connector that requires property files, you can create an initialization script that writes files based on config vars before launching the Connector processes. This example repository writes configuration files with a start-distributed script, which is launched by its Procfile at dyno boot.
Installing system packages
A dyno runs on a stack, an operating system image that’s curated and maintained by Heroku. Each stack includes a set of installed system packages.
If a Kafka Connector needs additional packages, you can install them via the Apt Buildpack and an Aptfile. For details on this process, see Using Third-Party Buildpacks. Apps that use Cloud Native Buildpacks automatically detect the Aptfile in your project without having to explicitly configure the Apt buildpack for your app.
If you can’t install the packages you need via the Apt Buildpack, you can instead be able to use a Docker deployment.