Table of Contents [expand]
Last updated March 30, 2026
Heroku CI automatically runs your app’s test suite with every push to your app’s GitHub repository, enabling you to easily review test results before merging or deploying changes to your codebase. Tests execute in a disposable environment that closely resembles your staging and production environments, which helps to ensure that results are accurate and obtained safely.
Heroku CI works seamlessly with any Heroku Pipeline.
Heroku CI is currently unavailable for Fir-generation pipelines. Subscribe to our changelog to stay informed of when we add this feature to Fir.
Setup
If you don’t have one already, create a Heroku Pipeline for your app.
Select a single verified Heroku user or team that will own the pipeline and all of its associated apps. Assign ownership to this user or team via the Heroku Dashboard. Heroku CI usage is billed to the account that owns the associated pipeline.
Go to your pipeline’s
Settingstab in the Heroku Dashboard and connect your app’s GitHub repository. Note that you must have admin access to the repo.Also from your pipeline’s
Settingstab, clickEnable Heroku CI.
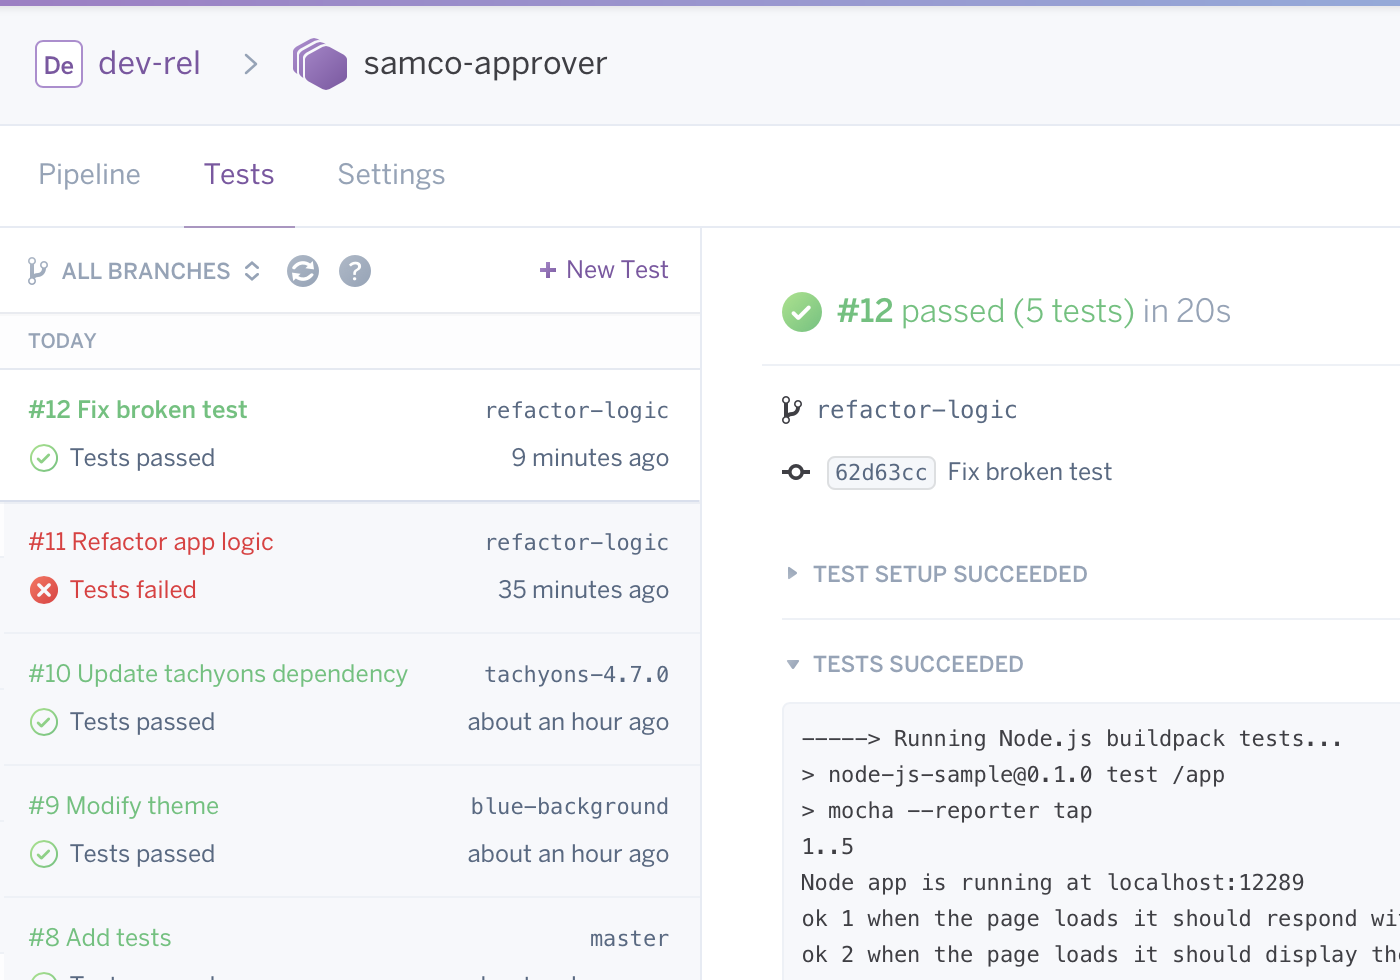
If your app uses a common testing framework for its associated language, Heroku CI is probably already configured to execute the correct command for your test suite. Try creating a pull request on your GitHub repo. If Heroku CI is configured correctly, you should see your test suite running from your pipeline’s Tests tab in the Heroku Dashboard:
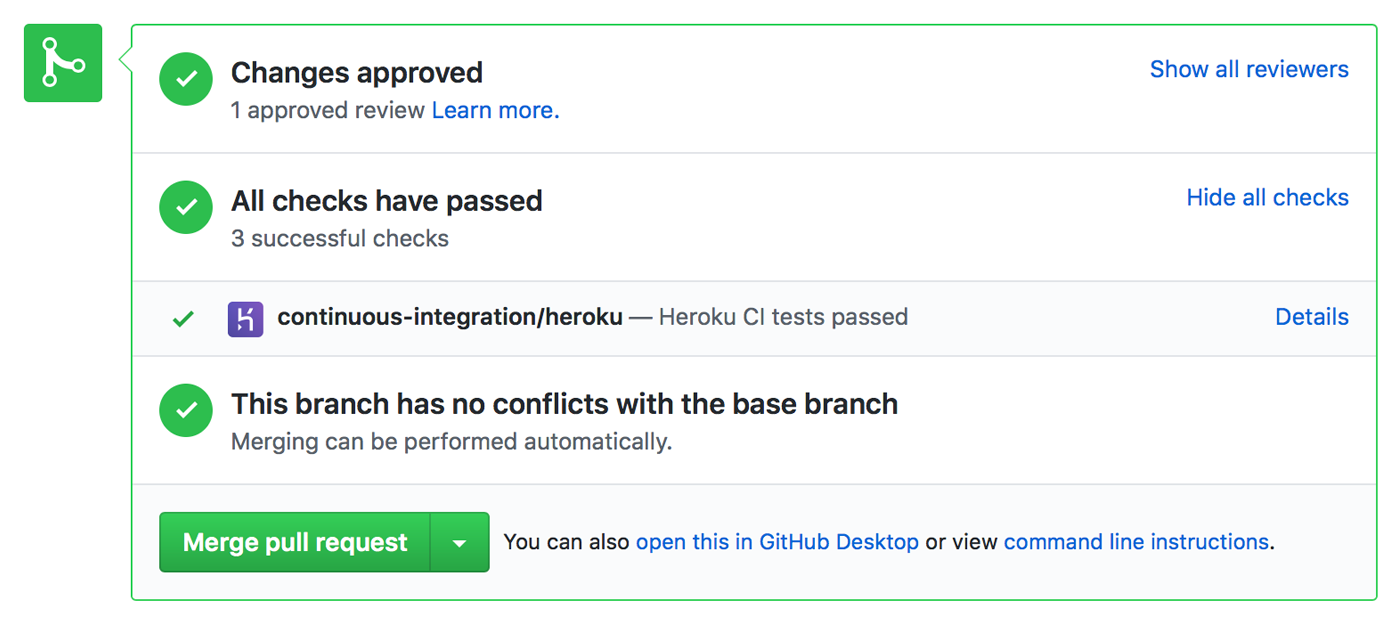
The GitHub pull request’s Conversation tab also displays CI results next to a Heroku icon:
If Heroku CI doesn’t execute the correct command, or if some tests fail due to missing resources in your test environment, you can easily resolve these issues by configuring your test environment.
Configure Your Test Environment
You can configure your Heroku CI test environment by including an app.json manifest in your repository’s root directory. During CI test runs, any keys defined in this file’s test environment take precedence over any matching keys in your app’s base configuration.
Keys that affect the configuration of your CI environment include:
scriptsaddonsenvbuildpacksformation
Specify Custom Test Commands (scripts)
The scripts section of your app.json manifest lets you override the commands that Heroku CI runs to set up and then run your test suite. For typical usage of Heroku’s officially supported languages, you do not need to specify these (see additional language-specific documentation below).
The scripts field can include two keys: test-setup and test.
Each of these can be any shell command, including the path to an executable that exists within your application repo (e.g., make tests).
test-setup
Include a test-setup script to perform one-time setup tasks before running your test suite, for example:
- Installing test dependencies like code linters, compilers, and test runners
- Setting up and seeding a database
test
The test script should be the command you use to execute your tests. It’s likely the same command you use in your local environment, such as bundle exec rspec or npm test.
Example
If your Ruby app doesn’t have any tests, but you want to analyze all new code changes with Rubocop, you can install and run it as your test suite like so:
{
  "environments": {
    "test": {
      "scripts": {
        "test-setup": "gem install rubocop",
        "test": "rubocop ."
      }
    }
  }
}
Provisioning Add-ons (addons)
Heroku uses your project’s app.json manifest to determine which add-on services to provision for temporary deployments (i.e., deployments performed by Heroku CI and review apps).
Many add-ons that support Heroku CI have a special plan that is provisioned for test runs. These plans are functionally similar to a production add-on plan but are quicker to provision and de-provision.
For example, Heroku Postgres and Heroku Key-Value Store both have an ephemeral in-dyno plan that can only be provisioned during a test run. You can learn more about them in Heroku CI In-Dyno Databases.
Some add-ons don’t support Heroku CI. If you attempt to provision one of these add-ons during a test run, you’ll encounter an error message like <add-on service slug> has opted out of supporting Review and CI apps.
Example
This snippet specifies that Heroku CI should provision an instance of the in-dyno Heroku Key-Value Store plan for test runs:
{
  "environments": {
    "test": {
      "addons":[
        "heroku-redis:in-dyno"
      ]
    }
  }
}
Setting Environment Variables (env)
If your app or any of its add-ons require certain environment variables during test runs, you can specify them with the env key, like so:
{
  "environments": {
    "test": {
      "env": {
        "PHOTON_TORPEDOES": "online"
      }
    }
  }
}
Note that unlike review apps, Heroku CI does not inherit any config vars from the parent app.
To set confidential or volatile environment variables (such as access tokens) that you shouldn’t include in app.json, you can instead add them to your pipeline’s Heroku CI settings in the Heroku Dashboard:

Values specified here are available in all test runs.
Immutable Environment Variables
The following environment variables are available in all Heroku CI test runs and cannot be changed:
CI: A string indicating that this is a continuous integration environment. This value is alwaystrue.HEROKU_TEST_RUN_BRANCH: A string representing the branch of the commit being tested.HEROKU_TEST_RUN_COMMIT_VERSION: A string representing the commit version being tested (this is usually the commit’s SHA).HEROKU_TEST_RUN_ID: A string UUID representing the unique ID of the test run.
Test Run Behavior
After you enable Heroku CI for a pipeline, it runs tests automatically for every subsequent push to your GitHub repository. This means that all GitHub pull requests are automatically tested, along with any merges to master (which are typically deployed to staging).
Test runs are executed inside an ephemeral Heroku app that is provisioned for each test run. The app is automatically destroyed when the run completes.
CI does not run on Pipeline promotions, or on direct deploys to an app in your pipeline. Any arbitrary branch can be tested via a manual test run, available from your pipeline’s Tests tab.
All Heroku CI test runs execute on the Common Runtime (even if the parent app runs in a Private Space). Consequently, test runs cannot access apps or resources running inside a Private Space.
Using with Automatic Deploys
Heroku’s GitHub integration lets you automatically deploy a new version of your app (usually to development or staging) whenever a designated branch of your repo is updated.
You can require that your Heroku CI test run pass before an update to this branch is automatically deployed. See Automatic Deploys to learn how.
Supported Languages
Heroku CI offers language support via the Testpack API, which allows a buildpack to prepare your app for testing, and in some cases, detect what tests to run.
All of Heroku’s officially supported languages have full Heroku CI support. Some third-party buildpacks also provide support.
To add Heroku CI support to a buildpack, the buildpack needs to implement the Testpack API. As an example, check out this pull request to the Elixir buildpack. For additional help or assistance, reach out to us at heroku-ci-feedback@heroku.com.
Go
The Heroku Go buildpack supports Heroku CI:
- Compiles and installs dependencies with Go modules.
- Runs tests with
go test ./….
Node
The Heroku Node buildpack supports Heroku CI:
- Compiles your tests with
NPM_CONFIG_PRODUCTION=falseandNODE_ENV=test(which installs your test and dev dependencies) - Runs your tests with
npm testoryarn testas appropriate
For typical Node apps, this should mean you do not need to define test scripts in app.json (but you may in package.json).
Java
The Heroku Java buildpack supports Heroku CI.
- Compiles test source code into the
targetdirectory by executing Maven’stest-compilelifecycle. - Executes tests by running
mvn -B testormvnw -B testdepending if using your own Maven wrapper.
PHP
The Heroku PHP buildpack supports Heroku CI:
- Dependencies from
require-devincomposer.jsonwill be installed for test runs. - Tests are auto-detected in the following order; only the first match found is executed:
composer test(runstestfrom thescriptssection incomposer.json)codecept runbehatphpspec runatoumkahlanperidotphpunit
- the
zend.assertionsINI directive is enabled on Heroku CI
Make sure your test dependencies, e.g. phpunit/phpunit, are in your composer.json require-dev section, and that composer.lock is up to date.
If your tests require a running web server, e.g. for acceptance testing, you need to launch the boot script you’re also using in your Procfile in the background, and suppress all of its output. This can also be done in the test-setup step:
{
  "environments": {
    "test": {
      "scripts": {
        "test-setup": "heroku-php-apache2 >/dev/null 2>&1 & sleep 5",
        "test": "codecept run"
      }
    }
  }
}
The sleep 5 call ensures that the PHP-FPM and the web server have started up fully before the tests are started.
Python
The Heroku Python buildpack supports Heroku CI:
- For apps using pip, all dependencies specified within
requirements.txtand optionallyrequirements-test.txtwill be installed. - For apps using Poetry, all dependency groups will be installed apart from those marked as
optional = true. - For apps using Pipenv, both the default and development dependency groups will be installed.
- For apps using uv, all default dependency groups will be installed.
The Python buildpack does not automatically detect your tests. You’ll need to tell Heroku CI what tests to run with scripts.test inside environments.test in your app.json.
Example app.json:
{
  "environments": {
    "test": {
      "scripts": {
        "test": "nose test"
      }
    }
  }
}
Ruby
The Heroku Ruby buildpack supports Heroku CI:
- installs
developmentandtestdependencies defined in yourGemfile - supports both
:rubyor:sqldatabase schema when preparing database tests. In addition, will runrake db:migrate. - Runs your tests with the appropriate Rake command (e.g.
bundle exec rspec,bin/rails test, orrake test).
For typical Ruby apps, you should not need to define scripts in app.json.
The Ruby Buildpack creates a lib/tasks/heroku_clear_tasks.rake file in your application for a Rails CI test run. The Heroku Postgres add-on does not provide create, drop, or reset access. That level of access is not required to run your test suite, so heroku_clear_tasks works around the access limitations.
Heroku CI does not currently support capybara-webkit please see for supports browser and user Acceptance Testing (beta)
Example (for a Rails app):
{
  "environments": {
    "test": {
      "addons":[
         "heroku-redis",
         "heroku-postgresql"
      ]
    }
  }
}
Gradle
The Heroku Gradle buildpack supports Heroku CI.
- Runs tests with
gradlew check.
Scala
The Heroku Scala buildpack supports Heroku CI.
- Runs tests with
sbt test.
Clojure
The Heroku Clojure buildpack supports Heroku CI.
- Prepares test environment by running
lein deps(which will be overrided by theLEIN_BUILD_TASKconfig var). - Runs tests with
lein test.
.NET
The Heroku .NET buildpack supports Heroku CI.
- Installs the .NET SDK and restores .NET tools specified in
.config/dotnet-tools.json. - Runs tests with
dotnet testfor the project or solution file used to publish the application. - The default build configuration (
Debug) and verbosity level (minimal) for thedotnet testcommand applies, but can be overridden by setting theBUILD_CONFIGURATIONandMSBUILD_VERBOSITY_LEVELenvironment variables.
For typical .NET apps, you should not need to define scripts in app.json.
Elixir
The third-party Elixir buildpack supports Heroku CI:
- Compiles and installs dependencies with
MIX_ENV=test. - Runs tests with
mix test.
Note that because Elixir is not an officially supported language, you must still specify the buildpack in your app.json file. Also make sure that the test alias in your mix.exs file does not create a database, because adding the Heroku Postgres add-on does that for you.
Example app.json:
{
  "buildpacks": [
    {"url": "https://github.com/HashNuke/heroku-buildpack-elixir"}
  ]
}
Release Phase and Heroku CI
Release Phase is ignored during Heroku CI test runs. We suggest placing any scripts that need to run before your tests in your test-setup script.
Parallel Test Runs for Heroku CI
Parallel Test Runs for Heroku CI enable you to distribute your app’s test suite across multiple dynos to substantially reduce execution time.
Browser Tests and UAT on Heroku CI
The (headless) Chrome buildpack enables tests that require Chrome (e.g., Selenium and other UAT technologies). Other solutions are also supported.
See documentation for Heroku CI user acceptance testing (UAT) for more detail.
Debugging
The Heroku CLI includes a ci:debug command that you can use to start a debug test run. This enables you to inspect the Heroku CI environment and the execution of tests inside a test dyno. This is handy for solving issues where tests pass locally but not on CI, or for debugging problems with test setup.
You should run this command from within your repo. It will build a new test run and execute the test setup phase. Note that the heroku ci:debug command doesn’t require you to push your latest commits to GitHub. It creates a new test dyno based on your latest local commit.
$ cd my-repository
$ heroku ci:debug
Preparing source... done
Creating test run... done
Running setup and attaching to test dyno...

~ $ npm test # or whatever test command your application uses
To skip the test setup phase (for debugging setup issues), run with the --no-setup flag:
$ heroku ci:debug --no-setup
Preparing source... done
Creating test run... done
Attaching to test dyno...
 ▸    Skipping test setup phase.
 ▸    Run `sprettur setup && for f in .profile.d/*; do source $f; done`
 ▸    to execute a build and configure the environment
~ $
Technical Detail on Test Run Lifecycle
Maintainers of third-party buildpacks can add explicit support for Heroku CI to their buildpacks. Please contact Heroku for help adding this support to your buildpack.
Consult Heroku CI: Technical Detail on Test Run Lifecycle for the sequence of events performed by Heroku CI during a test run. This information can be also be helpful to advanced developers who want to debug certain test run failures.
Costs
We previously charged $10/month for Heroku CI-enabled pipelines.
Dyno and add-on run time for the duration of the test run is charged at the normal rate prorated to the second. This pricing enables you to try out Heroku CI with your pipeline for a low cost.
Cost details are available on the Heroku pricing page.
Dynos
By default, test runs execute on a Performance-M dyno and are billed at that rate prorated to the second. If Performance-M type dynos aren’t available to your account, 2X dynos are used instead. This run time includes both test-setup and test phases. For example, a 5-minute test run incurs $0.03 in dyno costs:
$250/month * 5 minutes / 43200 minutes/month = $0.03
You can specify alternative dyno sizes with the formation key in the test environment section of your app.json file. Dyno sizes of standard-1x and above are supported. For example:
"environments": {
    "test": {
      "formation": {
          "test": {
            "quantity": 1,
            "size": "standard-1x"
          }
      }
   }
}
Add-ons
When a test run is created, any add-ons listed in the app.json manifest’s test environment are provisioned with the “temporary deployments” plan specified by the add-on vendor. If the test environment is either absent or omits the addons key, the list of add-ons in the base manifest is used.
Note that add-on providers are informed that these add-ons are being used to support ephemeral CI runs, and they might take measures to allow the add-on to provision and destroy faster, such as omitting long-term logging or regular backups.
After a test run completes (reported as failed, errored, or succeeded), the test run’s add-ons are de-provisioned and destroyed. This means that any paid add-ons are billed at the plan’s rate, prorated to the second, only for the duration of the test run. Free add-on plans remain free on Heroku CI.
Billing
On your pipeline’s Settings page in your Pipelines interface, under “Configure Heroku CI” you can select which party is billed for CI runs.
If your Pipeline is comprised only of resources owned by a Heroku Enterprise Organization, you only have the option to bill that Organization.
Known Issues
Rails Fixtures and Referential Integrity
Rails default fixtures load test data by first disabling referential integrity. If you are using this feature you cannot use the default Heroku Postgres add-on. Instead, you can use in dyno databases.
Docker Deploys
Currently, it is not possible to use Heroku CI to test container builds.
Disabling Heroku CI
To disable Heroku CI on a given pipeline, visit the pipeline’s Settings tab on the Heroku Dashboard and click Disable.

Charges for CI-enablement and CI runs on the Pipeline will stop immediately. Note that CI is billed per second.