Last updated July 08, 2024
This feature is currently available in Heroku Enterprise
CLI flag names have been upgraded from --org to --team. --org commands are still compatible during this deprecation period.
Developing and deploying applications within an Enterprise Team is largely the same experience as doing so in your personal account. Git-based deploys, command-line scaling, and add-ons all behave as expected. However, just as with account administration, there are a few additions to the experience you should be aware of when working within an Enterprise Team.
Joining an Enterprise Team
Enterprise Teams centralize the management of users and roles. If you wish to join an Enterprise Team, an admin user must add you directly.
Once you have been added to a team, you can select it in the Heroku Dashboard to view its applications. The Heroku Dashboard displays all teams that you belong to in the sidebar.
Developing apps
As an Enterprise Team member, you have the ability to list and access all applications in the team. You can click an app in the app list to view its basic details, including who can give you more permissions on the app.
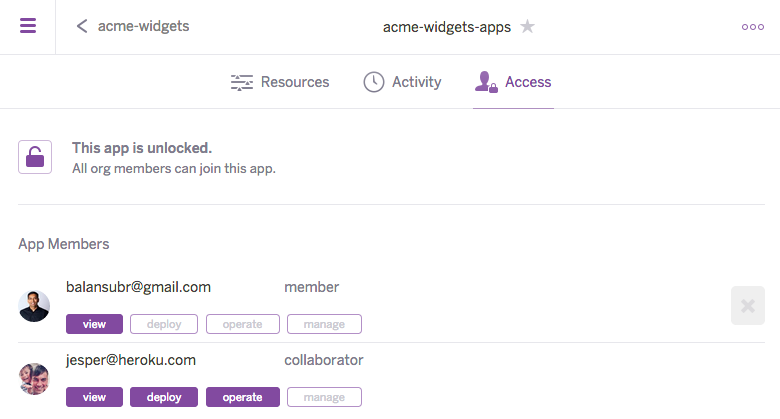
You need additional permissions on an app to be able to deploy, scale, work with add-ons, etc. Going to an app’s access page will show you what access you currently have on the app. Team admins and users with manage permission on the app can grant you additional permissions.
In the CLI
To access apps in your team, you can list them by specifying the --team flag:
$ heroku apps --team acme-widgets
=== Apps in team acme-widgets
acme-website
To work with an existing app in the CLI, you must join the app first:
$ heroku join -a acme-website
Joining acme-website... done.
join happens automatically on the Heroku Dashboard.
Leaving an app
When you are no longer working with an application on a regular basis, you can leave the app. This revokes all of your permissions on the app, but you can always click on it again to restore basic view access.
From the CLI, use the leave command:
$ heroku apps:leave --app acme-website
Leaving application acme-website... done
Or, in the Heroku Dashboard, go to the Access tab of the app and remove yourself from the list of members.

Adding apps to an Enterprise Team
If you have existing apps you’ve been developing under your personal account, you need to transfer them to your Enterprise Team in order for them to be considered part of the team and billed against it.
You can use the CLI to transfer apps to your team (where acme-widgets is your team name and deep-spring-4274 is the app):
$ heroku apps:transfer acme-widgets --app deep-spring-4274
Transferring deep-spring-4274 to acme-widgets... done
You can also use the app settings page in the Heroku Dashboard to transfer app ownership.
Apps can also be created directly in the team:
$ heroku create --team acme-widgets
Creating frozen-wave-4030 in organization acme-inc...done
http://frozen-wave-4030.herokuapp.com/ | git@heroku.com:frozen-wave-4030.git
Git remote heroku added
Setting a default team
The Heroku CLI defaults to using your personal account and requires the --team flag when performing team actions. If you generally work under a particular team, you can set the HEROKU_ORGANIZATION environment variable in order to default to that team.
$ export HEROKU_ORGANIZATION=acme-widgets
$ heroku apps
=== Apps joined in organization acme-widgets
frozen-wave-4030
salty-depths-3445
This won’t persist when you open a new shell, however. For that you can add this setting to your profile file. For Unix machines using bash, this is likely ~/.bashrc. For Windows you can set environment variables on the Advanced tab of System in the Control Panel.
Transfer a Team To or From an Enterprise Account
If you have an existing Heroku Team that incurs charges to a payment card, you can transfer the team to your Enterprise account to consolidate billing. You can also request to migrate an Enterprise Team out of your Enterprise account. See Transfer Heroku Teams To and From Enterprise Accounts for more info.
Next steps
This guide gives you a high-level overview of developing applications within an Enterprise Team. To learn how to manage a team as an administrator, see one of the articles on creating and managing an Enterprise Team or managing Enterprise Team users and app access.