Last updated June 04, 2026
Heroku AppLink exposes your Heroku apps as API services in Salesforce. This article describes how to work with Heroku AppLink and the necessary permissions.
Provision Heroku AppLink
To provision the add-on, run the command:
$ heroku addons:create heroku-applink -a example-app
Creating heroku-applink on ⬢ example
applink-regular-78506 is being created in the background. The app will restart when complete...
Use heroku addons:info applink-regular-78506 to check creation progress
Use heroku addons:docs example-app to view documentation
After provisioning, the add-on creates the config vars:
HEROKU_APPLINK_URL: contains the base URL for the CLI to make requestsHEROKU_APPLINK_TOKEN: contains the access token
You can get your config vars with the heroku config command:
$ heroku config -a example-app
=== example-app Config Vars

HEROKU_APPLINK_API_URL: https://heroku-applink.heroku.com/addons/894792c1-c1e8-4f34-ba32-00000000000
HEROKU_APPLINK_TOKEN: af0a7e7984d4ef28948db6431dc036ae383fcb2f02064cbb0000000000000000
To create a data action target, you must also set the HEROKU_APP_ID config var:
$ heroku config:set HEROKU_APP_ID="$(heroku apps:info --json | jq -r '.app.id')"
If you add other config vars to the add-on, they can’t begin with HEROKU_. If you receive an error, use another name and try again.
Share Your Add-on Between Applications
When you want to isolate connections and authorizations on an app, don’t share your add-on across apps or environments. Instead, follow the 1:1 model by provisioning one add-on to one app. When you want to share connections and authorizations across apps, you can share a single AppLink add-on between multiple apps through the add-on’s attachment menu or with the heroku addons:attach command. Use the --as flag to specify an alias for the add-on:
$ heroku addons:attach applink-regular-78506 -a applink-app --as ATTACHED_APPLINK

Attaching applink-regular-78506 to applink-app... done
Setting ATTACHED_APPLINK config vars and restarting applink-app... done, v4
For example, if you established a connection or authorization on App A with an AppLink add-on, you can share this connection or authorization with App B by attaching the same add-on to App B.

Attaching the same AppLink add-on across your apps eliminates duplicating connections and authorizations, and makes managing AppLink easier. You can also have more than one AppLink add-on on the same application.
In the Heroku Dashboard, you see the attachment in the Add-ons section of the Resources tab on your app:

Remove Your Add-on
Removing the add-on removes all the connections, authorizations, and publications. We recommend verifying that you’re not using the connections, authorizations, or publications anywhere before removing the add-on.
To remove your Heroku AppLink add-on, run the command:
$ heroku addons:destroy heroku-applink
Assigning User Permissions
You must have the required user permissions in Heroku or in Salesforce to perform operations with Heroku AppLink. AppLink operations can affect both your Heroku app and Salesforce environment, so your Heroku user account and Salesforce user account used to create, modify, authorize, or publish connections via AppLink commands must have the necessary permissions:
| AppLink Operation | Heroku User Permissions | Salesforce User Permissions |
|---|---|---|
| View connections | deploy, operate, or app’s owner |
|
| View authorizations | deploy, operate, or app’s owner |
|
| Create and modify connections | deploy, operate, or app’s owner |
Manage Heroku AppLink |
| Create and modify authorizations | deploy, operate, or app’s owner |
Manage Heroku AppLink |
| Publish app | deploy, operate, or app’s owner |
|
| View publications | deploy, operate, or app’s owner |
|
| Create, edit, and delete Heroku External Service registrations | Manage Heroku AppLink |
|
| Invoke published app actions | Permission set generated if you set the --authorizationPermissionSetName flag when you published the app |
If you’re using AppLink with Data Cloud and Agentforce, make sure you have any necessary permissions to work with those features as well. See Data Cloud Standard Permission Sets and Enable Agentforce for more information.
See Manage Permission Set Assignments for more information on how to assign permissions to users in Salesforce.
Add Manage Heroku AppLink Permission in Salesforce
A Salesforce administrator must provide the Manage Heroku AppLink permission to the users creating connections or authorizations. You can find this permission under System Permissions in a permission set.
Add the Manage Heroku AppLink user permission to an existing permission set, or add to a new permission set:
- From Salesforce Setup, in the
Quick Findbox, enter and selectPermission Sets. - Select
Newand give the permission set a name. - Select
Save. - In the
Find Settings…box, enter and selectManage Heroku AppLink. - At the top of the Systems Permissions page, select
Edit. - Select the checkbox next to
Manage Heroku AppLinkand selectSave, andSaveagain. - On the navigation bar of the Systems Permissions page, select
Manage Assignments. - Select
Add Assignments. - Select the checkbox next to the user you want to add the permission set to, select
Next, thenAssign.

Create a Connection
A connection is a trusted connection between the Heroku app and the Salesforce or Data Cloud org. Connections let you publish the app as an external service and generate API actions in Salesforce. See Connections on Your App for more information.
For production and developer orgs, use “https://login.salesforce.com” for the login URL. For sandbox and scratch orgs, use “https://test.salesforce.com” for the login URL.
If you’re already logged into an org, this command attempts to connect to the org you’re already logged into. If you want to connect to a different org, log out from all existing orgs before running this command.
When you connect your org for the first time, a browser window appears for you to enter your Salesforce credentials. You must accept the access levels to give Heroku.
Connect to a Salesforce Org
To connect to a Salesforce org from the CLI, run the command:
$ heroku salesforce:connect production-org --addon applink-regular-78506 -a example-app
Opening browser to https://login.salesforce.com/services/oauth2/authorize?client_id=…
Press any key to open up the browser to connect ⬢ example-app to production-org, or q to exit:
Connecting Salesforce org production-org to ⬢ example-app... Connected
Connect to Data Cloud
You must enable Data Cloud in your Salesforce org to complete this step. See the instructions to turn on Data Cloud.
To connect to a Data Cloud org from the CLI, run the command:
$ heroku datacloud:connect my-datacloud --addon applink-regular-78506 -a example-app
Opening browser to https://login.salesforce.com/services/oauth2/authorize?client_id=…
Press any key to open up the browser to connect ⬢ example-app to my-datacloud, or q to exit:
Connecting Data Cloud org my-datacloud to ⬢ example-app... Connected
Connect to Salesforce via JWT
You can also connect to a Salesforce org using a JWT auth token. Connecting with JWT is useful for using AppLink in existing CI/CD workflows.
To connect to Salesforce via JWT from the CLI, run the command:
$ heroku salesforce:connect:jwt org_jwt --addon applink-simple-60625 -a example-app --client-id 3MVG9N7GK6... --jwt-key-file jwt/server.key --username test-user@example.com --login https://test.salesforce.com
Adding credentials for test-user@example.com to example-app as org_jwt... Connected
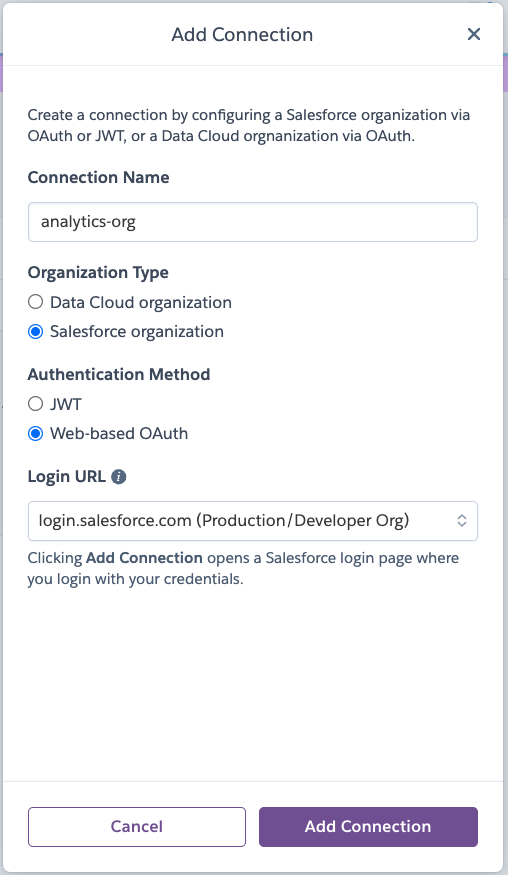
Create Connections on the Dashboard
To create a connection from the AppLink dashboard:
-
From the
Connectionstab, clickCreate Connection. -
Enter a name for your connection in the
Connection Namefield. -
Select to connect to a Salesforce or Data Cloud org in the
Organization Typefield. -
Select the
Authentication Methodto connect with. You can either connect to an org viaWeb-based OAuthorJWT. -
Select the
Login URLfor the type of environment for your connection.a. If you select
Custom, enter the custom domain URL for your org. -
If you’re connecting via JWT, also provide:
a. The Salesforce
Usernameto connect with.b. The
Consumer Keyfrom your external client app.c. The
Private Keyfile that you generated. -
Click
Add Connectionto finish creating the connection. If you’re connecting via OAuth, you’re redirected to Salesforce to log in to the org you’re connecting to.
View Your Connections
You can view your connections in the Connections tab in the Heroku AppLink dashboard or through the CLI.
applink:connections shows all the connections on the apps you own or are a collaborator on. If you’re an admin of a Heroku Team or Enterprise Team, you can see all the connections created on apps on the team.
To view a list of your connected orgs, run the command:
$ heroku applink:connections -a example-app
=== Heroku AppLink connections for app ⬢ example-app
Add-on				   Type			   Connection Name	Status
────────────────────── ─────────────── ──────────────── ─────────
applink-regular-78506  Salesforce Org   production-org  Connected
applink-regular-78506  Data Cloud Org   my-datacloud    Connected
To view the info a specific connection, run the command:
$ heroku applink:connections:info production-org -a example-app --addon applink-regular-78506

=== production-org on ⬢ app example-app
Connection Type:  Salesforce Org
Created By:       admin@heroku.com
Created Date:     2025-05-30T18:55:42.863808Z
Id:               b36e267d-3af0-4647-b4dc-060e980e2f99
Instance URL:     https://acme-corp.my.salesforce.com
Last Modified:    2025-05-30T18:56:02.282284Z
Last Modified By: admin@heroku.com
Org ID:           00DSB00000VAyPF2A1
Status:           Connected
Remove Your Connections
This action removes your connection to your org and you can’t undo it.
When you remove a connection, you can no longer publish apps to that Salesforce org. To remove a connection from a Salesforce org, run the command:
$ heroku salesforce:disconnect production-org -a example-app
 ›   Warning: Destructive action
 ›   This command disconnects the connection production-org from add-on applink-regular-78506 on app ⬢ example-app.
 ›
To proceed, type production-org or re-run this command with --confirm production_org: production-org

Disconnecting Salesforce org production-org from example-app ... done
To remove a connection from a Data Cloud org, run the command:
$ heroku datacloud:disconnect datacloud-org -a example-app
 ›   Warning: Destructive action
 ›   This command disconnects the connection datacloud-org from add-on applink-regular-78506 on app ⬢ example-app.
 ›
To proceed, type datacloud-org or re-run this command with --confirm datacloud: datacloud-org

Disconnecting Data Cloud org datacloud-org from example-app ... done
You can also delete connections from the AppLink dashboard. From the Connections tab, select the dropdown from the Actions column and select Delete Connection. Then, enter the connection name to confirm and click Delete Connection again.

Connection Statuses
You can check your connection’s status via the Heroku AppLink dashboard, CLI, or API.
| Status | Description |
|---|---|
connecting |
The org is connecting to the add-on instance. |
connected |
The org is connected to the add-on instance. |
disconnecting |
The org is disconnecting from the add-on instance. |
disconnected |
The org is disconnected from the add-on instance due to either a user disconnecting the org or the access token expiring. Reconnect with salesforce:connect. |
failed |
The connection failed due to an unexpected error. Check your logs for details and try connecting again. If the issue persists, open a ticket with Heroku Support. |
Create an Authorization
An authorization stores a user’s credentials and security token. You can use the stored security token later in your app’s code and when you invoke your published app as the authorized user. We recommend creating an integration user specifically for authorized-user connections. See Authorizations on Your App for more information.
For production and developer orgs, use “https://login.salesforce.com” for the login URL. For sandbox and scratch orgs, use “https://test.salesforce.com” for the login URL.
If you’re already logged into an org, this command attempts to connect to the org you’re already logged into. If you want to connect to a different org, log out from all existing orgs before running this command.
When you connect your org for the first time, a browser window appears for you to enter your Salesforce credentials. You must accept the access levels to give Heroku.
Authorize a Salesforce User
To authorize a Salesforce user from the CLI, run the command:
$ heroku salesforce:authorizations:add auth-user --addon applink-regular-78506 -a example-app
Opening browser to https://login.salesforce.com/services/oauth2/authorize?client_id=…
Press any key to open up the browser to add credentials to ⬢ example-app as auth_user, or q to exit:
Adding credentials to ⬢ example-app as auth_user... Authorized
Authorize a Data Cloud User
You must enable Data Cloud in your Salesforce org to complete this step. See the instructions for enabling Data Cloud.
To authorize a Data Cloud user from the CLI, run the command:
$ heroku datacloud:authorizations:add dc-user --addon applink-regular-78506 -a example-app
Opening browser to https://login.salesforce.com/services/oauth2/authorize?client_id=…
Press any key to open up the browser to add credentials to ⬢ example-app as auth_user, or q to exit:
Adding credentials to ⬢ example-app as dc_user... Authorized
Authorize a User with JWT
You can also authorize a user to a Salesforce org using a JWT auth token. Authorizing with JWT is useful for using AppLink in existing CI/CD workflows.
To authorize a Salesforce user via JWT from the CLI, run the command:
$ heroku salesforce:authorizations:jwt:add org_jwt --addon applink-simple-60625 -a example-app --client-id 3MVG9N7GK6... --jwt-key-file jwt/server.key --username test-user@example.com --login https://test.salesforce.com
Adding credentials for test-user@example.com to example-app as org_jwt... Connected
To authorize a Data Cloud user via JWT from the CLI, run the command:
$ heroku datacloud:authorizations:jwt:add dc_jwt --addon applink-simple-60625 -a example-app --client-id 3MVG9N7GK6... --jwt-key-file jwt/server.key --username test-user@example.com --login https://test.salesforce.com
Adding credentials for test-user@example.com to example-app as dc_jwt... Connected
For more information on JWT authorizations and a step-by-step guide, see JWT Authorizations with Heroku AppLink.
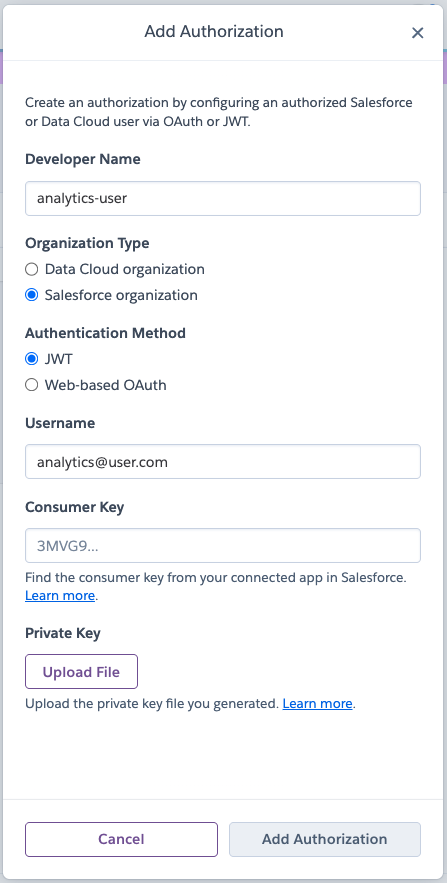
Create Authorizations on the Dashboard
To create an authorization from the AppLink dashboard:
-
From the
Authorizationstab, clickCreate Authorization. -
Enter a name for your authorization in the
Developer Namefield. -
Select to authorize a user from a Salesforce or Data Cloud org in the
Organization Typefield. -
Select the
Authentication Methodto connect with. You can either authorize a user viaWeb-based OAuthorJWT. -
Select the
Login URLfor the type of environment for your authorization.a. If you select
Custom, enter the custom domain URL for your org. -
If you’re authorizing a user JWT, also provide:
a. The Salesforce
Usernameto authorize with.b. The
Consumer Keyfrom your external client app.c. The
Private Keyfile that you generated. -
Click
Add Authorizationto finish creating the authorization. If you’re authorizing a user via OAuth, you’re redirected to Salesforce to log in as the user you’re authorizing as.
Use Your Authorization in Your Code
Here’s an example referencing an authorization called org_name in code:
getAuthorization('org_name'); // Defaults to the default AppLink add-on
getAuthorization('org_name', 'add-on-name-or-uuid'), // Use if you have more than one AppLink add-on on the same app
View Your Authorizations
You can view your connections in the Authorizations tab of the Heroku AppLink dashboard or through the CLI.
applink:authorizations shows all the authorized users stored on the apps you own or are a collaborator on. If you’re an admin of a Heroku Team or Enterprise Team, you can see all the authorizations created on the apps on the team.
To view a list of your authorizations, run the command:
$ heroku applink:authorizations -a example-app

=== Heroku AppLink authorizations for app example-app
Type			 Add-on				    Developer Name   Status
─────────────── ─────────────────────── ──────────────── ─────────
Salesforce Org	 applink-regular-78506	auth_user		 Authorized
Data Cloud Org	 applink-regular-78506	dc_user	  	         Authorized
To view the info a specific authorization, run the command:
$ heroku applink:authorizations:info auth_user --addon applink-regular-78506 -a example-app

=== auth_user on app ⬢ example_app
Add-on:           applink-regular-78506
App:              example-app
Created By:       admin@heroku.com
Created Date:     2025-05-21T05:11:10.864524Z
ID:               864aace1-72cb-47e0-aafe-35286b4283be
Instance URL:     https://acme-corp.my.salesforce.com
Last Modified:    2025-05-21T05:11:29.383383Z
Last Modified By: admin@heroku.com
Org ID:           00DSB00000SEt1L2AT
Status:           Authorized
Type:             Salesforce Org
Remove Your Authorizations
This action removes your authorization to your org. Make sure no existing code references an authorization before removing it. Any references to the authorization in your code will fail when you remove an authorization.
To remove an authorized Salesforce user, run the command:
$ heroku salesforce:authorizations:remove auth-user --addon applink-regular-78506 -a example-app
Removing credentials auth-user from example-app ... done
To remove an authorized Data Cloud user, run the command:
$ heroku datacloud:authorizations:remove dc-user --addon applink-regular-78506 -a example-app
Removing credentials dc-user from example-app ... done
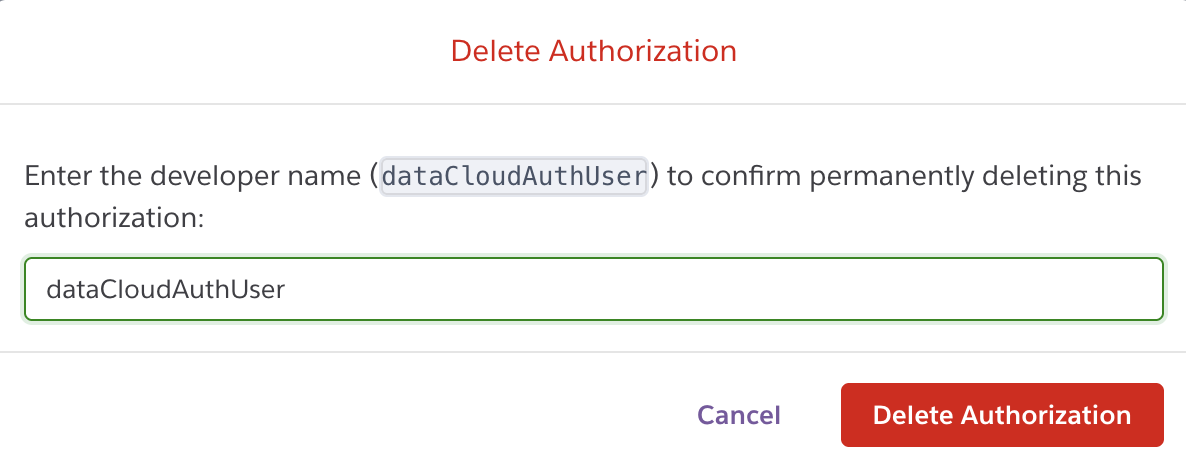
You can also remove authorizations from the AppLink dashboard. From the Authorizations tab, select the dropdown from the Actions column and select Delete Authorization. Then, enter the developer name to confirm and click Delete Authorization again.
Authorization Statuses
You can check your authorization’s status via the CLI or API.
| Status | Description |
|---|---|
authorizing |
The add-on instance is authorizing the user. |
authorized |
The user is authorized on the add-on instance. You can use the user in your apps via an SDK’s getAuthorization API. |
disconnecting |
The add-on instance is removing the user authorization. |
disconnected |
The user authorization is removed from the add-on instance. |
failed |
The authorization failed due to an unexpected error. Check your logs for details and try authorizing again. If the issue persists, open a ticket with Heroku Support. |
Publish Your Heroku App
As of the Salesforce Spring ’26 release, you can no longer create new connected apps in Salesforce. We’re deprecating using connected apps with Heroku AppLink, and replacing them with external client apps. From now on, use external client apps instead of connected apps with your Heroku AppLink integrations. See External Client Apps for Heroku AppLink to create external client apps in Salesforce for AppLink. To create external client apps with the --auth-external-client-app-name CLI flag, your Salesforce org must be on the Summer ‘26 release and later.
If you have existing connected apps in your Salesforce org, you can still reference them in the API spec file or migrate them to external client apps.
External Services lets you use declarative tools and OpenAPI specifications to connect your Salesforce org to an external API. When you publish your Heroku app as an external service, you can invoke the app with Salesforce Flow, Apex, Agentforce, and Data Cloud. Only connected Salesforce and Data Cloud orgs can invoke your published apps.
You can configure the OpenAPI spec in the publish command to enable generating specific actions such as designating API operations as Agentforce actions and adding additional user permissions for user-plus mode. By default, calling the app from the external service action runs as the invoking user in user mode. See Configuring OpenAPI Specification for Heroku AppLink for more information.
To publish your app from the CLI, run the command:
$ heroku salesforce:publish api-spec.yaml --client-name HerokuAPI --authorization-external-client-app-name MyAppLinkExternalClientApp --authorization-permission-set-name MyAppLinkPermSet --connection-name production-org --addon applink-regular-78506

Publishing ⬢ example-app to production-org as HerokuAPI via https://applink.herokudev.com/addons/1c6bb699-2a91-47b3-b55e-8f2e37254684/connections/salesforce/production-org/apps... done
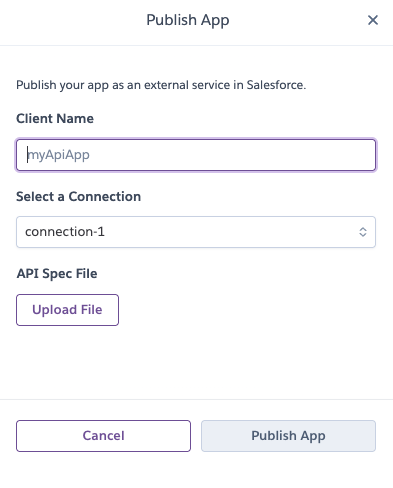
To publish an app from the AppLink dashboard:
- From the
Publicationstab, clickCreate Publication. - Select a connected org to publish your app to in the
Select a Connectiondropdown. - Enter a client name, or name of your publication, in the
Client Namefield. - Upload your OpenAPI specification file with
Upload File. - Click
Publish App.
Publishing your app generates:
- A permission set required for users to use the published app and invoke the app’s actions. The permission set is named the value you passed in the
--client-nameflag. - A
Herokutype external service registration that represents the published APIs. - A named credential and external credential to store the endpoint URL and to customize authentication for the Heroku external service callout. The named credential is called
<published-app-name>. - Apex classes and methods for the external service that you can invoke in Apex and Salesforce Flow as custom actions. The Apex class is named
herokuapplink.<published-app-name>. See Invoking Heroku AppLink Apps for more information. - (Optional) An authorization external client app to request access to API resources on behalf of the client app. The external client app is named the value you passed in the
--authorization-external-client-app-nameflag or in the metadata zip file. - (Optional) A permission set to access to the external credential and allows users to invoke the external service. The permission set is named the value you passed in the
--authorizationPermissionSetNameflag or in the metadata zip file. - APIs in the
Herokutab of API Catalog.
If publish fails, review the Deployment Status in the Salesforce Setup for more details.
You must assign all permission sets to the user invoking the external service.
View Your Publications in Heroku
You can view your connections in the Publications tab of the Heroku AppLink dashboard or through the CLI.
salesforce:publications shows all the publications on the connected orgs on the app. To view a list of your publications, run the command:
$ heroku salesforce:publications -a example-app
=== Salesforce publications for app ⬢ example-app
Connection Name	 Org ID		 	     Created Date		  Created By   	   Last Modified		 Last Modified By
──────────────── ─────────────────── ──────────────────── ──────────────── ───────────────────── ──────────────
production-org	 00DSB00000VAyPF2A1  2025-05-30T17:34:56Z admin@heroku.com 2025-05-30T17:34:56Z  Admin Heroku
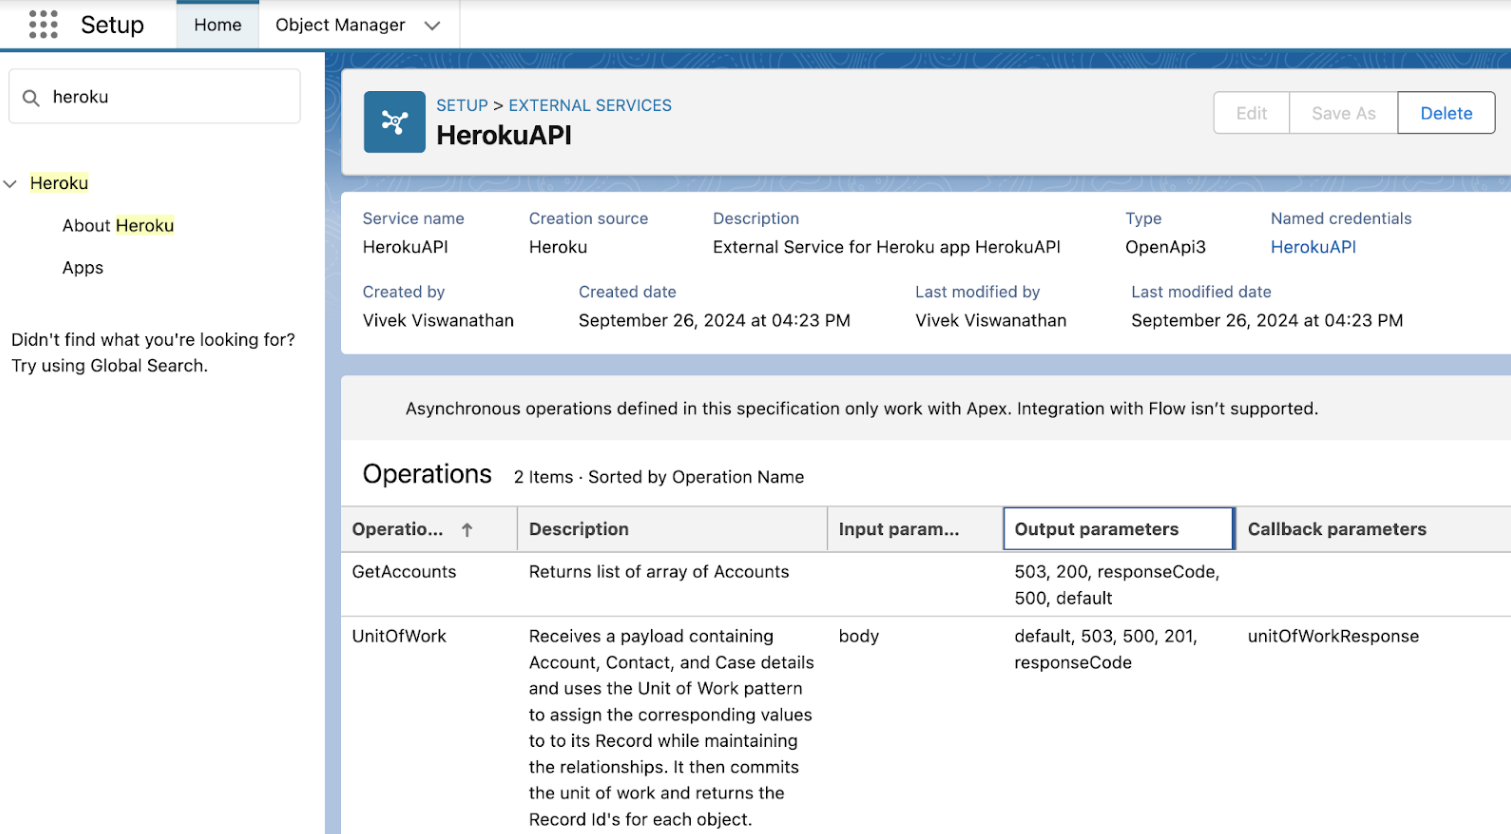
View Your Publications in Salesforce
After publishing your app, you can see the app and its input and output parameters from Salesforce Setup. From the setup page:
- Search for
Herokuin the Quick Find and selectApps. - Select the app you published.

You can also see your published app and its APIs in the External Services page or in the Heroku tab of API Catalog:

Delete Your Publications
This action deletes your published app from Salesforce. Make sure no existing code or resource references an app action before deleting it.
You can delete your published app from Salesforce by clicking the arrow in the external service’s Actions column, and selecting Delete. You can also click Delete on the published app external service page.
Invoking Your Heroku App
After publishing your app, you can invoke your app’s actions in Salesforce. See Invoking Heroku AppLink Apps for more information.