Table of Contents [expand]
Last updated January 28, 2026
Background jobs can dramatically improve the scalability of a web app by enabling it to offload slow or CPU-intensive tasks from its front-end. This helps ensure that the front-end can handle incoming web requests promptly, reducing the likelihood of performance issues that occur when requests become backlogged.
Ideally, a typical web app responds to most requests in no more than 500 milliseconds. If your app is regularly taking one second or longer to respond, you should investigate whether adding background jobs would improve its performance.
This article provides an overview of background jobs as an architectural pattern and points to implementations of the concept for a number of different programming languages and frameworks.
Use cases
Background jobs are especially useful for the following types of tasks:
- Communicating with an external API or service, such as to upload a file to Amazon S3
- Performing resource-intensive data manipulation, such as image or video processing
Order of operations
The following are the high-level steps for handling a request that uses a background job:
- A client sends an app a request to perform a task that is well suited to a background job.
- The app’s front-end (known on Heroku as the web process) receives the request. It adds the task to a job queue and immediately responds to the client. The response indicates that the result of the request is pending, and it optionally includes a URL the client can use to poll for the result.
- A separate app process (known on Heroku as a worker process) notices that a task was added to the job queue. It takes the task off of the queue and begins performing it.
- When the worker process completes the task, it persists the outcome of the task. For example, in the case of uploading a file to Amazon S3, it might persist the file’s S3 URL.
- The client polls the app on a regular basis until the task is completed and the result is obtained.
Example
Consider the example of an RSS reader app. The app provides a form where users can submit the URL of a new RSS feed to read. After a delay, the user is taken to a page where they can view the contents of the feed.
Non-scalable approach
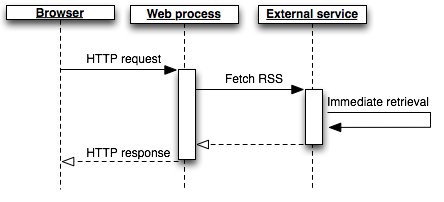
A simple (but non-scalable) way to do this is to retrieve the feed contents from the third-party site while handling the form submission request:

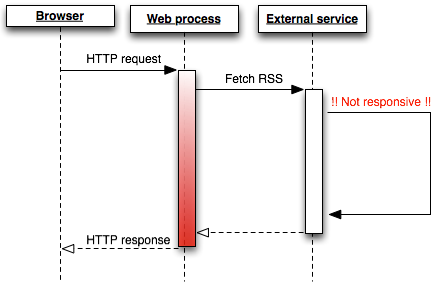
The amount of time it takes to fetch data from an external source is extremely unpredictable. It can sometimes happen in as little as a few hundred milliseconds. Other times, it might take several seconds. If the feed’s server is down, the request could hang for 30 seconds or more before it ultimately times out:

Tying up your app’s resources during this time might prevent it from handling other requests, and it generally results in a very poor user experience. This issue might not arise under low load, but as soon as your app has multiple simultaneous users, your response times will become more and more inconsistent, and some requests might result in H12 or other error statuses. These are indicators of poor scalability.
Scalable approach
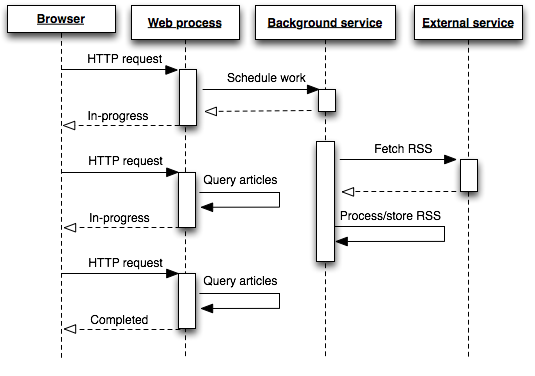
A more predictable and scalable architecture is to background the high-latency or long-running work in a process separate from the web layer and immediately respond to the user’s request with some indicator of work progress.

Here, one or more background services, running separate from the web process and not serving web requests, will read items off their work queue one by one and do the work asynchronously. Once complete, the results will be stored in Postgres, Redis, Memcached, or another persistence system.
Judging by the sequence diagram the background approach may not appear to be of any benefit as there are now more client (HTTP) requests than before. This is true but masks the real gain. While the browser may have to make more than one request to retrieve the backgrounded work the benefit is that these are very low-latency and predictable requests. No longer is any single user-request waiting, or hanging, for a long-running task to complete.
Handling long-running work with background workers has many benefits. It avoids tying up your web dynos, preventing them from serving other requests, and keeps your site snappy. You can now monitor, control and scale the worker processes independently in response to site load. The user experience is also greatly improved when all requests are immediately served, even if only to indicate the current work progress.
Process model
Heroku allows you to specify an application-specific process model, which can include background workers retrieving and processing jobs from the work queue. Here’s an example Procfile for a Clojure application that has both a web process type and a process type for handling background jobs:
If desired, the worker process type can have a name other than worker. Unlike the web process type, worker doesn’t have any significance on Heroku.
web:    lein run -m myapp.web
worker: lein run -m myapp.worker
You can then scale the number of web dynos independently of the number of worker dynos.
$ heroku ps:scale web=1 worker=5
Implementation
Backgrounding by itself is just a concept. There are many libraries and services that allow you to implement background jobs in your applications. Some popular tools include database-backed job frameworks and message queues.
Some concrete examples of background worker implementations in various languages include:
| Language/framework | Tutorials |
|---|---|
| Ruby/Rails |
|
| Node.js | |
| Python | |
| Go |