Table of Contents [expand]
- Overview
- Provisioning Remora Backup
- Provisioning Remora Backup on Fir
- Configuration
- Accessing Your Backups
- Backing Up to a Custom Server
- Upgrading Your Database
- Providing Your Own Encryption Key
- Security, HIPAA, and Compliance
- Upgrading the Helper App’s Stack Version
- Support
- Debugging Issues
- Removing Remora Backup
Last updated July 05, 2026
Overview
Remora Backup is a secure, simple, yet powerful offsite backup service for your Heroku Postgres database. We operate with the belief that your data is the lifeblood of your business, and offsite backups are a must. While Heroku does a great job protecting your data, it’s always a good idea to have an offsite backup. And sometimes it’s not just a good idea, as it’s often a legal requirement for certain industries.
Heroku is built and runs on AWS. With Heroku being an AWS-centric Platform as a Service, we consider offsite to mean “not stored on AWS.” The default Heroku Postgres backups are stored on AWS using the S3 service. The default Heroku Postgres backups are your first line of data protection. We run our businesses on Heroku too, and take full advantage of the Heroku Postgres data protection features. At the end of the day, all data and backups still reside on AWS infrastructure.
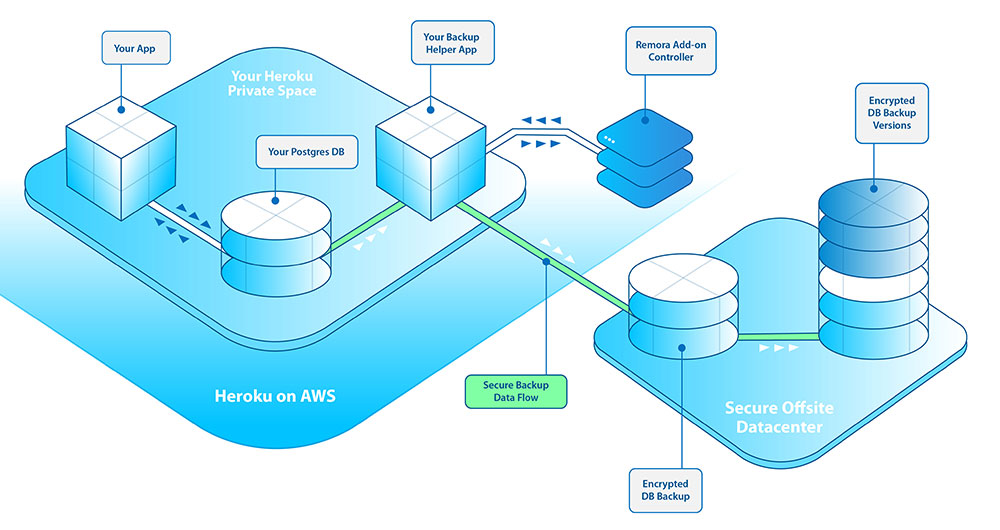
We recently built out the infrastructure for a new project using Heroku Private Spaces. While deciding on the architecture, we knew that we’d also need to have a secure, encrypted copy of our data residing completely off AWS infrastructure yet stored in a secure and compliant location. That’s why we built Remora Backup.
With Remora Backup we provide you with a simple, secure backup utility that runs entirely under your control. We accomplish this using a single utility app that we help you provision but that you own and ultimately control - the Remora Helper App. This Helper App is able to reside on the Common Runtime or within a Private (or Shield) Space. The Remora Backup service has access to only this app, and you have full control over which database this app has access to. More on this below. Your database is backed up using the standard Postgres utility pg_dump, then encrypted using the open source encryption utility gpg. Encryption keys are generated and stored using a service backed by Hardware Security Modules. Once a backup has been created and encrypted, it is copied from within your app to our offsite storage via an SSH encrypted connection. Your encrypted backups are then stored using the rock-solid ZFS filesystem, complete with snapshots.
With Remora Backup, your data never passes through our add-on service. It goes directly from your Postgres database through your Remora Helper App to our secure hosting partner, encrypted the entire way.
If you need to restore a backup, we provide you with SFTP or SSH access, as well as the key needed to decrypt your backup files.
We’ve built Remora Backup with security, compliance, and simplicity as our top priorities. If you need a BAA for HIPAA compliance, we can do that too.
In short, we’ve created a backup solution we think you’ll come to love and trust.
Provisioning Remora Backup
The simplest and quickest way to get started is to use our Heroku Button.
If your app (and database) reside in the Common Runtime, use this button:

Otherwise, if your app (and database) reside in a Private or Shield Space, use this button instead:
Clicking one of the above buttons will guide you in creating the Remora Helper App, as well as automatically provision the Remora Backup add-on alongside the new app. Be sure to place this new Helper App in the same location as the database you are backing up. For instance, if your database resides inside a Private Space, the Helper App must also be inside the Private Space.
If your app is running on Fir, see the steps for Fir configuration.
The Heroku Button automatically provisions the Remora Backup add-on to the Helper App it adds. You should NOT add the add-on manually unless instructed to do so.
This Helper App will be a stand-alone app solely for the purpose of creating offsite backups using the Remora Backup service. For security reasons, our service will have minimal access to this app. We suggest using a name based on your existing app name such as ‘yourapp-backup’ or similar, a name that will remind you of the purpose of the app. It’s best to think of this new Remora Helper App as a utility app for the backup process. No other processes or code are necessary, and the new app will not be running any dynos except for when a backup is scheduled to run.
The Remora Backup Helper app runs on your account, meaning you are responsible for any usage charges it incurs. That said, the Helper App only runs while the backup is executing so you won’t be charged for a full month of dyno use, just for the time in a day while a backup is running.
If for some reason the Helper App is unable to add the Remora Backup add-on automatically, so you can add it via the command line: heroku addons:create remora-backup --app ##yourhelperappname##
Once your new app has been created using the Heroku Button process, you’ll need to attach your Heroku Postgres database to it that you wish to back up. This attachment will create a secure connection that the Remora Backup utility will then use for backups.
If you wish to backup multiple databases, you will need a separate Helper App and add-on for each.
If you added the Remora Backup add-on directly to your primary app you want backed up instead of using our Heroku Button, you will need to remove the add-on from your app after following the instructions on this guide to avoid being charged twice as the Helper App you create will also have the add-on on it. Only the Remora Helper App should have the Remora Backup add-on on it.
Provisioning Remora Backup on Fir
Fir is Heroku’s newest platform, and because it does not support the Heroku Button deployment process, you will need to create and configure the Remora Backup Helper App manually by following the steps outlined below.
Create the Helper App
Create a new app inside the Fir Space containing the database you wish to back up. For this example, the database to be backed up using Remora Backup will be attached to an app called ##yourapp##.
We recommend creating a Helper App with a descriptive name, such as ##yourapp-backup##.
heroku create ##yourapp-backup## --space ##your-fir-space-name##
Next, you will need to add the Remora Backup add-on to the Helper App. You can do this on the command line:
heroku addons:create remora-backup:mako --app ##yourapp-backup##
You will then need to deploy a small set of files to enable the Helper App to communicate with the Remora Backup service:
git clone --branch fir-space-template https://github.com/RemoraSoft/remora-backup-bootstrap ##yourapp-backup##
cd ##yourapp-backup##
heroku git:remote --app ##yourapp-backup##
git push heroku fir-space-template:master
This should deploy the local code to the newly created Helper App.
Next, you will configure a read-only credential for Remora Backup to use. Proceed to the Configuration section.
Configuration
In order for Remora Backup to securely connect to a database and run backups, you will need to provide it with a Postgres connection string. The Remora Backup service will only work with a config variable named REMORA_TARGET_URL, which must be a Postgres connection string added to the newly created Helper App above. Fortunately, Heroku has provided a secure, reliable method for this called Heroku Postgres Credentials. You will need to create a read-only credential on the database you wish to backup, and then attach that credential to the newly created app from above.
Using Heroku Postgres Credentials to create REMORA_TARGET_URL on the new app is important for two reasons. First, it’s secure and reliable. Credentials are stored at the Postgres level and are maintained by Heroku. In the event that your database were to fail and be replaced, the connection details are automatically updated on all apps that have the credentials attached. Second, Remora Backup only needs read-only access to backup your database. We don’t want write access! Heroku Postgres Credentials is the simplest and most secure way to accomplish this.
There are two different ways to configure Heroku Postgres Credentials for use with Remora Backup, depending on which tier of database you have.
If you are using a Heroku Shield Tier database, you will need to use the command line method below.
In the examples below, we’ll use ##yourapp## as the name of the main application containing the Postgres database that needs offsite backups, and ##yourapp-backup## will be the name of the newly created Helper App from which backups will be run.
Creating the Postgres Credential via the Postgres Resources Dashboard (Standard, Premium, and Private Tier Databases)
Remora Backup is designed to work with Standard tier and above databases. It will not work with Essential tier databases.
Here’s how to create and attach a read-only credential to your newly created app. This process starts within the Heroku Dashboard interface.
-
In the Heroku Dashboard, go to the Resources section of your
##yourapp##app:https://dashboard.heroku.com/apps/##yourapp##/resources -
Find the database you’d like to backup in the Resources list and click on it. This will open the Heroku Data Overview for the database.
-
Click on the Credentials section near the top, next to Overview.
-
Choose the ‘New Credential’ option.
-
Provide the exact name
REMORA_TARGETfor the credential (note the lack of_URLat the end). Note that this step will not work if the##yourapp##app and database are in a Shield Space. See the next section for details on Shield Space configuration. -
Once you’ve confirmed creation of the credential, the next step is to attach it to the newly created
##yourapp-backup##app. -
You should now see your new credential in the list of database credentials, listed along with the
defaultcredential. -
Expand the details of the new credential, and look for the ‘Attachments’ section below the connection details.
-
In the ‘Select an app’ dropdown you should choose the newly created
##yourapp-backup##app. -
Click the ‘Add Attachment’ button.
-
Connect to your database directly via the
heroku pg:psql DATABASE --app ##yourapp##command. -
Jump to the section below titled ‘Set the correct permissions’. Return here when complete.
-
At this point you can exit
psqlwith\q.
Creating the Postgres credential via the command line (Shield Tier Databases)
Heroku Postgres databases running inside a Shield Space are very secure. Many of the access methods available to databases on the Common Runtime or in a Private Space are simply not available to a database within a Shield Space. However, creating a read-only credential for the sole purpose of offsite backups is still possible, but it must be done via the command line:
-
Find out what the add-on name is for the Postgres database attached to your
##yourapp##app. Theheroku pg:info --app ##yourapp##command will show information about your database, and you’re looking for a string similar toAdd-on: postgresql-sunny-1234. This is your Heroku Postgres add-on’s name, and you’ll use this name in the next step (referred to as##postgres-addon-name##below). -
Create the credential by running this command on the
##yourapp##app:heroku pg:credentials:create ##postgres-addon-name## --name remora_target --app ##yourapp##. Be sure to use--name remora_targetexactly. -
Next, you will need
psqlaccess to your database. The easiest way to get this is theheroku run bash --app ##yourapp##command. -
When you have a
bashprompt ready, connect to your database with thepsql $DATABASE_URLcommand. This command should connect you directly to your database, from which you will be able to define the read-only permissions of the newly created credential. -
Jump to the section below titled Set the correct permissions’. Return here when complete.
-
At this point you can exit
psqlwith\q, then exit the one-off dyno viaexit. -
The last step is to attach the new credential to the
##yourapp-backup##app with this command:heroku addons:attach ##postgres-addon-name## --credential remora_target --as REMORA_TARGET --app ##yourapp-backup##.
That’s it! The Remora Backup service now has read-only access to the database you’ve chosen.
If you inadvertently use the command line method to create the credential and you are NOT using a Shield database, don’t worry. It will still work. You just took the more challenging path to getting it done!
Set the correct permissions
Be sure and just give the credential Read-Only access. The Remora Helper App doesn’t need write access for its purposes.
Once you have connected to your database directly using the default credential, the following commands should be run one-by-one to grant read-only access to the newly created remora_target credential:
 GRANT USAGE ON SCHEMA public TO remora_target;
 GRANT SELECT ON ALL TABLES IN SCHEMA public TO remora_target;
 GRANT SELECT ON ALL SEQUENCES IN SCHEMA public TO remora_target;
 ALTER DEFAULT PRIVILEGES IN SCHEMA public GRANT SELECT ON TABLES TO remora_target;
 ALTER DEFAULT PRIVILEGES IN SCHEMA public GRANT SELECT ON SEQUENCES TO remora_target;
Setting when to run the backups
The final step is to visit the Remora Backup Dashboard to choose what time you’d like backups to run. To get there:
-
Go to your newly created Remora Backup Helper app.
-
Go to the Resources tab
-
Click on the Remora Backup add-on.
This will take you to the Remora Backup dashboard where you can choose the time of day you’d like backups to run.
Is the Remora Backup add-on not there? Make sure you are in the Helper App you created and not your primary app.
Accessing Your Backups
Remora Backup does not test the decryption or restoration of your backup files. You are responsible for ensuring a backup file can be successfully downloaded, decrypted, and restored (especially if you provide your own encryption key). No backup system is complete without frequent, thorough restoration testing.
The Remora Backup Dashboard provides your username, password, and host details in the ‘Accessing Your Backups’ section. The simplest way to access your backups is to use an SFTP capable program such as Transmit for macOS. You can also use the command line to access your account, via sftp or scp.
To verify you are connecting to the correct host, our backup.remorabackup.com server has this fingerprint:
SHA256:1Z1TGkiiS5Aucq7lVVvjZNvhRBjoChjvmNpmTkQjjYE
Here’s how you can view the size of your current backup (1234 is an example login ID - our dashboard provides you the actual login ID for your account) :
$ ssh 1234@backup.remorabackup.com -t ls -lh
Password:
total 39084
-rw-r--r--  1 1234  1234    19M May  2 02:51 db_backup.gpg
Connection to backup.remorabackup.com closed.
And here’s how to download the latest backup to your local machine using scp (again assuming a login ID of 1234):
$ scp 1234@backup.remorabackup.com:db_backup.gpg .
Remora Backup runs daily and stores a single file - db_backup.gpg - which is then kept in weekly, monthly, and yearly snapshots. If you need the latest backup, simply download the db_backup.gpg file you see when first connecting to your account via the utility of choice.
If you need to download a previous backup stored in one of the snapshots, browse to the .zfs/snapshot/ directory and pick the correct snapshot to download. These snapshots are maintained by the ZFS filesystem and are read-only. Here’s the command to list available snapshots:
$ ssh 1234@backup.remorabackup.com -t ls -lh .zfs/snapshot/
Once you have a backup downloaded, you will need to decrypt it using gpg before you can uncompress and make use of it. If you’re not familiar with gpg you can find more information here, including instructions on how to install locally. You can find your decryption key in the Remora Backup Dashboard in the ‘Your Decryption Key’ section. Here you’ll be able to view the plaintext encryption key that can be used by gpg:
gpg --decrypt --output db_backup db_backup.gpg
After this, you’re free to make use of the backup as you see fit, including restoring it via the standard Postgres pg_restore utility:
pg_restore -v -c -d <<database> -h <<host>> -U <<user>> db_backup
There are other options for the pg_restore command that you may consider using. View the full documentation for more details.
Backing Up to a Custom Server
You may choose to have the Remora Backup process copy the encrypted backup to a custom server of your choosing. This will bypass the use of Remora’s secure offsite hosting partner and instead send your backups to a server you control. A typical use case for this option is a nightly snapshot of your production database copied ‘onsite’ for development or testing.
When backup up to a custom server, you are responsible for all security, storage and retention policies on the backup archive once at your location.
The custom server requirements are simple. Your server must support SSH connections via public key authentication on the account that will be storing the encrypted backup files. On a Linux or macOS system, this means placing the RSA public key Remora provides in the .ssh/authorized_keys file in the home directory of the proper account.
Remora Backup provides this RSA public key via the Dashboard.
Once this RSA public key is in place, it will allow the Remora Backup process to make a secure SSH connection to your custom server and transfer the resulting backup file.
We also require use of the dd utility on your server, which should be present on any Linux or Unix based system.
If choosing to use a custom server, please keep the following in mind:
- The server must be reachable via an outbound connection from a Heroku dyno via the SSH protocol’s port 22.
- Once the backup file has been copied to your custom server, versioning and retention is left up to you (the subsequent backup process will overwrite the existing backup file).
Upgrading Your Database
It is occasionally necessary to upgrade a Heroku Postgres database to the latest major version, such as 14.x to 15.x. When you upgrade your Postgres database, the settings for your REMORA_TARGET credential are copied to the new, upgraded database for you. However, the credential’s attachment, which is what allows Remora Backup to access your database, is left as-is. In other words, when a database upgrade is completed, the credential used by the Remora Helper App is still attached to the old database. The process to fix this is straightforward:
If you are using the Postgres Resources dashboard (for Common Runtime & Private Space Databases), use the following steps:
-
In the Heroku Dashboard, go to the Resources section of your
##yourapp##app:https://dashboard.heroku.com/apps/##yourapp##/resources -
Find the old database in the Resources list and click on it. This will open the Heroku Data Overview for the database.
-
Click on the Credentials section near the top, next to Overview.
-
Expand the details for the
REMORA_TARGEToption. -
Click the ‘Detach’ button.
-
Click the ‘Destroy Credential’ button, and confirm.
At this point, you have deleted the credential attached to the old database. You now need to create a new credential for the newly upgraded database, and attach it to the Remora Helper App. This can be done by repeating the steps above, in the Creating the Postgres Credential via the Postgres Resources Dashboard section.
If you have just upgraded a Shield Database, or wish to reconfigure the credential for the newly upgraded database via the command line, follow the steps below:
-
Detach the existing credential with this command:
heroku addons:detach ##old-postgres-addon-name## --app ##yourapp-backup## -
The credential and its permissions already exist in the newly upgraded database, so it simply needs to be attached to the Remora Helper app:
heroku addons:attach ##new-postgres-addon-name## --credential remora_target --as REMORA_TARGET --app ##yourapp-backup#
Once the above is complete, backups will continue to run as scheduled.
Providing Your Own Encryption Key
Some Remora Backup plans offer the ability to provide your own encryption key, rather than using one we generate for you. There are numerous benefits to providing your own encryption key, including compliance, the ability to rotate the key on your own schedule, and further limiting who has access to a key that can decrypt sensitive data. When you provide your own encryption key, even we at Remora have no access to your key as it is specified and managed completely on your Remora Helper App in a config variable.
Providing your own encryption key means ALL responsibility for decrypting your data resides with you. Remora will be unable to decrypt your backups for any reason, and if you lose your key, you lose your backups.
Provided you have chosen a plan that supports a custom encryption key, activating its use is straightforward:
- In your Remora Backup Dashboard, be sure the checkbox for using a custom encryption key is checked.
- Set the
REMORA_GPG_KEYconfig variable on your Helper App. This config variable will need to hold a string value that will be used as the symmetric key for encrypting and decrypting your database contents.
Choosing a secure encryption key is important. Remora recommends using a password manager such as 1Password or LastPass to generate the string that will be your encryption key, and securely storing the key in either program. There are limits to what a Heroku Config Var can contain, but in general, a lengthy, random password generated by 1Password or LastPass will be more than secure enough.
That’s it! Once the above steps are complete, the next time a backup runs, the process will use your provided custom encryption key. Note that to access your backups, you will still need to follow the instructions here.
We HIGHLY recommend performing a test decryption following setting your own encryption key to verify everything is working as expected. Remora Backup does not test the decryption or restoration of your backup files. You are responsible for ensuring a backup file can be successfully downloaded, decrypted, and restored (especially if you provide your own encryption key). No backup system is complete without frequent, thorough restoration testing.
If you downgrade to a plan that does not support the use of a custom encryption key, keep in mind that Remora will fall back to using the key we provide on subsequent backups. You are still responsible for keeping track of your custom key for any backups that were created using it.
Security, HIPAA, and Compliance
Our secure hosting partner is HIPAA, PCI and SSAE16/SAS70 compliant, and our add-on is designed so your data flows directly from your Private or Shield Space in Heroku to them, never passing through a third-party unsecured. Additional info can be provided upon request.
For those needing a BAA for HIPAA compliance, we can facilitate a BAA between yourself and our secure storage provider. Please contact us for details.
Upgrading the Helper App’s Stack Version
Heroku will occasionally deprecate older stacks, and require that all existing apps update their stack version. When your Remora Helper App needs a stack upgrade, follow these steps:
Clone our Helper App locally:
% git clone https://github.com/RemoraSoft/remora-backup-bootstrap
Change to the newly cloned app, then add the Helper App as a remote:
% cd remora-backup-bootstrap
% heroku git:remote -a ##yourapp-backup##
Next, clear the existing buildpack, and update to use heroku-community/null:
% heroku buildpacks:clear -a ##yourapp-backup##
% heroku buildpacks:add heroku-community/null -a ##yourapp-backup##
Then set the new stack version (with heroku-26 as the example below):
% heroku stack:set heroku-26 -a ##yourapp-backup##
Finally, trigger a new build to upgrade the stack:
% git commit --allow-empty -m "Trigger Rebuild" && git push heroku master
Support
We’re here to help! We realize that in an emergency, getting access to your backups is critical. If for some reason you’re not able to access or download a backup using the process detailed above, let us know via a Heroku Support Ticket. We can even arrange to have your data physically delivered to you in the event of an emergency.
Debugging Issues
The first place to look when trying to figure out why Remora Backup is not working is the Helper App’s log stream. You can see the latest logs via this command:
heroku logs -a ##yourapp-backup##
A correctly running backup should look similar to this:
app[api]: Starting process with command `./bootstrap.sh c65d359e8d1106d5236bd1f7295c13ec9e059edc9abf9cab13c244e4ec1112cc` by user remora-backup@addons.heroku.com
heroku[run.8645]: Starting process with command `./bootstrap.sh c65d359e8d1106d5236bd1f7295c13ec9e059edc9abf9cab13c244e4ec1112cc`
heroku[run.8645]: State changed from starting to up
app[run.8645]: ./bootstrap.sh: starting bootstrap process
app[run.8645]: ./bootstrap.sh: beginning backup process
app[run.8645]: --- Database Size: 7927 kB ---
app[run.8645]: --- Beginning Database Dump ---
app[run.8645]: gpg: directory `/app/.gnupg' created
app[run.8645]: gpg: new configuration file `/app/.gnupg/gpg.conf' created
app[run.8645]: gpg: WARNING: options in `/app/.gnupg/gpg.conf' are not yet active during this run
app[run.8645]: gpg: keyring `/app/.gnupg/pubring.gpg' created
app[run.8645]: Warning: Permanently added 'backup.remorabackup.com,64.62.236.68' (ED25519) to the list of known hosts.
app[run.8645]: pg_dump: last built-in OID is 16383
app[run.8645]: pg_dump: reading extensions
app[run.8645]: pg_dump: identifying extension members
app[run.8645]: pg_dump: reading schemas
...
If you see significantly different output, such as an error message, it should provide clues as to what is misconfigured. Feel free to send us the Helper App logs if you have questions.
Finally, we realize that Remora Backup can be complex to setup, but that’s the trade-off we made for a more secure add-on and service. If you’re not able to get your backups running correctly, please don’t hesitate to contact us.
Removing Remora Backup
If you need to remove the Remora Backup add-on, please be sure you have downloaded any and all backups you’d like to save. Though we don’t immediately delete your backup snapshots upon add-on removal, we do delete them within a few business days.
You will immediately lose access to your backups if backing up to our secure repository. If you’ve mistakenly removed the Remora Backup add-on, let us know via a Heroku Support Ticket right away.