Skip Navigation
Show nav
Heroku Dev Center
  • Get Started
  • Documentation
  • Changelog
  • Search
  • Get Started
    • Node.js
    • Ruby on Rails
    • Ruby
    • Python
    • Java
    • PHP
    • Go
    • Scala
    • Clojure
  • Documentation
  • Changelog
  • More
    Additional Resources
    • Home
    • Elements
    • Products
    • Pricing
    • Careers
    • Help
    • Status
    • Events
    • Podcasts
    • Compliance Center
    Heroku Blog

    Heroku Blog

    Find out what's new with Heroku on our blog.

    Visit Blog
  • Log inorSign up
View categories

Categories

  • Heroku Architecture
    • Dynos (app containers)
    • Stacks (operating system images)
    • Networking & DNS
    • Platform Policies
    • Platform Principles
  • Command Line
  • Deployment
    • Deploying with Git
    • Deploying with Docker
    • Deployment Integrations
  • Continuous Delivery
    • Continuous Integration
  • Language Support
    • Node.js
    • Ruby
      • Rails Support
      • Working with Bundler
    • Python
      • Working with Django
      • Background Jobs in Python
    • Java
      • Working with Maven
      • Java Database Operations
      • Java Advanced Topics
      • Working with Spring Boot
    • PHP
    • Go
      • Go Dependency Management
    • Scala
    • Clojure
  • Databases & Data Management
    • Heroku Postgres
      • Postgres Basics
      • Postgres Getting Started
      • Postgres Performance
      • Postgres Data Transfer & Preservation
      • Postgres Availability
      • Postgres Special Topics
    • Heroku Data For Redis
    • Apache Kafka on Heroku
    • Other Data Stores
  • Monitoring & Metrics
    • Logging
  • App Performance
  • Add-ons
    • All Add-ons
  • Collaboration
  • Security
    • App Security
    • Identities & Authentication
    • Compliance
  • Heroku Enterprise
    • Private Spaces
      • Infrastructure Networking
    • Enterprise Accounts
    • Enterprise Teams
    • Heroku Connect (Salesforce sync)
      • Heroku Connect Administration
      • Heroku Connect Reference
      • Heroku Connect Troubleshooting
    • Single Sign-on (SSO)
  • Patterns & Best Practices
  • Extending Heroku
    • Platform API
    • App Webhooks
    • Heroku Labs
    • Building Add-ons
      • Add-on Development Tasks
      • Add-on APIs
      • Add-on Guidelines & Requirements
    • Building CLI Plugins
    • Developing Buildpacks
    • Dev Center
  • Accounts & Billing
  • Troubleshooting & Support
  • Integrating with Salesforce
  • Security
  • Identities & Authentication
  • Salesforce Authenticator

Salesforce Authenticator

English — 日本語に切り替える

Last updated June 16, 2023

Table of Contents

  • Registering Salesforce Authenticator
  • MFA Verification with Salesforce Authenticator

Salesforce Authenticator is a mobile application that you can use as a multi-factor authentication (MFA) verification method with Heroku, Salesforce, and other services.

The app sends you a notification when you try to log in to Heroku. You approve the login with a tap on your mobile device, or block it if someone else tries to access your account. You can enable Einstein Automation to automatically approve login whenever you’re in a location that you trust.

Registering Salesforce Authenticator

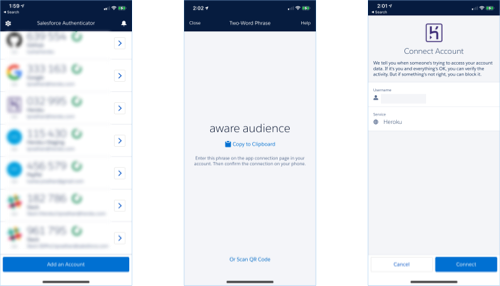
For registering Salesforce Authenticator as an MFA verification method, from Account Settings, select Setup Multi-Factor Authentication. Or if you already enabled other verification methods, select Manage Multi-Factor Authentication.

On the next page, choose Add Salesforce Authenticator option. You’re prompted to enter a phrase.

  • Download Salesforce Authenticator from the App Store or Google Play, and install it on your iOS or Android mobile device.
  • Open the app, and tap Add an Account.
  • The app shows you a unique two-word phrase. Enter the phrase on the setup page.
  • Tap Connect on your mobile device to complete registration.

Add Salesforce Authenticator

For optimal experience, enable push notifications on your mobile device.

MFA Verification with Salesforce Authenticator

To log in using Salesforce Authenticator:

  • After entering your email and password, you get a push notification on your mobile device.
  • Tap on the notification, and approve your login to complete MFA verification.
  • If you frequently log in from the same location, you can automate approvals by enabling the Always approve from this location option in the app.

Login with Salesforce Authenticator

If your mobile device doesn’t have connectivity or you haven’t enabled push notifications, you can still log in using six-digit TOTP codes generated by Salesforce Authenticator.

You can use Salesforce Authenticator with any services that use an authenticator app to generate one-time passwords. You can securely back up your accounts and restore them to another device if needed. You can even approve logins on your Apple Watch.

Keep reading

  • Identities & Authentication

Feedback

Log in to submit feedback.

Two-Factor Authentication (deprecated) Security Keys

Information & Support

  • Getting Started
  • Documentation
  • Changelog
  • Compliance Center
  • Training & Education
  • Blog
  • Support Channels
  • Status

Language Reference

  • Node.js
  • Ruby
  • Java
  • PHP
  • Python
  • Go
  • Scala
  • Clojure

Other Resources

  • Careers
  • Elements
  • Products
  • Pricing
  • RSS
    • Dev Center Articles
    • Dev Center Changelog
    • Heroku Blog
    • Heroku News Blog
    • Heroku Engineering Blog
  • Twitter
    • Dev Center Articles
    • Dev Center Changelog
    • Heroku
    • Heroku Status
  • Github
  • LinkedIn
Heroku is acompany
  • heroku.com
  • Terms of Service
  • Privacy (日本語)
  • Cookies
  • Cookie Preferences
  • Your Privacy Choices
  • © 2023 Salesforce.com