Last updated March 09, 2026
OAuth provides a way to authorize and revoke access to your account to yourself and third parties. Third parties can use this to provide services, such as monitoring and scaling your applications. You can also use these tokens obtained with OAuth to grant access for your own scripts on your machine or to other applications.
The Heroku Platform API implements OAuth version 2.0 as the preferred authentication mechanism. For further details of the specific API endpoints see the Platform API Reference.
Third parties who wish to provide services to Heroku users should implement web application authorization. Users who would like to use a personal OAuth token should instead use direct authorization.
Integrating with Client Libraries
To integrate with existing client libraries, you should use these endpoints:
- Tokens: https://id.heroku.com/oauth/token
- Authorizations: https://id.heroku.com/oauth/authorize
Additional details and directions follow if you need to do non-web flows or customize usage.
A Note on Architecture
An OAuth authorization can be generated in one of two ways: via web authorization flow, or from the Heroku API. The web authorization flow (located at the domain id.heroku.com) is designed to easily support common OAuth conventions and be accessible to widely-used libraries. The component supporting this web flow is itself built on the Heroku API (located at the domain api.heroku.com), which is the canonical source for all OAuth data. Both components will be covered in this article.
Prefixed OAuth Tokens
Heroku OAuth access tokens are 65 characters long and prefixed with HRKU-.
Token example: "HRKU-AALJCYR7SRzPkj9_BGqhi1jAI1J5P4WfD6ITENvdVydAPCnNcAlrMMahHrTo"
Using a prefixed token helps identify potentially leaked tokens in code or logs by searching for the HRKU- prefix.
If you notice a token in your store that doesn’t have the HRKU- prefix, then this token hasn’t been regenerated since the change was implemented. After regenerating the token, it will have the HRKU- prefix.
Web Application Authorization
Web application authorization allows third parties to ask for and gain access to the resources of a Heroku user, which they can then use to provide services and features on top of the Heroku platform.
Register Client
The client is what identifies you, the third-party integrator, to Heroku and to authorizing users. When you register a client, you provide a callback URL and a name. The name is displayed to users when authorization is requested, so choose a name that identifies your site or application.
There are three ways to register a client: on dashboard (easiest), using the Heroku CLI’s oauth commands or using the API directly.
When you register a client, you get an ID and a secret that you use to authorize Heroku users against.
OAuth Flow
This section describes the flow required to authorize your app to get access to a Heroku user’s account.
Redirect to Heroku
From your app, redirect the user to authorize:
GET https://id.heroku.com/oauth/authorize?client_id={client-id}&response_type=code&scope={scopes}&state={anti-forgery-token}
Include client-id in the request, which is the public identifier of an OAuth client. Also make sure to include response_type, and to set it to code, which is the only currently supported grant type.
The scope URL parameter is a space-delimited (and url-encoded) list of the authorization scopes you are requesting. See available scopes below.
The state parameter is a unique string used to maintain state between Heroku’s OAuth provider and your app. When Heroku redirects users back to your app’s redirect_uri, this parameter’s value will be included in the response (see below). This parameter’s value should be an anti-forgery token to protect against cross-site request forgery (CSRF).
Redirect Back
The user will then be redirected back, based on the client redirect uri:
GET {redirect-uri}?code={code}&state={anti-forgery-token}
Token Exchange
Given the code from the redirect url, a token may now be acquired.
POST /oauth/token
Curl Example
$ curl -X POST https://id.heroku.com/oauth/token \
-d "grant_type=authorization_code&code=01234567-89ab-cdef-0123-456789abcdef&client_secret=01234567-89ab-cdef-0123-456789abcdef"
Response
HTTP/1.1 200 OK
Content-Type: application/json;charset=utf-8
{
  "access_token":"HRKU-01234567-89ab-cdef-0123-456789abcdef",
  "expires_in":28799,
  "refresh_token":"01234567-89ab-cdef-0123-456789abcdef",
  "token_type":"Bearer",
  "user_id":"01234567-89ab-cdef-0123-456789abcdef",
  "session_nonce":"2bf3ec81701ec291"
}
Use the access token’s token value in the Authorization header in subsequent requests. For example, given the token 01234567-89ab-cdef-0123-456789abcdef, you’d set the header to Authorization: Bearer 01234567-89ab-cdef-0123-456789abcdef.
Access tokens acquired through the direct authorization flow don’t expire.
Token Refresh
Access tokens expire 8 hours after they are issued. The refresh token can be used to make a request for a new access token, similar to the initial access token exchange. Refresh tokens don’t expire.
POST /oauth/token
Curl Example
$ curl -X POST https://id.heroku.com/oauth/token \
-d "grant_type=refresh_token&refresh_token=036b9495-b39d-4626-b53a-34399e7bc737&client_secret=fa86a593-d854-4a3f-b68c-c6cc45fb6704"
Response
HTTP/1.1 201 Created
ETag: "0123456789abcdef0123456789abcdef"
Last-Modified: Sun, 01 Jan 2012 12:00:00 GMT
RateLimit-Remaining: 1200
{
  "access_token":"HRKU-811235f4-16d3-476e-b940-ed5dfc7d6513",
  "expires_in":7199,
  "refresh_token":"036b9495-b39d-4626-b53a-34399e7bc737",
  "token_type":"Bearer",
  "user_id":"01234567-89ab-cdef-0123-456789abcdef",
  "session_nonce":"2bf3ec81701ec291"
}
Subsequent requests should authenticate by adding the access token’s token value to the Authorization header and specifying type Bearer. For example, given the access token 01234567-89ab-cdef-0123-456789abcdef, request headers should be set to Authorization: Bearer 01234567-89ab-cdef-0123-456789abcdef.
Scopes
The following scopes are supported by the API:
global: Read and write access to all of your account, apps and resources. Equivalent to the default authorization obtained when using the CLI.identity: Read-only access to your account information.readandwrite: Read and write access to all of your apps and resources, excluding account information and configuration variables. This scope lets you request access to an account without necessarily getting access to runtime secrets such as database connection strings.read-protectedandwrite-protected: Read and write access to all of your apps and resources, excluding account information. This scope lets you request access to an account including access to runtime secrets such as database connection strings.
While tokens with read and read-protected scopes restrict the ability to modify app configurations, some read-only resources can include write credentials in metadata. For example, log drain definitions often contain embedded credentials, such as basic auth usernames and passwords or API tokens. These credentials are visible via the API to any user or integration with read or read-protected access.
Direct Authorization
Direct authorization is used to provide a simpler workflow when users are creating authorizations for themselves. It allows the exchange of an expiring token for a non-expiring token.
Token Exchange Requests
As multi-factor authentication is a mandatory Heroku security feature, accounts must pass a Heroku Platform API token to exchange for a non-expiring token. You can’t exchange your username and password for this purpose.
POST /oauth/authorizations
You can get your API token using the heroku auth:token command.
You can then create a direct authorization request by including this token:
$ curl -X POST https://api.heroku.com/oauth/authorizations \
-H "Accept: application/vnd.heroku+json; version=3" \
-H "Authorization: Bearer <token retrieved from heroku auth:token>" \
-H "Content-Type: application/json" \
-d "{\"description\":\"sample authorization\"}"
Include a description to help distinguish this authorization from others. Similar to the web flow, you can scope the authorization to particular permissions on the account.
Token Exchange Response
The response to any of the previous direct authorization token exchange requests looks like this example:
HTTP/1.1 201 Created
ETag: "0123456789abcdef0123456789abcdef"
Last-Modified: Sun, 01 Jan 2012 12:00:00 GMT
RateLimit-Remaining: 1200
{
  "access_token": {
    "expires_in": 2592000,
    "id": "01234567-89ab-cdef-0123-456789abcdef",
    "token": "HRKU-01234567-89ab-cdef-0123-456789abcdef"
  },
  "client": {
    "id": "01234567-89ab-cdef-0123-456789abcdef",
    "name": "example",
    "redirect_uri": "https://example.com/auth/heroku/callback"
  },
  "created_at": "2012-01-01T12:00:00Z",
  "grant": {
    "code": "01234567-89ab-cdef-0123-456789abcdef",
    "expires_in": 2592000,
    "id": "01234567-89ab-cdef-0123-456789abcdef"
  },
  "id": "01234567-89ab-cdef-0123-456789abcdef",
  "refresh_token": {
    "expires_in": 2592000,
    "id": "01234567-89ab-cdef-0123-456789abcdef",
    "token": "01234567-89ab-cdef-0123-456789abcdef"
  },
  "scope": [
    "global"
  ],
  "updated_at": "2012-01-01T12:00:00Z"
}
Subsequent requests should use the access token’s token value in the Authorization header. For example, given the token 01234567-89ab-cdef-0123-456789abcdef, you’d set the header to Authorization: Bearer 01234567-89ab-cdef-0123-456789abcdef.
Access tokens acquired through the direct authorization flow do not expire.
Revoking Authorization
Revoking an authorization will block associated tokens from making further requests.
DELETE /oauth/authorizations/{authorization-id}
Curl Example
$ curl -X DELETE https://api.heroku.com/oauth/authorizations/$AUTHORIZATION_ID \
-H "Accept: application/vnd.heroku+json; version=3" \
-H "Authorization: Bearer 01234567-89ab-cdef-0123-456789abcdef"
Response
HTTP/1.1 200 OK
ETag: "0123456789abcdef0123456789abcdef"
Last-Modified: Sun, 01 Jan 2012 12:00:00 GMT
RateLimit-Remaining: 1200
{
  "access_token": {
    "expires_in": 2592000,
    "id": "01234567-89ab-cdef-0123-456789abcdef",
    "token": "HRKU-01234567-89ab-cdef-0123-456789abcdef"
  },
  "client": {
    "id": "01234567-89ab-cdef-0123-456789abcdef",
    "name": "example",
    "redirect_uri": "https://example.com/auth/heroku/callback"
  },
  "created_at": "2012-01-01T12:00:00Z",
  "grant": {
    "code": "01234567-89ab-cdef-0123-456789abcdef",
    "expires_in": 2592000,
    "id": "01234567-89ab-cdef-0123-456789abcdef"
  },
  "id": "01234567-89ab-cdef-0123-456789abcdef",
  "refresh_token": {
    "expires_in": 2592000,
    "id": "01234567-89ab-cdef-0123-456789abcdef",
    "token": "01234567-89ab-cdef-0123-456789abcdef"
  },
  "scope": [
    "global"
  ],
  "updated_at": "2012-01-01T12:00:00Z"
}
Resources and Examples
- Platform API Reference
- Heroku CLI plugin to manage OAuth clients and authorizations
- Ruby sample app demonstrating OAuth
- Go sample app demonstrating OAuth
- OmniAuth Strategy for Heroku
- Ruby Rack middleware Heroku Bouncer
- Python WSGI middleware
Limit Access to Apps via OAuth
Heroku administrators can deny OAuth access to team-owned resources from all non-Heroku products and services. Turn off third-party OAuth access to the Heroku Platform API in the Settings tab of the team. Team members can still OAuth with Heroku, but team resources aren’t accessible.
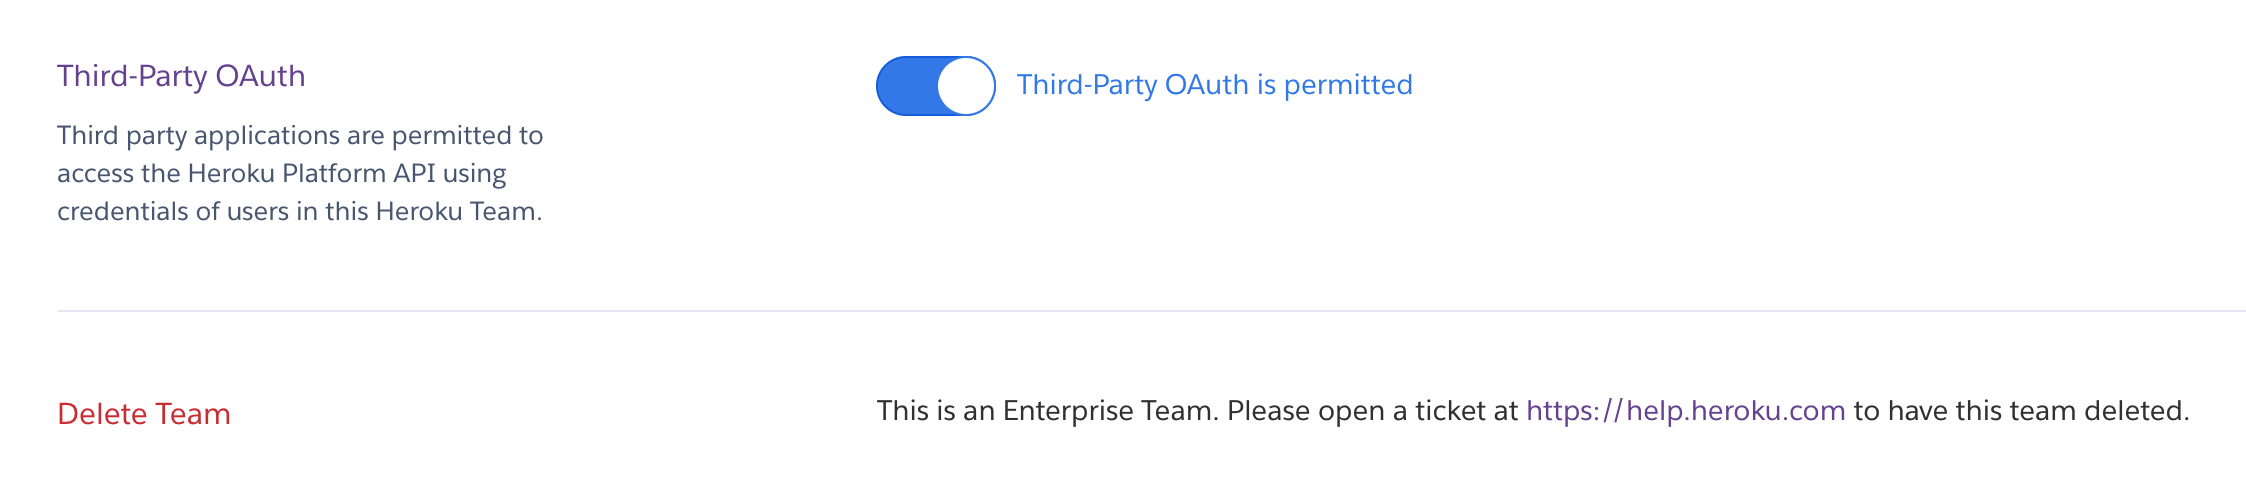
When third-party OAuth access is disabled, API calls attempted against team apps return a failure. Previously configured services set up with an app in a personal account or team risk breaking if you transfer that app to a team with third-party OAuth access disabled.
Some third-party add-ons use OAuth and can be blocked regardless of Add-on Controls settings.