Last updated September 20, 2021
Softtrends MSSQL allows you to add a highly available and high-performance Azure SQL database to your heroku application.
Use MSSQL add-on to:
- Provision a single Database from Azure SQL
- Provision a pool of Databases from Azure SQL
- Set and roll your database credentials
- Build applications on Heroku using Azure SQL Database
Upon provisioning an MSSQL add-on, you will be issued the credentials for Azure Database. These credentials are managed by the add-on, and you can regenerate your MSSQL Database password any time using the Dashboard.
MSSQL is compatible with all applicable languages and frameworks supported by the Heroku platform and Microsoft .Net Core. Drivers are available for C# (ADO.NET) , C++ (ODBC, OLE DB), JAVA (JDBC), Nodejs (nodejs driver), PHP (PHP), Python(pyodbc) and Ruby(ruby driver).
If you are just getting started with Heroku or Heroku add-ons, please see the Heroku Getting Started Guides or the add-ons overview.
Provisioning the add-on
If you want to use MSSQL add-on with an existing app, you can provision it from your app’s Resources tab in the Heroku Dashboard, or via the CLI. During provisioning, An Azure MSSQL database is automatically provisioned based on the plan which you choose and MSSQL_TCP_URL, MSSQL_URL config vars are added to your app. Your app can use any one of the URLs in the config vars to access the database. To see more information about config vars Accessing the Database using values from Config Vars.
A list of all plans available can be found here.
$ heroku addons:create mssql:test
Creating mssql on sharp-mountain-4005... free
Created mssql-infinite-31247
Setup
Before you begin using MSSQL add-on, you need to perform the following setup tasks:
Open mssql add-on by selecting it MSSQL from the Resources tab of your app in the Heroku Dashboard, or by running the following CLI command:
$ heroku addons:open mssql
Full instructions for configuring MSSQL are described in Navigating the add-on dashboard.
Upgrading the add-on plan
You can upgrade from the free test plan to the paid Micro or Small or Medium or Large or Extra Large or Large Pool or Extra Large Pool plans using the Edit plan option in the Heroku Dashboard or using the CLI, assuming you are operating inside a Heroku organization with a paid plan entitlement:
$ heroku addons:upgrade mssql:micro -a mynewmssqlapp
Changing mssql-rigid-36410 on mynewmssqlapp from mssql:test to mssql:micro... done, free
Removing the add-on
You can remove the add-on from the Heroku dashboard or with the CLI.
$ heroku addons:destroy mssql -a mynewmssqlapp
▸    WARNING: Destructive Action
▸    This command will affect the app mynewmssqlapp
▸    To proceed, type mynewmssqlapp or re-run this command with --confirm mynewmssqlapp
$heroku addons:destroy mssql -a mynewmssqlapp --confirm mynewmssqlapp
Destroying mssql-shallow-50722 on ⬢ mynewmssqlapp... done
Navigating the add-on dashboard
The MSSQL add-on dashboard allows you to create, and manage your database. It is available to any member or collaborator on your application. See Collaborating with Other Developers on Your App for more information on how to manage the users who have access to your application.
The Administration menu
The Administration menu allows you to:
- Get a dashboard view of your existing database
- Create a new database
Figure 1. Creating a New Database
Open the Administration menu and select Add New Database to create your Azure SQL Databast
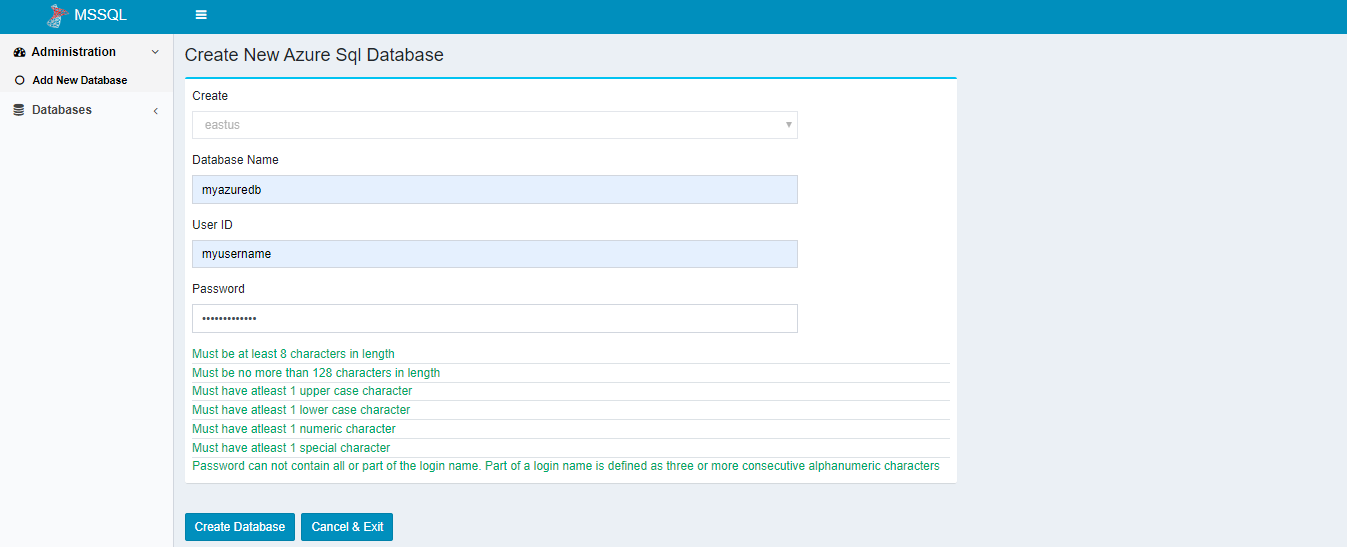
Provide the following information and then click on the Create Database button
Database Name: Database name must be between 8 and 128 characters in length and use alphanumeric only.
User ID: User ID must be between 8 and 128 characters in length and use lowercase and alphanumeric only.
Password: Password must have the following property
- Must be at least 8 characters in length
- Must be no more than 128 characters in length
- Must have atleast 1 upper case character
- Must have atleast 1 lower case character
- Must have atleast 1 numeric character
- Must have atleast 1 special character
- Password can not contain all or part of the login name. Part of a login name is defined as three or more consecutive alphanumeric characters
Once the database is created successfully, it goes back to the dashboard list databases screen.
Once you create a database, you may see Add new database (your plan limit reached or Add new database under Administration menu depending on what plan you have provisioned. Some Plans with Pool option allows you to create more than 1 database up to your limit. Please see Plans to see how many databases you can create in your database pool.
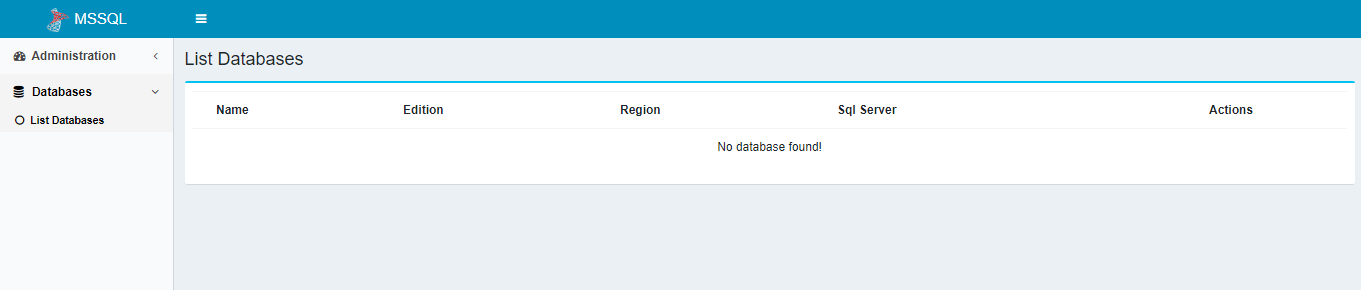
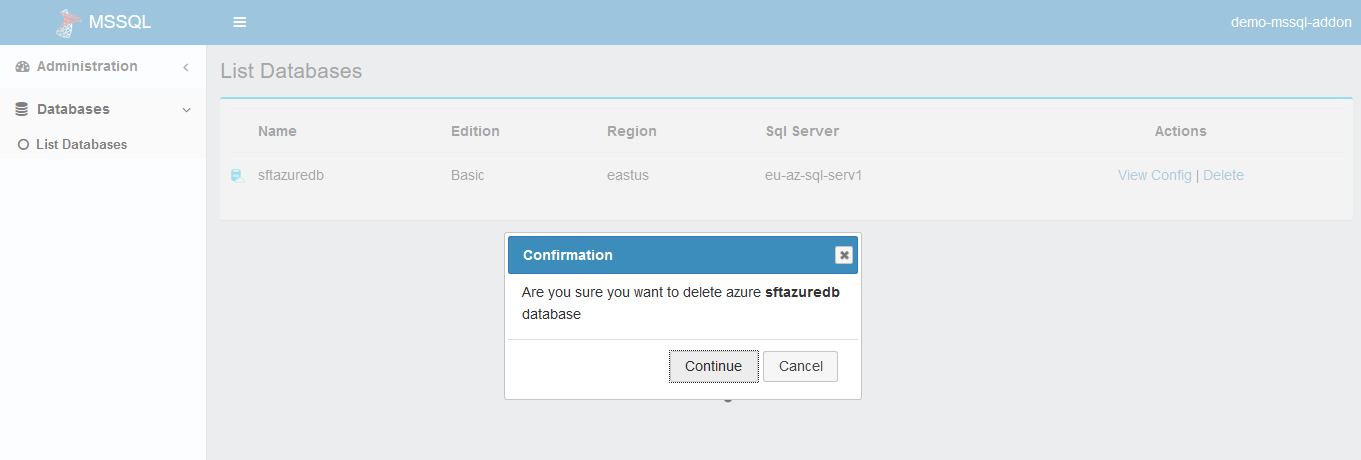
Figure 2. Showing the List of Database Created
Open the Databases menu option on left and select ‘List Databases’ to display the list of databases you have created
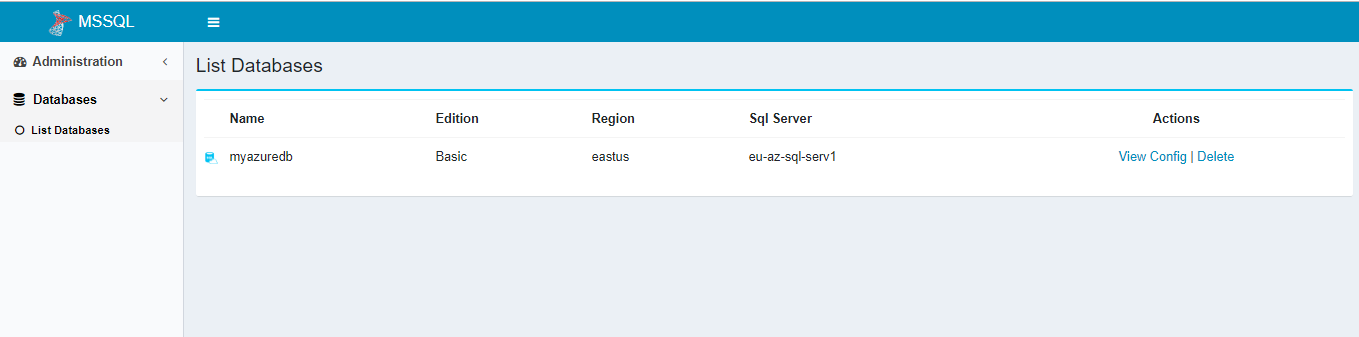
Here you have 2 options for each database:
View Config: View configuration of the database and change password if required
Delete: Delete a database which is a destructive operation and all data in your database will be lost
Figure 3. Viewing the Configuration of a Database
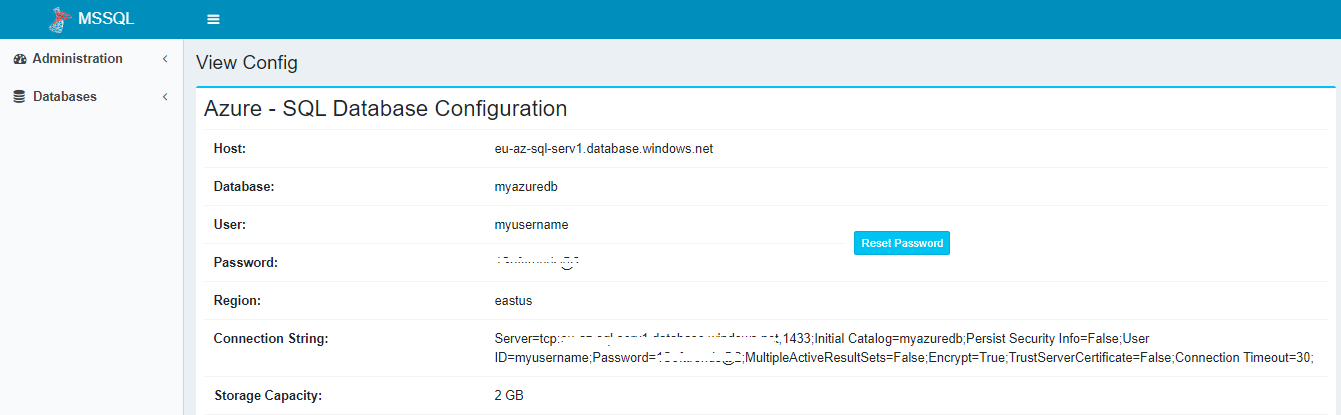
Figure 4. Deleting a Database
Delete database is a destructive operation. It will delete the database permanently and all your data will be lost. Take a backup of your database before the Delete operation
Accessing the Database using values from Config Vars
Once you create a database, you will need a connection string to access the database from your Heroku App. These connections strings are stored in Apps Config vars in the following 2 parameters:
MSSQL_URL: to access the database without using TCP
MSSQL_TCP_URL: to access the database using TCP
Verifying connectivity with the database
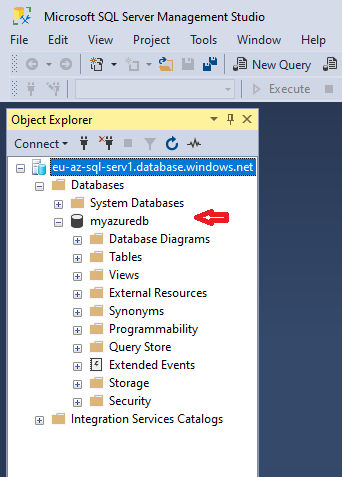
You can use the database configuration and credentials to connect to it from external applications. A quick way to verify connectivity is to check it with Microsoft SQL Management Studio.
Once you open the SQL server management studio, and click on Connect, you get the following screen
Figure 1. Provide the database credentials
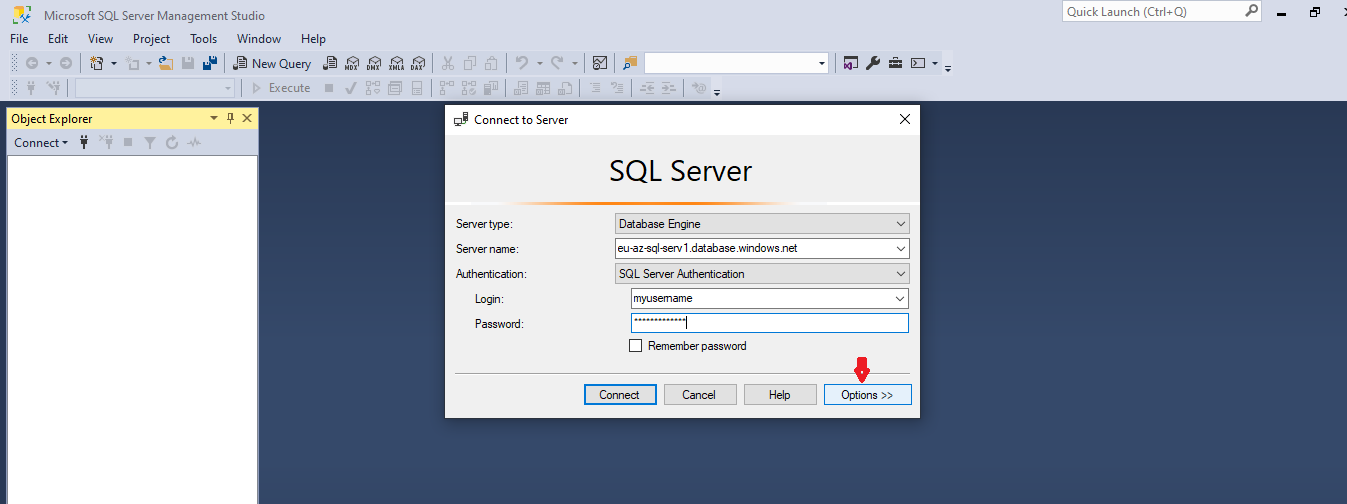
Server Name: this is the Host information provided in your database configuration screen on add-on MSSQL Dashboard
Authentication: user SQL Server Authentication
Login: enter User information from your database configuration screen on MSSQL add-on Dashboard
Password: enter the Password from your database configuration screen on MSSQL add-on Dashboard
Options button: click on options button to go to connection properties tab
Figure 2. Enter the connection properties
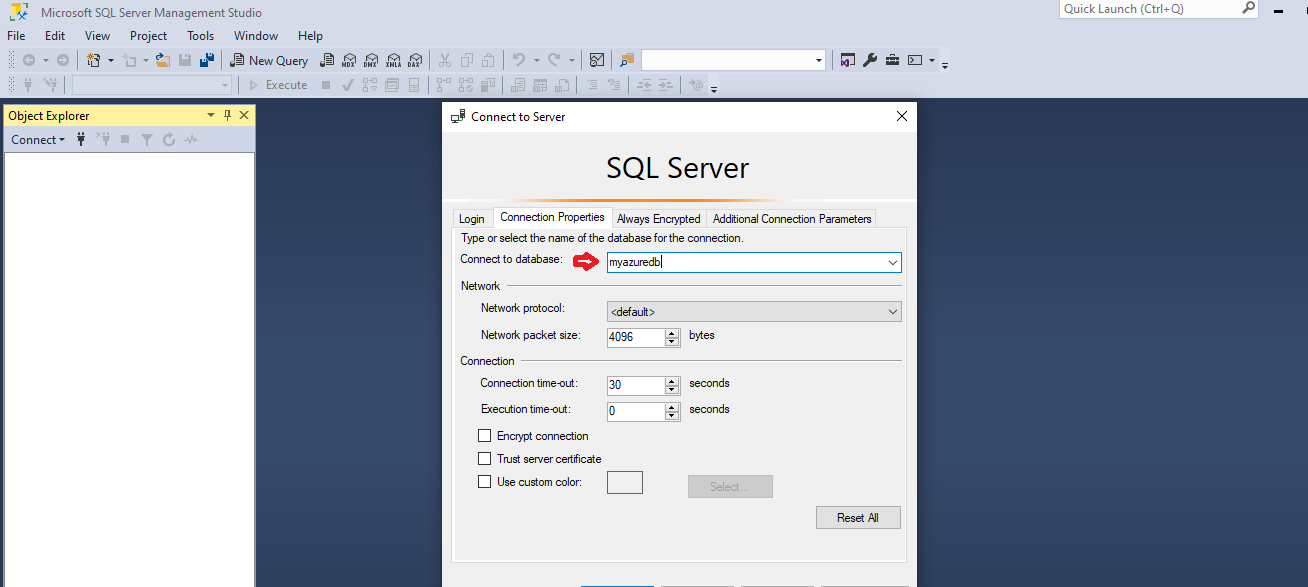
Connect to database: enter Database name from your database configuration screen on MSSQL add-on Dashboard
Figure 3. Connect to the database
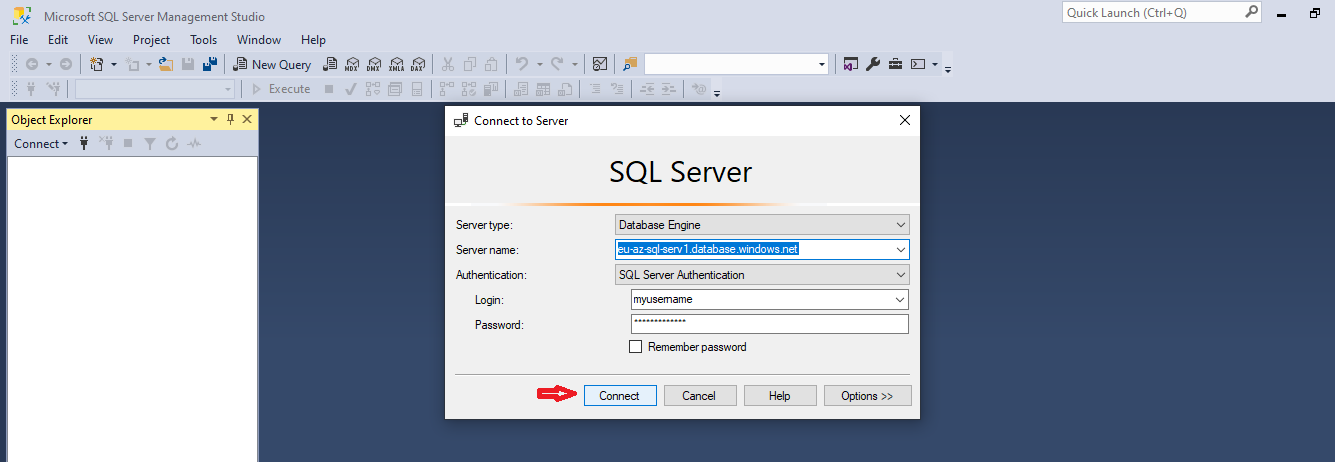
Click on Login tab and then on the Connect button to connect to your database.
Figure 4. Connected to database
If you are connected to the database, you will see the following screen indicating that the external connectivity to the database you created in MSSQL add-on is successful.
Point in time Restore
The Azure SQL Database provisioned by your MSSQL add-on protects all databases with an automated backup system. These backups are retained for a period time between 7 to 35 days as specified in each plan feature. You can uses Point-in-time restore to any point within the retention period. This service is provided at no additional charges. Full backups are taken every week, differential backups every day, and log backups every 5 minutes. After the first full back up all further backups are scheduled automatically and managed silently in the background.
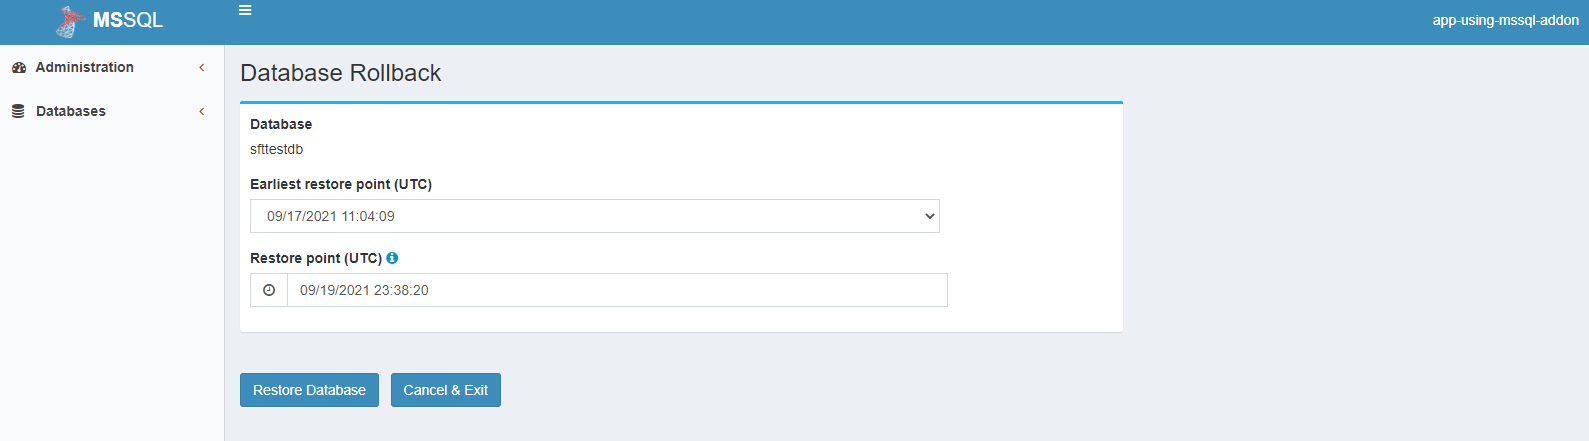
To access this feature, you click on Rollback link of the particular database and select an earliest restore point, and an actual restore point after the earliest restore point that you want to restore.
On Demand Backup & Restore
MSSQL add-on provides the option to backup and restore from backup on-demand. Backup and Restore is only supported from Azure Blob. You have 3 options with On-demand backup / restore:
- Backup & Restore using MSSQL add-on internal Azure Blob
- Restore from an Azure Blob that has a Public URL
- Backup & Restore using your own Private Azure Blob
Backup & Restore feature is supported in Mini & Above add-on plan. When it is supported, you will see a Backup/Restore link on dashboard for each database you have created using MSSQL add-on
Backup & Restore using MSSQL add-on Internal Azure Blob
You can take backup in MSSQL add-on’s internal Azure blob and restore it from the backup anytime. The number of backups you can take in MSSQL add-on’s internal Azure container is limited by plan and listed in the add-on plans & pricing at Softtrends MSSQL
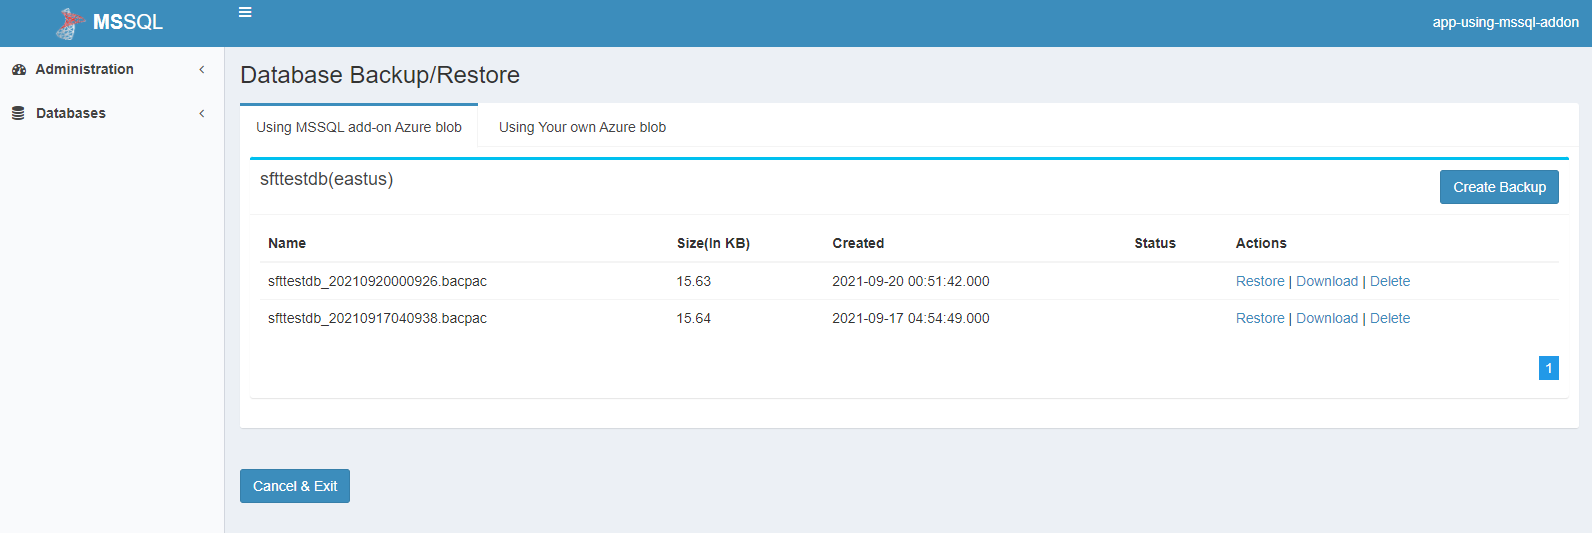
- When you click on
Create Backupa new backup will be created and listed in the backup list once completed - Clicking
Restoreon any link will restore the database from that back up
once the backup is started, it cannot be cancelled. However, when backup is in progress, you can go back to the dashboard if you wish but all links for that particular database will be disabled till the current backup is completed.
Restore from an Azure Blob that has a Public URL
This feature allows you to restore a database which has not been backed up by MSSQL add-on, but backed up using some other tool and copied to an Azure blob with a public URL.

Click Restore to restore the database from the backup file stored at the URL.
The public is created as a shared access signature (SAS) token for the Blob. Follow this link to know more how you can create an shared access signature (SAS) token for an Azure Blob and use it here.
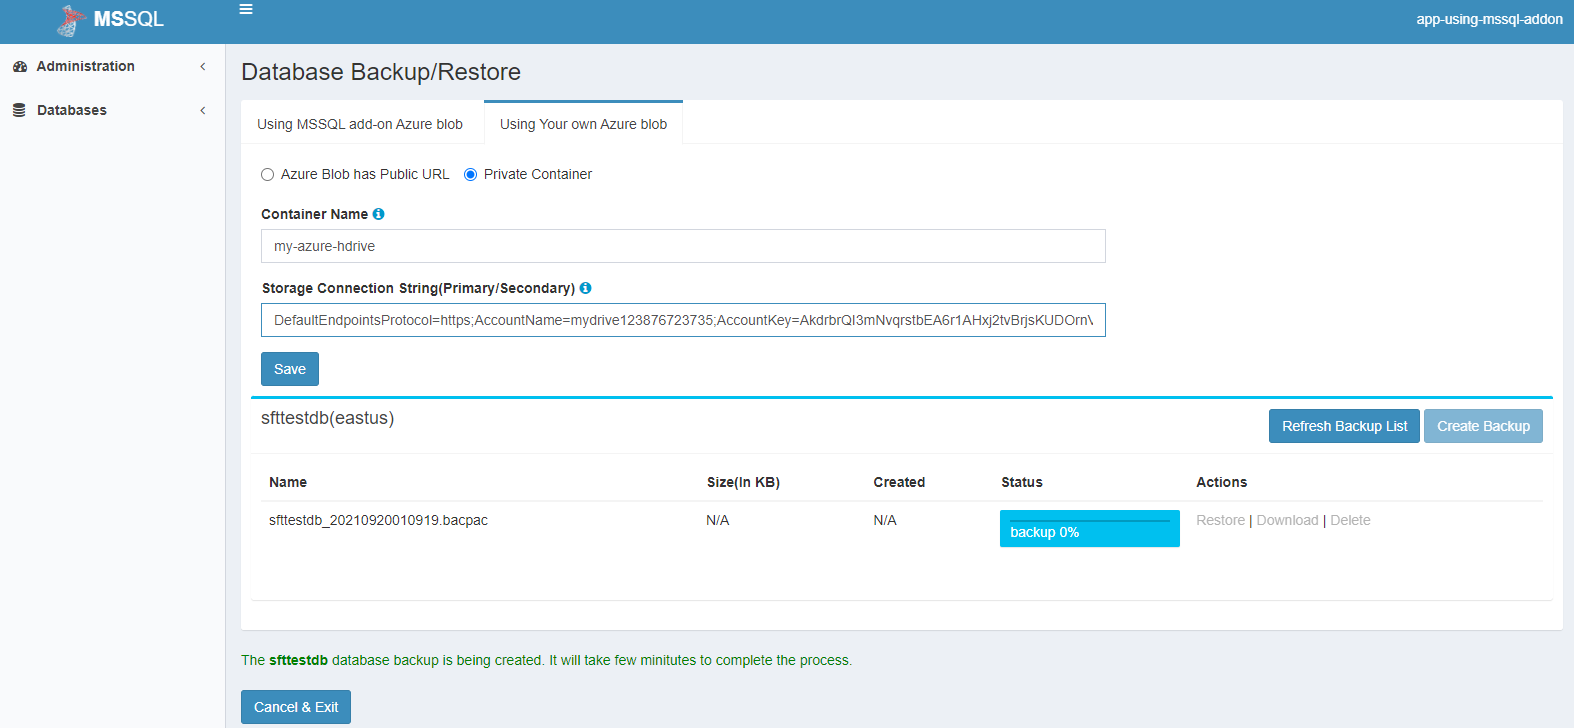
Backup & Restore using your own Private Azure Container
You can use this option to take backup of your database in your own Azure container for your archival purpose or for sharing with other applications. If you do not have a Azure Container and wish to provision one, you can use Softtrends HDrive add-on which will allow you to provision your own Azure Container.
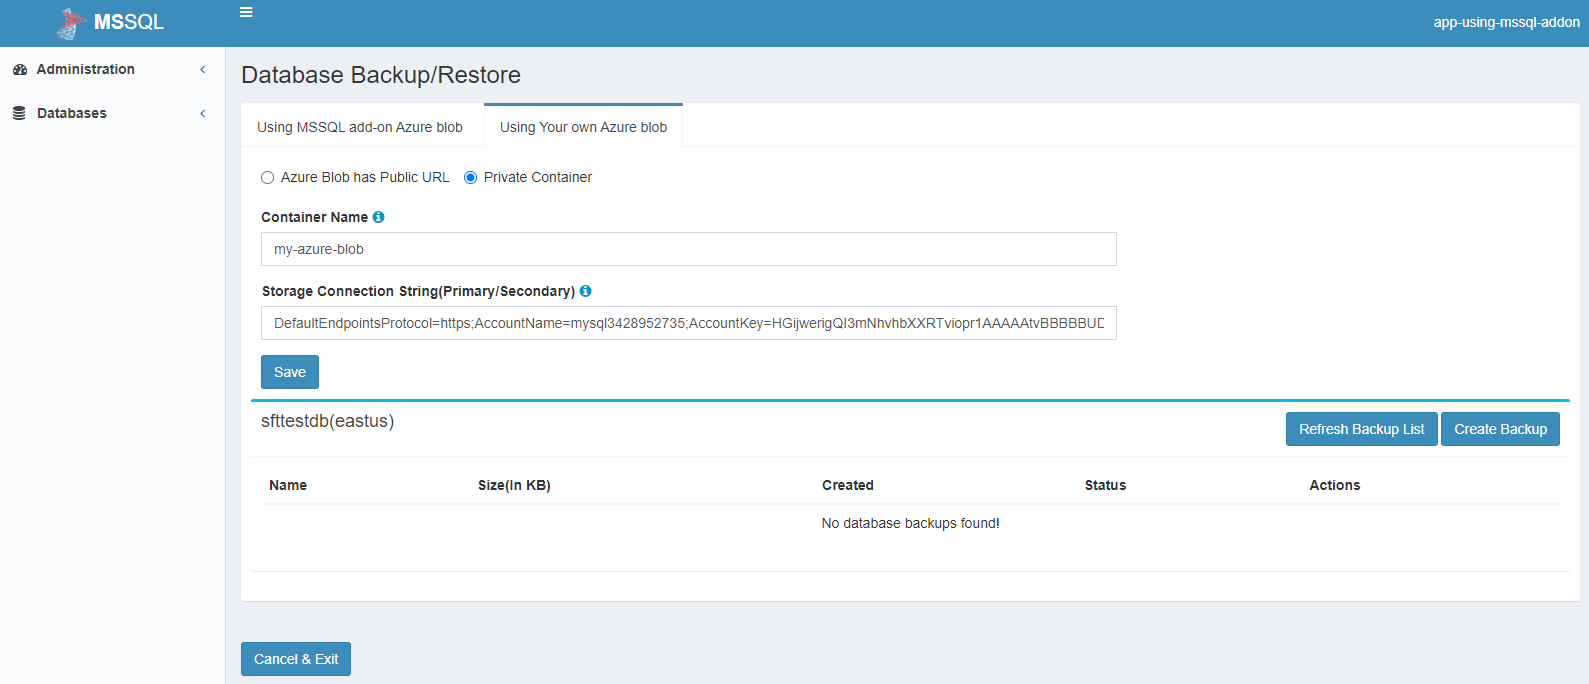
- You will have to enter your
Container NameandConnection stringthat MSSQL add-on needs to validate - Once it is validates, you can Click on
Create backupto create a backup. The screen shows the backup progress.
once the backup is started, it cannot be cancelled. However, when backup is in progress, you can go back to the dashboard if you wish but all links for that particular database will be disabled till the current backup is completed.
- Once backup is complete, it will be listed in Backup List
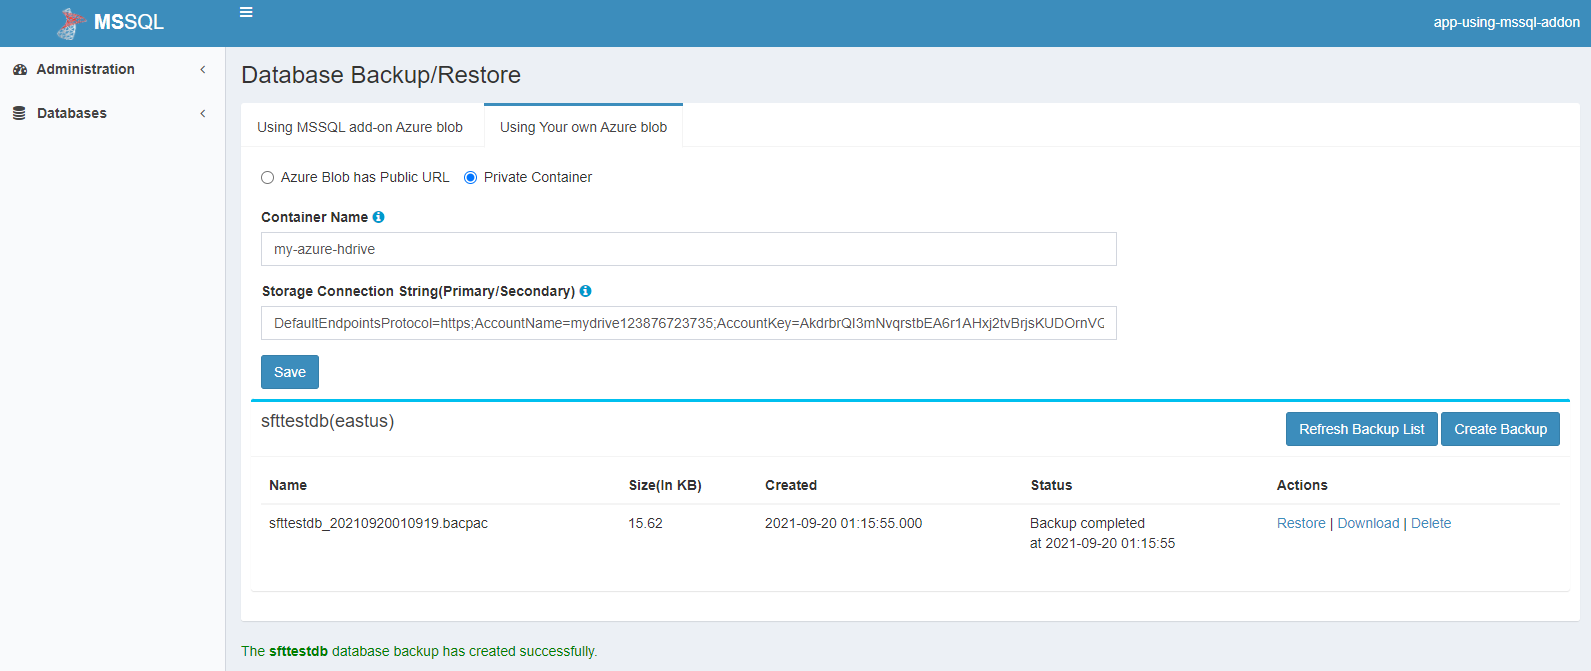
You can click on the Restore link of any of the backups you have taken to restore it.
Accessing Azure SQL database from PHP server
In order to access the Azure SQL database provisioned by MSSQL add-on from a PHP application deployed in Heroku, you will need to follow the process out like in this link
Support
All Softtrends MSSQL add-on support and runtime issues should be submitted via one of the Heroku Support channels. Any non-support related issues or product feedback is welcome at heroku@softtrends.com.