Table of Contents [expand]
- Getting started
- Supported Protocols: ASCII & Binary
- Ruby
- Rails
- Ruby Puma Webserver
- Rails Rack::Cache
- Python
- Django
- Flask
- PHP
- Laravel
- Symfony2
- CakePHP
- WordPress
- Node.js
- Java
- Spring Boot
- Go
- Gin
- Rust
- Client library support
- Sample applications
- Local usage
- MemCachier Analytics
- Analytics API V2
- Credentials
- Disabled Caches
- Encrypted Connections (TLS)
- Upgrading and downgrading
- Using MemCachier
- Key-Value size limit (1MB)
- Errors about app trying to connect to localhost
- Support
Last updated August 06, 2025
MemCachier is an implementation of the Memcached in-memory key/value store used for caching data. It is a key technology in modern web applications for scaling and reducing server loads. The MemCachier add-on manages and scales clusters of memcache servers so you can focus on your app. Tell us how much memory you need and get started for free instantly. Add capacity later as you need it.
Follow our blog or Twitter (@memcachier), for status and product announcements.
Getting started
Start by installing the add-on:
$ heroku addons:create memcachier:dev
You can start with more memory if you know you’ll need it:
$ heroku addons:create memcachier:100
$ heroku addons:create memcachier:500
 ... etc ...
Once the add-on has been added you’ll notice three new variables in
heroku config:
$ heroku config
...
MEMCACHIER_SERVERS    => mcX.ec2.memcachier.com
MEMCACHIER_USERNAME   => bobslob
MEMCACHIER_PASSWORD   => l0nGr4ndoMstr1Ngo5strang3CHaR4cteRS
...
Next, setup your app to start using the cache. We have documentation for the following languages and frameworks:
- Ruby
- Rails
- Ruby Puma Webserver
- Rack::Cache
- Python
- Django
- PHP
- WordPress
- CakePHP
- Symfony2
- Laravel
- Node.js
- Java
Your credentials may take up to three (3) minutes to be synced to our servers. You may see authentication errors if you start using the cache immediately.
Supported Protocols: ASCII & Binary
MemCachier supports both the memcache binary and ASCII protocols. Our preferred method is to use the binary protocol as it natively supports user authentication and improves the performance slightly over the ASCII protocol. All our documentation is written for using the binary protocol.
The ASCII protocol does not natively support user authentication. For
MemCachier, where all connections require authentication, we extend the ASCII
protocol in a very simple way. Once the connection is established, you should
send a set command with your username as the key and your password as the
value. For example:
$ telnet 35865.1e4cfd.us-east-3.ec2.prod.memcachier.com 11211
>
> set 15F38e 0 0 32
> 52353F9F1C4017CC16FD348B982ED47D
> STORED
You’ll need to do this quickly! As we timeout connections that don’t authenticate within a few seconds. Once authenticated, the full ASCII protocol is available to you.
Ruby
We’ve built a small Ruby Sinatra example.
Source code or
 .
.
Start by adding the dalli gem to your
Gemfile. Dalli is a Ruby memcache client.
gem 'dalli'
Then run bundle install:
$ bundle install
You can now start writing some code. First, you’ll need to create a client object with the correct credentials and settings:
require 'dalli'
cache = Dalli::Client.new((ENV["MEMCACHIER_SERVERS"] || "").split(","),
                    {:username => ENV["MEMCACHIER_USERNAME"],
                     :password => ENV["MEMCACHIER_PASSWORD"],
                     :failover => true,            # default is true
                     :socket_timeout => 1.5,       # default is 0.5
                     :socket_failure_delay => 0.2, # default is 0.01
                     :down_retry_delay => 60       # default is 60
                    })
Now you can use the cache through simple get and set operations,
as well as many others.
cache.set("foo", "bar")
puts cache.get("foo")
Testing (Ruby)
The easiest way to test that your setup is working is through the heroku console:
$ heroku run console --app <app>
>> require 'dalli'
>> cache = Dalli::Client.new(ENV["MEMCACHIER_SERVERS"].split(","),
                        {:username => ENV["MEMCACHIER_USERNAME"],
                         :password => ENV["MEMCACHIER_PASSWORD"]
                        })
>> cache.set('memcachier', 'rocks')
=> true
And then fetch the value back:
>> cache.get('memcachier')
=> "rocks"
You can also get an insight into your cache usage (number of keys
stored and bytes) with the stats command:
>> cache.stats
=> {"memcachier.example.net:11211" => {"cur_items" => "49982", "bytes" => "89982234"} }
Rails
We’ve built a small Rails example.
Source code or
.
We also have a tutorial on using MemCachier with Rails here.
Here we explain how you setup and install MemCachier with Rails. Refer to the Rails caching guide for information on how you use MemCachier with Rails. Rails supports automatic whole site caching, per-view caching and fragment caching.
Start by adding the dalli gem to your
Gemfile. Dalli is a Ruby memcache client.
gem 'dalli'
Then run bundle install:
$ bundle install
Once this gem is installed you’ll want to configure the Rails cache_store
appropriately. Modify your config/environments/production.rb with the
following:
config.cache_store = :mem_cache_store,
                    (ENV["MEMCACHIER_SERVERS"] || "").split(","),
                    {:username => ENV["MEMCACHIER_USERNAME"],
                     :password => ENV["MEMCACHIER_PASSWORD"],
                     :failover => true,
                     :socket_timeout => 1.5,
                     :socket_failure_delay => 0.2,
                     :down_retry_delay => 60
                    }
In your development environment, Rails.cache defaults to a simple in-memory store and so it doesn’t require a running memcached.
From here you can use the following code examples to use the cache in your Rails app:
Rails.cache.write("foo", "bar")
puts Rails.cache.read("foo")
It is possible you will run into a configuration problem if you are using Rails 3.1 and the Heroku Cedar platform. Information on how to fix that issue can be found at this Stackoverflow answer
Testing (Rails)
To test locally you can simply use the rails console:
rails console
>> Rails.cache.write('memcachier', 'rocks')
=> true
>> Rails.cache.read('memcachier')
=> "rocks"
To test against MemCachier itself, refer to the Ruby testing instructions.
Rails 2
When adding the dalli gem to your Rails 2 Gemfile you will need to use dalli v1.0.5 as later versions of Dalli don’t support Rails 2.
gem 'dalli', '~>1.0.5'
Also modify config/environment.rb to contain:
config.gem 'dalli'
Else proceed just as newer Rails versions.
Ruby Puma Webserver
If you are using the Puma webserver for your Ruby app (Rails or otherwise), then you should take some additional steps due to the multi-threaded runtime being used. This applies to all threaded webservers for Ruby, not just Puma.
First, please refer to the documentation on Rails or Ruby appropriately, and then take these additional steps.
Dalli by default uses a single connection to each server. This works fine
normally, but can become a bottleneck in a multi-threaded environment and
limit performance. In this case, Dalli supports connection pooling, where
multiple connections are created to MemCachier’s servers. To use this, start by
adding the connection_pool gem to your Gemfile:
gem 'connection_pool'
Next, you’ll need to set the :pool_size configuration option when setting up
Dalli. For example, in Rails your configuration would become:
config.cache_store = :mem_cache_store,
                    (ENV["MEMCACHIER_SERVERS"] || "").split(","),
                    {:username => ENV["MEMCACHIER_USERNAME"],
                     :password => ENV["MEMCACHIER_PASSWORD"],
                     :failover => true,
                     :socket_timeout => 1.5,
                     :socket_failure_delay => 0.2,
                     :down_retry_delay => 60,
                     :pool_size => 5
                    }
Where the number 5 should be chosen according to how many threads you will be running and the available concurrency on the machines running your webserver.
Rails Rack::Cache
Rails can use a middle-ware component of the Rack web server architecture called Rack::Cache. This provides caching of static assets in Rails and is a simple alternative to use a full CDN.
Please see this article for information.
Python
Here we explain how you setup and install MemCachier with Python.
We recommend the python-binary-memcached memcache client as it is a pure Python library. However, if you prefer, you can use pylibmc which has a larger ecosystem.
Recommended client: python-binary-memcached
This is a pure python client that supports the binary protocol and SASL authentication.
To install python-binary-memcached:
$ pip install python-binary-memcached
Be sure to update your requirements.txt file with these new requirements
(note that your versions may differ than what’s below):
python-binary-memcached==0.28.0
Next, configure your memcached client in the following way:
import bmemcached
import os

servers = os.environ.get('MEMCACHIER_SERVERS', '').split(',')
user = os.environ.get('MEMCACHIER_USERNAME', '')
passw = os.environ.get('MEMCACHIER_PASSWORD', '')

mc = bmemcached.Client(servers, username=user, password=passw)

mc.enable_retry_delay(True)  # Enabled by default. Sets retry delay to 5s.
After this, you can start writing cache code in your Python app:
mc.set("foo", "bar")
print(mc.get("foo"))
Alternative client: pylibmc
This client relies on the C libmemcached library. This should be fairly
straight-forward to install with your package manager on Linux or
Windows. We also have a
blog post
for Ubuntu users on how to do this.
You only need to be concerned about this for local development, the Heroku
platform includes libmemcached.
If you are caching sessions, also install libsasl2-modules with your OS
package manager. libmemcached requires it for session caching support
with SASL. Otherwise, you will likely see an error
FAILED TO SEND AUTHENTICATION TO SERVER and potentially an associated
message no mechanism available.
Once it’s installed, then install pylibmc:
$ pip install pylibmc
Be sure to update your requirements.txt file with these new requirements
(note that your versions may differ than what’s below):
pylibmc==1.5.2
The above pylibmc requirements must be added directly to your
requirements.txt file. They shouldn’t be placed in an included pip
requirement file. The Heroku Python buildpack checks the requirements.txt
file and only that file for the presence of pylibmc to trigger bootstrapping
libmemcached, which is prerequisite for installing pylibmc.
Next, configure your memcached client in the following way:
import pylibmc
import os

servers = os.environ.get('MEMCACHIER_SERVERS', '').split(',')
user = os.environ.get('MEMCACHIER_USERNAME', '')
passw = os.environ.get('MEMCACHIER_PASSWORD', '')

mc = pylibmc.Client(servers, binary=True,
                    username=user, password=passw,
                    behaviors={
                      # Faster IO
                      'tcp_nodelay': True,

                      # Keep connection alive
                      'tcp_keepalive': True,

                      # Timeout for set/get requests
                      'connect_timeout': 2000, # ms
                      'send_timeout': 750 * 1000, # us
                      'receive_timeout': 750 * 1000, # us
                      '_poll_timeout': 2000, # ms

                      # Better failover
                      'ketama': True,
                      'remove_failed': 1,
                      'retry_timeout': 2,
                      'dead_timeout': 30,
                    })
After this, you can start writing cache code in your Python app:
mc.set("foo", "bar")
print(mc.get("foo"))
A confusing error message you may get from pylibmc is
MemcachedError: error 37 from memcached_set: SYSTEM ERROR (Resource
temporarily unavailable). This indicates that you are trying to
store a value larger than 1MB. MemCachier has a hard limit of 1MB for
the size of key-value pairs. To work around this, either consider
sharding the data or using a different technology. The benefit of an
in-memory key-value store diminishes at 1MB and higher.
Django
We’ve built a small Django example.
Source code or
.
We also have a tutorial on using Django and MemCachier together
here.
We recommend the django-bmemcached
Django backend, as it uses the python-binary-memcached
memcache client which is a pure Python library. However, if you prefer, you can
try the pylibmc memcache client which has a larger ecosystem. However, it can sometimes be difficult to install locally
as it relies on the C libmemcached library.
Here we explain how you setup and install MemCachier with Django. Please see the Django caching guide for how you effectively use MemCachier. Django supports whole site caching, per-view caching and fragement caching.
Recommended client: python-binary-memcached
MemCachier has been tested with the python-binary-memcached memcache client. This is a great
client, fully-featured, high-performance and Python 2 & 3 support. Older Django versions
require django-pylibmc to work with MemCachier. Please follow the instructions
in this example if you wish to
use an older version.
Install django-bmemcached:
$ pip install django-bmemcached
Be sure to update your requirements.txt file with these new requirements
(note that your versions may differ than what’s below):
django-bmemcached==0.2.4
Note: The above django-bmemcached requirements must be added directly to your
requirements.txt file. They shouldn’t be placed in an included pip
requirement file.
Next, configure your settings.py file the following way:
servers = os.environ['MEMCACHIER_SERVERS']
username = os.environ['MEMCACHIER_USERNAME']
password = os.environ['MEMCACHIER_PASSWORD']

CACHES = {
    'default': {
        # Use django-bmemcached
        'BACKEND': 'django_bmemcached.memcached.BMemcached',

        # TIMEOUT is not the connection timeout! It's the default expiration
        # timeout that should be applied to keys! Setting it to `None`
        # disables expiration.
        'TIMEOUT': None,

        'LOCATION': servers,

        'OPTIONS': {
            'username': username,
            'password': password,
        }
    }
}
After this, you can start writing cache code in your Django app:
from django.core.cache import cache
cache.set("foo", "bar")
print cache.get("foo")
Alternative client: pylibmc
MemCachier has been tested with the pylibmc memcache client. This is a great
client, fully-featured, high-performance and Python 2 & 3 support. As of Version
1.11 Django has out-of-the-box support for pylibmc. Older Django versions
require django-pylibmc to work with MemCachier. Please follow the instructions
in this example if you wish to
use an older version.
The pylibmc client relies on the C libmemcached library. This should be
fairly straight-forward to install with your package manager on Linux or
Windows. For macOS users, Homebrew provides an easy solution. We also have a
blog post
for Ubuntu users on how to do this.
You only need to be concerned about this for local development, the Heroku
platform includes libmemcached.
Once libmemcached is installed, then install pylibmc:
$ pip install pylibmc
Be sure to update your requirements.txt file with these new requirements
(note that your versions may differ than what’s below):
pylibmc==1.5.1
Note: The above pylibmc requirements must be added directly to your
requirements.txt file. They shouldn’t be placed in an included pip
requirement file. The Heroku Python buildpack checks the requirements.txt
file and only that file for the presence of pylibmc to trigger bootstrapping
libmemcached, which is prerequisite for installing pylibmc.
Next, configure your settings.py file the following way:
servers = os.environ['MEMCACHIER_SERVERS']
username = os.environ['MEMCACHIER_USERNAME']
password = os.environ['MEMCACHIER_PASSWORD']

CACHES = {
    'default': {
        # Use pylibmc
        'BACKEND': 'django.core.cache.backends.memcached.PyLibMCCache',

        # TIMEOUT is not the connection timeout! It's the default expiration
        # timeout that should be applied to keys! Setting it to `None`
        # disables expiration.
        'TIMEOUT': None,

        'LOCATION': servers,

        'OPTIONS': {
            # Use binary memcache protocol (needed for authentication)
            'binary': True,
            'username': username,
            'password': password,
            'behaviors': {
                # Enable faster IO
                'no_block': True,
                'tcp_nodelay': True,

                # Keep connection alive
                'tcp_keepalive': True,

                # Timeout settings
                'connect_timeout': 2000, # ms
                'send_timeout': 750 * 1000, # us
                'receive_timeout': 750 * 1000, # us
                '_poll_timeout': 2000, # ms

                # Better failover
                'ketama': True,
                'remove_failed': 1,
                'retry_timeout': 2,
                'dead_timeout': 30,
            }
        }
    }
}
After this, you can start writing cache code in your Django app:
from django.core.cache import cache
cache.set("foo", "bar")
print cache.get("foo")
A confusing error message you may get from pylibmc is
MemcachedError: error 37 from memcached_set: SYSTEM ERROR (Resource
temporarily unavailable). This indicates that you are trying to
store a value larger than 1MB. MemCachier has a hard limit of 1MB for
the size of key-value pairs. To work around this, either consider
sharding the data or using a different technology. The benefit of an
in-memory key-value store diminishes at 1MB and higher.
Template fragment caching
Django allows you to cache rendered template fragments. To enable fragment
caching, add {% load cache %} to the top of each template caching is used in.
The control statement to cache a fragment has the form
{% cache timeout key ... %} where all additional parameters after the key
are just appended to the key. In practice this may look as follows:
{% load cache %}
<!-- ... -->

<!-- Fragment caching example -->
{% for item in list %}
  {% cache None 'item-fragment' item.id %}
  <div>
    <!-- fragment that does something with the item -->
  </div>
  {% endcache %}
{% endfor %}
Here the timeout is None, but it can also be a variable that contains a time or
an integer denoting seconds.
The cached snippet from the above example can be invalidated (deleted) as follows:
from django.core.cache import cache
from django.core.cache.utils import make_template_fragment_key
key = make_template_fragment_key("item-fragment", vary_on=[str(item.id)])
cache.delete(key)
View caching
Django also provides a decorator to cache views:
from django.shortcuts import render_to_response
from django.views.decorators.cache import cache_page
# ...

timeout = 600 # 10 min

@cache_page(timeout)
def index(request):
  # ...
  return render_template('index.html', ...)
If a cached view ever has to be invalidated explicitly, the key to the view needs to be saved:
from django.shortcuts import render_to_response
from django.views.decorators.cache import cache_page
from django.utils.cache import learn_cache_key
# ...

timeout = None
view_keys = {}

@cache_page(timeout)
def index(request):
  # ...
  response = render_template('index.html', ...)
  view_keys['index'] = learn_cache_key(request, response)
  return response
Now the view can be invalidated with:
from django.core.cache import cache
cache.delete(view_keys['index'])
Session storage
Memcache works well for storing information for short-lived sessions that time out. However, because Memcache is a cache and therefore not persistent, long-lived sessions are better suited to permanent storage options, such as your database.
For short-lived sessions configure SESSION_ENGINE to use the cache backend in
django_tasklist/settings.py:
SESSION_ENGINE = 'django.contrib.sessions.backends.cache'
For long-lived sessions Django allows you to use a write-through cache, backed
by a database. This is the best option for performance while guaranteeing
persistence. To use the write-through cache, configure the SESSION_ENGINE in
django_tasklist/settings.py like so:
SESSION_ENGINE = 'django.contrib.sessions.backends.cached_db'
For more information on how to use sessions in Django, please see the Django Session Documentation
Flask
We’ve built a small Flask example.
Source code or
.
We also have a tutorial on using Flask and MemCachier together
here.
Here we explain how you setup and install MemCachier with Flask. While Flask
has a built-in caching backend its features are limited to manual caching. For
this reason we recommend you use the
Flask-Caching package.
Flask-Caching supports memoization, fragment caching (Jinja2 snippets), and
whole view caching. For more details about how to use Flask-Caching please
refer to its documentation
Flask-Caching requires the pylibmc client which relies on the C
libmemcached library. This should be
fairly straight-forward to install with your package manager on Linux or
Windows. For macOS users, Homebrew provides an easy solution. We also have a
blog post
for Ubuntu users on how to do this.
You only need to be concerned about this for local development, the Heroku
platform includes libmemcached.
Once libmemcached is installed, then install Flask-Caching and pylibmc:
$ pip install Flask-Caching pylibmc
Be sure to update your requirements.txt file with these new requirements
(note that your versions may differ than what’s below):
Flask-Caching==1.4.0
pylibmc==1.5.2
Note: The above pylibmc requirements must be added directly to your
requirements.txt file. They shouldn’t be placed in an included pip
requirement file. The Heroku Python buildpack checks the requirements.txt
file and only that file for the presence of pylibmc to trigger bootstrapping
libmemcached, which is prerequisite for installing pylibmc.
Next, configure your Flask app the following way:
import os
from flask import Flask
from flask_caching import Cache

cache = Cache()
app = Flask(__name__)

cache_servers = os.environ.get('MEMCACHIER_SERVERS')
if cache_servers == None:
    # Fall back to simple in memory cache (development)
    cache.init_app(app, config={'CACHE_TYPE': 'simple'})
else:
    cache_user = os.environ.get('MEMCACHIER_USERNAME') or ''
    cache_pass = os.environ.get('MEMCACHIER_PASSWORD') or ''
    cache.init_app(app,
        config={'CACHE_TYPE': 'SASLMemcachedCache',
                'CACHE_MEMCACHED_SERVERS': cache_servers.split(','),
                'CACHE_MEMCACHED_USERNAME': cache_user,
                'CACHE_MEMCACHED_PASSWORD': cache_pass,
                'CACHE_OPTIONS': { 'behaviors': {
                    # Faster IO
                    'tcp_nodelay': True,
                    # Keep connection alive
                    'tcp_keepalive': True,
                    # Timeout for set/get requests
                    'connect_timeout': 2000, # ms
                    'send_timeout': 750 * 1000, # us
                    'receive_timeout': 750 * 1000, # us
                    '_poll_timeout': 2000, # ms
                    # Better failover
                    'ketama': True,
                    'remove_failed': 1,
                    'retry_timeout': 2,
                    'dead_timeout': 30}}})
After this, you can start writing cache code in your Flask app:
cache.set("foo", "bar")
print cache.get("foo")
Function memoization
Flask-Caching provides a decorator to memoize functions. This basically means
when the function is called, Flask-Cache will check if the result is in the
cache and if it is not it will run the function and save the result to the
cache. The memoize decorator works as follows:
@cache.memoize()
def run_expensive_computation(parameter):
    # ...
    return result
If you need to invalidate stale data you can either delete all memoized results
for a function with cache.delete_memoized(run_expensive_computation) or a
result for a specific parameter with
cache.delete_memoized(run_expensive_computation, parameter).
View caching
Flask-Caching also provides a decorator to cache views:
@bp.route('/', methods=('GET',))
@cache.cached()
def index():
  # ...
  return render_template('index.html', ...)
It is important to note that the @cache.cached() decorator is directly above
the definiton of the index() function, i.e., below the @bp.route()
decorator.
The views are cached with a key of the form 'view/' + request.path. This is
important to know if you ever need to invalidate a cached view. You can do that
with cache.delete('view/'+path_of_stale_view)
Jinja2 snippet caching
Flask-Caching provides a Jinja2 control flow statement to cache snippets.
The statement has the form {% cache timeout, key, ... %} where all additional
parameters after the key are just appended to the key. In practice this may look
as follows:
<!-- Snippet caching example -->
{% for item in list %}
  {% cache None, 'item', item['id']|string %}
  <div>
    <!-- Jinja2 snippet that does something with the item -->
  </div>
  {% endcache %}
{% endfor %}
Here the timeout is None but it can also be a variable that contains a time or
an integer denoting seconds.
The cached snippet from the above example can be invalidated (deleted) as follows:
from flask_caching import make_template_fragment_key
key = make_template_fragment_key('item', vary_on=[str(item.id)])
cache.delete(key)
Session caching
Memcache works well for storing information for short-lived sessions that time out. However, because Memcache is a cache and therefore not persistent, long-lived sessions are better suited to permanent storage options, such as your database.
To store sessions in Memcache, you need Flask-Session.
$ pip install Flask-Session pylibmc
Be sure to update your requirements.txt file with these new requirements
(note that your versions may differ than what’s below):
Flask-Session==0.3.1
pylibmc==1.5.2
Now, configure Flask-Session:
import os
import pylibmc
from flask import Flask
from flask_session import Session

app = Flask(__name__)

servers = os.environ.get('MEMCACHIER_SERVERS').split(',')
username = os.environ.get('MEMCACHIER_USERNAME')
passwd = os.environ.get('MEMCACHIER_PASSWORD')

app.config.from_mapping(
    SESSION_TYPE = 'memcached',
    SESSION_MEMCACHED =
        pylibmc.Client(cache_servers.split(','), binary=True,
                       username=cache_user, password=cache_pass,
                       behaviors={
                            # Faster IO
                            'tcp_nodelay': True,
                            # Keep connection alive
                            'tcp_keepalive': True,
                            # Timeout for set/get requests
                            'connect_timeout': 2000, # ms
                            'send_timeout': 750 * 1000, # us
                            'receive_timeout': 750 * 1000, # us
                            '_poll_timeout': 2000, # ms
                            # Better failover
                            'ketama': True,
                            'remove_failed': 1,
                            'retry_timeout': 2,
                            'dead_timeout': 30,
                       })
)
Session(app)
You can now use sessions in your app like so:
from flask import session
session['key'] = 'value'
session.get('key', 'not set')
PHP
We’ve built a small PHP example.
Source code or
.
Heroku recently improved their PHP support, please see their documentation if you aren’t familiar with the new model.
PHP Memcached Client
We recommended you use the PHP Memcached client to connect with MemCachier. It supports the full protocol and has great performance.
The memcached client is not a pure PHP client but a PECL extension that
makes use of libmemcached. You thus need to install the memcached PECL extension via your
OS package manager. In older operating systems you have to make sure libmemcached
has SASL authentication support enabled but for newer operating systems such as
Ubuntu 16.04 this is the default. After the installation you need to uncomment
;extension=memcached.so in /etc/php/conf.d/memcached.ini for the extension
to work.
On Heroku this dependency is already installed and configured.
First, you’ll need to modify your composer.json file to include the
module:
{
    "require": {
        "php": ">=5.3.2",
        "ext-memcached": "*"
    }
}
Next, ensure that your new requirements are “frozen” to composer.lock by running:
$ composer update
For more information on enabling the extension and potential troubleshooting (e.g. when you don’t have the memcached extension available on your local computer), refer to the using optional extensions extensions section of Heroku’s PHP reference documentation.
Then, you can connect to MemCachier using the client:
require 'vendor/autoload.php';

// create a new persistent client
$m = new Memcached("memcached_pool");
$m->setOption(Memcached::OPT_BINARY_PROTOCOL, TRUE);

// some nicer default options
// - nicer TCP options
$m->setOption(Memcached::OPT_TCP_NODELAY, TRUE);
$m->setOption(Memcached::OPT_NO_BLOCK, FALSE);
// - timeouts
$m->setOption(Memcached::OPT_CONNECT_TIMEOUT, 2000);    // ms
$m->setOption(Memcached::OPT_POLL_TIMEOUT, 2000);       // ms
$m->setOption(Memcached::OPT_RECV_TIMEOUT, 750 * 1000); // us
$m->setOption(Memcached::OPT_SEND_TIMEOUT, 750 * 1000); // us
// - better failover
$m->setOption(Memcached::OPT_DISTRIBUTION, Memcached::DISTRIBUTION_CONSISTENT);
$m->setOption(Memcached::OPT_LIBKETAMA_COMPATIBLE, TRUE);
$m->setOption(Memcached::OPT_RETRY_TIMEOUT, 2);
$m->setOption(Memcached::OPT_SERVER_FAILURE_LIMIT, 1);
$m->setOption(Memcached::OPT_AUTO_EJECT_HOSTS, TRUE);

// setup authentication
$m->setSaslAuthData( getenv("MEMCACHIER_USERNAME")
                   , getenv("MEMCACHIER_PASSWORD") );

// We use a consistent connection to memcached, so only add in the
// servers first time through otherwise we end up duplicating our
// connections to the server.
if (!$m->getServerList()) {
    // parse server config
    $servers = explode(",", getenv("MEMCACHIER_SERVERS"));
    foreach ($servers as $s) {
        $parts = explode(":", $s);
        $m->addServer($parts[0], $parts[1]);
    }
}
You should look at the PHP Memcached client documentation for a list of API calls you can make against MemCachier.
PHP Session Support
You can configure PHP to store sessions in MemCachier as follows.
First, start by configuring an appropriate .user.ini in your document
root (see heroku ini
guide).
It should contain the following:
session.save_handler=memcached
memcached.sess_sasl_username=${MEMCACHIER_USERNAME}
memcached.sess_sasl_password=${MEMCACHIER_PASSWORD}

memcached.sess_binary_protocol=1
session.save_path="${MEMCACHIER_SERVERS}"
memcached.sess_persistent=On
In your code you should then be able to run:
// Enable MemCachier session support
session_start();
$_SESSION['test'] = 42;
Do you get an error FAILED TO SEND AUTHENTICATION TO SERVER and potentially
an associated message no mechanism available? If so, try installing
libsasl2-modules with your OS package manager. libmemcached requires it
for session caching support with SASL.
Alternative PHP Client – MemcacheSASL
This is not our recommended client for using MemCachier from PHP. We recommend the php memcached client. However, it may work better for you if you are running into any problems with the php memcached client.
You should first install the PHPMemcacheSASL client. You can either grab the code directly or use composer for package management. We suggest composer.
First, if using composer, you’ll need to modify your composer.json file to
include the module:
{
    "require": {
        "php": ">=5.3.2",
        "memcachier/php-memcache-sasl": ">=1.0.1"
    }
}
Then, you can connect to MemCachier using the client:
require 'vendor/autoload.php';
use MemCachier\MemcacheSASL;

// Create client
$m = new MemcacheSASL();
$servers = explode(",", getenv("MEMCACHIER_SERVERS"));
foreach ($servers as $s) {
    $parts = explode(":", $s);
    $m->addServer($parts[0], $parts[1]);
}

// Setup authentication
$m->setSaslAuthData( getenv("MEMCACHIER_USERNAME")
                   , getenv("MEMCACHIER_PASSWORD") );

// Test client
$m->add("foo", "bar");
echo $m->get("foo");
Laravel
We’ve built a small Laravel example.
Source code or
.
We also have a tutorial on using Laravel with MemCachier
here.
As of Laravel 5.3, memcached is supported out of the box with the php-memcached
PECL extension. Instructions on how to install php-memcached can be found
here.
Older versions of Laravel require
laravel-memcached-plus for
memcached integration.
Before setting up memcached as your default cache we need to add the
dependency to composer.json:
$ composer require ext-memcached
Then we need to config the cache in config/cache.php:
'memcached' => [
    'driver' => 'memcached',
    'persistent_id' => 'memcached_pool_id',
    'sasl' => [
        env('MEMCACHIER_USERNAME'),
        env('MEMCACHIER_PASSWORD'),
    ],
    'options' => [
        // some nicer default options
        // - nicer TCP options
        Memcached::OPT_TCP_NODELAY => TRUE,
        Memcached::OPT_NO_BLOCK => FALSE,
        // - timeouts
        Memcached::OPT_CONNECT_TIMEOUT => 2000,    // ms
        Memcached::OPT_POLL_TIMEOUT => 2000,       // ms
        Memcached::OPT_RECV_TIMEOUT => 750 * 1000, // us
        Memcached::OPT_SEND_TIMEOUT => 750 * 1000, // us
        // - better failover
        Memcached::OPT_DISTRIBUTION => Memcached::DISTRIBUTION_CONSISTENT,
        Memcached::OPT_LIBKETAMA_COMPATIBLE => TRUE,
        Memcached::OPT_RETRY_TIMEOUT => 2,
        Memcached::OPT_SERVER_FAILURE_LIMIT => 1,
        Memcached::OPT_AUTO_EJECT_HOSTS => TRUE,

    ],
    'servers' => array_map(function($s) {
        $parts = explode(":", $s);
        return [
            'host' => $parts[0],
            'port' => $parts[1],
            'weight' => 100,
        ];
      }, explode(",", env('MEMCACHIER_SERVERS', 'localhost:11211')))
],
For Laravel to use memcached as its cache you will need to set the CACHE_DRIVER
environment variable:
$ heroku config:set CACHE_DRIVER=memcached
Note, if you prefer you may also configure memcached to be your default cache
driver in config/cache.php:
'default' => env('CACHE_DRIVER', 'memcached'),
For more information on how to use the cache in Laravel, we recommend you consult the Laravel caching documentation or our Laravel tutorial.
Use memcached for session storage
Memcached works well for sessions that time out, however, since memcached is a cache and thus not persistent, saving long-lived sessions in memcached might not be ideal. For long-lived sessions consider a permanent storage option such as you database.
Changing the session store from a file (default) to memcached can be done easily by just setting an environment variable:
$ heroku config:set SESSION_DRIVER=memcached
Caching rendered partials
With the help of laravel-partialcache you can also cache rendered partials in Laravel. This is essentially the same as fragment caching in Ruby on Rails. If you have complex partials in your application it is a good idea to cache them because rendering HTML can be a CPU intensive task.
Do not cache partials that include forms with CSRF tokens.
You can add this dependency to your Laravel project with
$ composer require spatie/laravel-partialcache
and it will give you the @cache blade directive. It works just like the
@include directive with a few added parameters.
For example,
@cache('my-complex.partial', ['data' => $data], null, $data->id)
will include my-complex.partial, pass it $data with the identifier data
and cache it forever (null) and add $data->id to the cache key.
You can invalidate this cached partial with from your code with
PartialCache::forget('my-complex.partial', $data->id);.
Caching entire reponses
In Laravel it is also easy to cache the entire rendered HTML response by using
laravel-responsecache. This
is essentially the same as view caching in Ruby on Rails. This package is easy
to use and has good documentation in it’s README. To use this package with
memcached you have to set the environment variable RESPONSE_CACHE_DRIVER to
memcached.
Symfony2
The Symfony2 framework is a great choice with Heroku and MemCachier. It supports caching and storing sessions in Memcache.
First, start by configuring an appropriate .user.ini in your document
root (see heroku ini
guide).
It should contain the following:
session.save_handler=memcached
memcached.sess_binary=1
session.save_path="PERSISTENT=myapp_session ${MEMCACHIER_SERVERS}"
memcached.sess_sasl_username=${MEMCACHIER_USERNAME}
memcached.sess_sasl_password=${MEMCACHIER_PASSWORD}
CakePHP
The CakePHP framework has excellent support for caching and can be easily used
with MemCachier as the provider. To setup CakePHP with MemCachier, you’ll need
to edit the file app/Config/bootstrap.php and add the following lines:
Cache::config('default', array(
    'engine' => 'Memcached',
    'prefix' => 'mc_',
    'duration' => '+7 days',
    'compress' => false,
    'persistent' => 'memcachier',
    'servers' => explode(',', getenv('MEMCACHIER_SERVERS')),
    'login' => getenv('MEMCACHIER_USERNAME'),
    'password' => getenv('MEMCACHIER_PASSWORD'),
    'serialize' => 'php'
));
After that, you should be able to use caching throughout your application like so:
class Post extends AppModel {

    public function newest() {
        $model = $this;
        return Cache::remember('newest_posts', function() use ($model){
            return $model->find('all', array(
                'order' => 'Post.updated DESC',
                'limit' => 10
            ));
        }, 'longterm');
    }
}
The above will fetch the value associated with the key newest_posts from the
cache if it exists. Otherwise, it will execute the function and SQL query,
storing the result in the cache using the newest_posts key.
You can find much more information on how to use caching with CakePHP here.
WordPress
Using MemCachier with the W3 Total Cache WordPress plugin
The W3 Total Cache WordPress plugin supports Memcached as a caching method. MemCachier is protocol-compliant with Memcached (and has several advantages over Memcached) so W3 Total Cache can be configured to use MemCachier to speed up your WordPress site.
Configuring W3 Total Cache to use MemCachier involves two steps:
- Install the Memcached PHP extension.
- Update the appropriate W3 Total Cache settings from WordPress Admin.
Install the Memcached PHP extension
First, check to see if the Memcached PHP extension is installed.
From the WordPress Admin left-hand menu, click Performance, then Dashboard. Then, from the W3 Total Cache dashboard, click compatibility check.
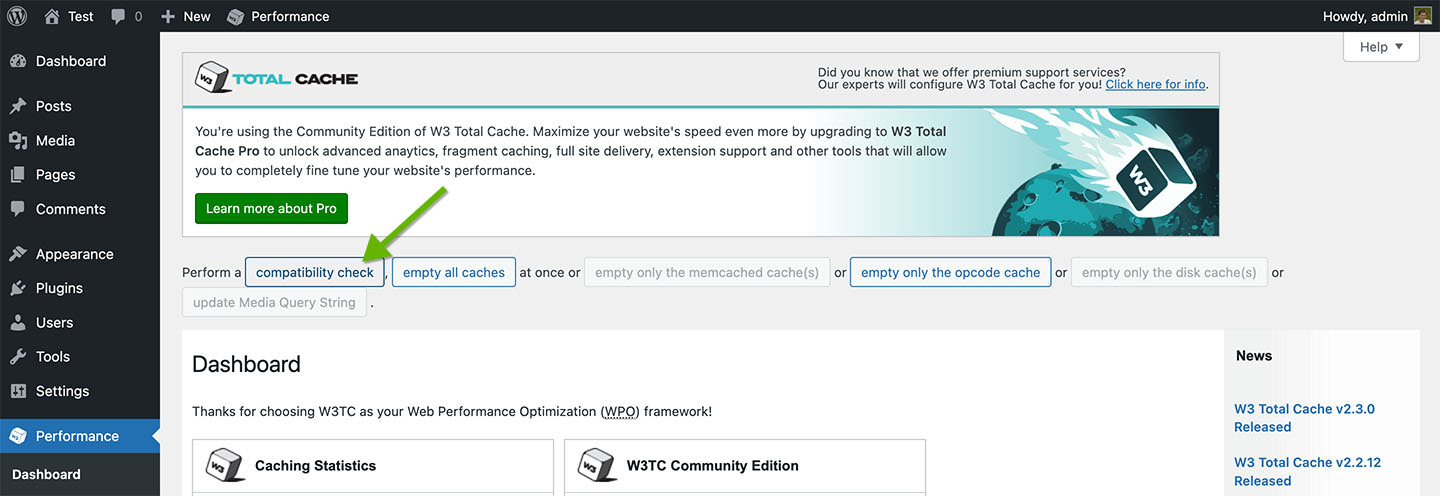
This will run a compatibility check for the various server modules and resources W3 Total Cache can make use of.
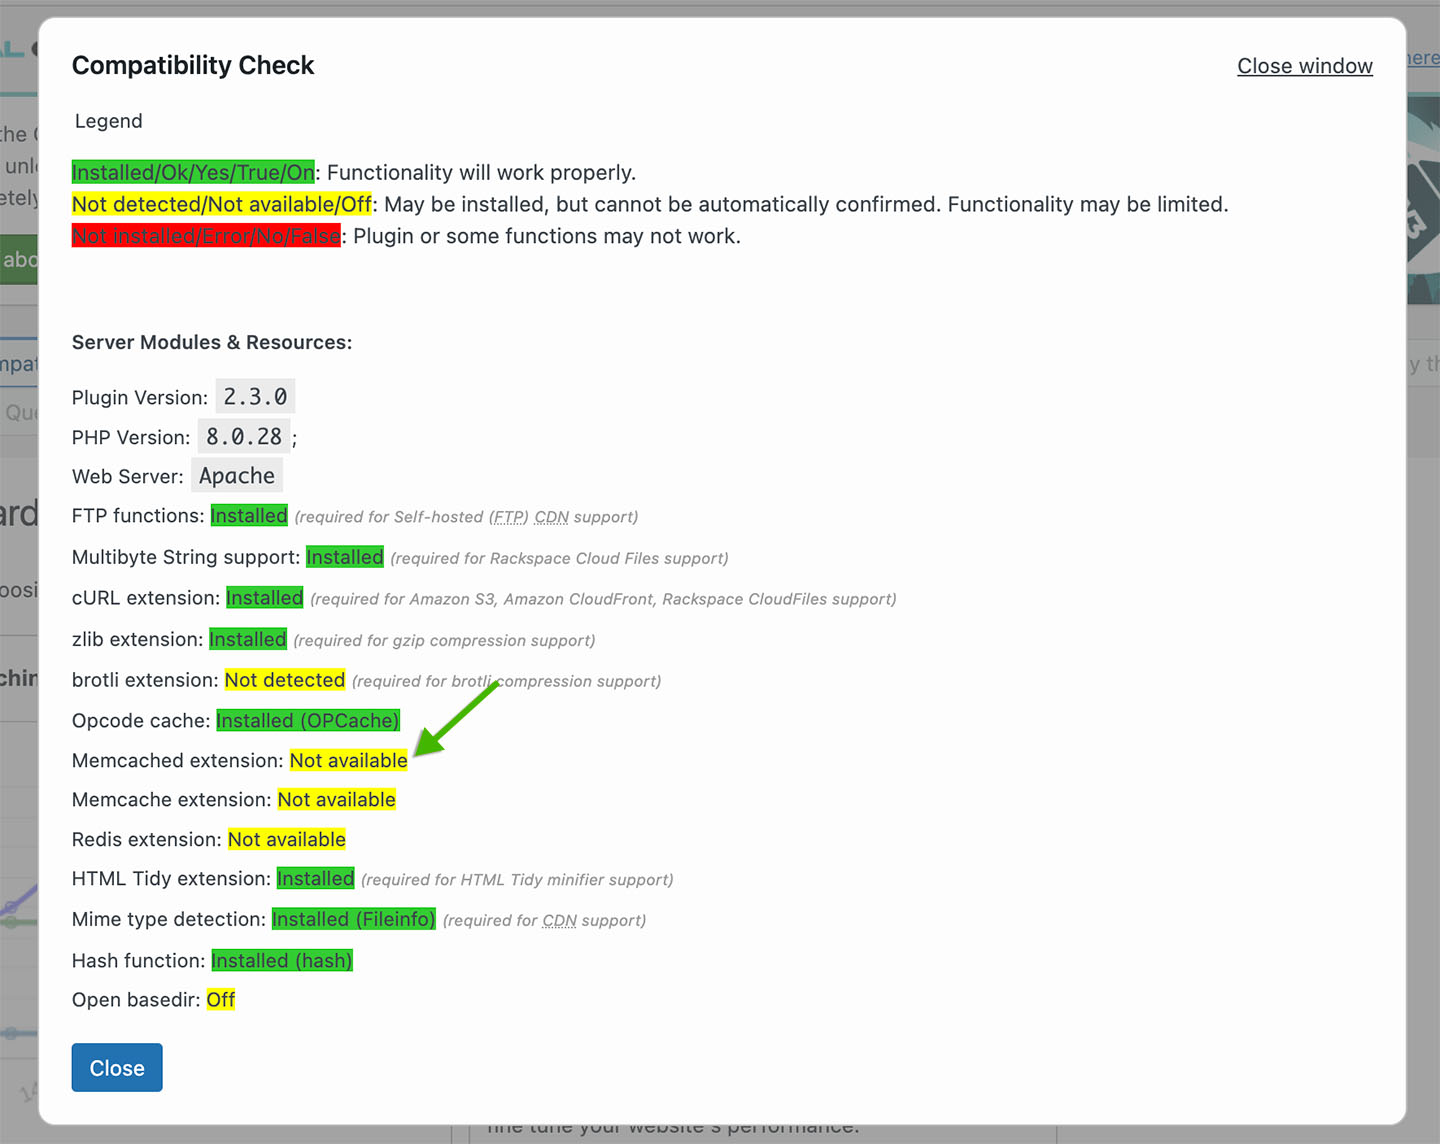
Notice, the Memcached PHP extension is shown as Not available, meaning it is not installed.
Next, install the Memcached PHP extension (not the Memcache extension). Make sure to install a version compatible with your installed version of PHP. Refer to the Compatibility Check results to see your PHP version. In the screenshot 8.0.28 is shown. If the PHP version you see is different, find a compatible extension version and install the appropriate extension version:
Install the Memcached PHP extension with your OS package manager. For example, to install the extension on Ubuntu, run the following command:
sudo apt-get install -y php8.0-memcached
Restart your web server.
Once that is complete, refresh your WordPress Admin browser window and click Compatibility Check again. The Memcached extension should now show as Installed.
W3 Total Cache can now use Memcached as a caching method.
Update W3 Total Cache Settings to use Memcached
To view the W3 Total Cache settings, click Performance on the WordPress Admin left sidebar menu. When you do this for the first time, you’ll be redirected to the W3 Total Cache Setup Guide. For now, click Skip at the bottom of that page. You can rerun it anytime by clicking Setup Guide from the Performance sub-menu.
Next, update the appropriate W3 Total Cache settings from WordPress Admin to use your MemCachier cache as its Memcached caching method.
Memcached can be used as a caching method for the following W3 Total Cache features:
- Page Cache
- Minify
- Database Cache
- Object Cache
- Fragment Cache (available with W3 Total Cache Pro paid plugin)
Configuring each one involves the same two steps:
- Enable the feature, selecting Memcached as the caching method.
- Configure the feature to use your MemCachier cache.
In the following section, you’ll configure the Object Cache. As mentioned, other Memcached-supported features require a very similar configuration process, so these following instructions should enable you to configure any of the other features.
Configuring the W3 Total Cache Object Cache
To enable the Object Cache, from the WordPress Admin left-hand menu, click Performance, then General Settings. Then, scroll down to the Object Cache settings.
Check the Enable checkbox to enable the object cache. Then, select Memcached and save settings.
Provided you con’t have a local Memcached server running, you’ll see the following warning:
The following memcached servers are not responding or not running:
Object Cache: 127.0.0.1:11211.
This message will automatically disappear once the issue is resolved.
This is because W3 Total Cache is configured by default to look for a Memcached server running on host 127.0.0.1 and port 11211.
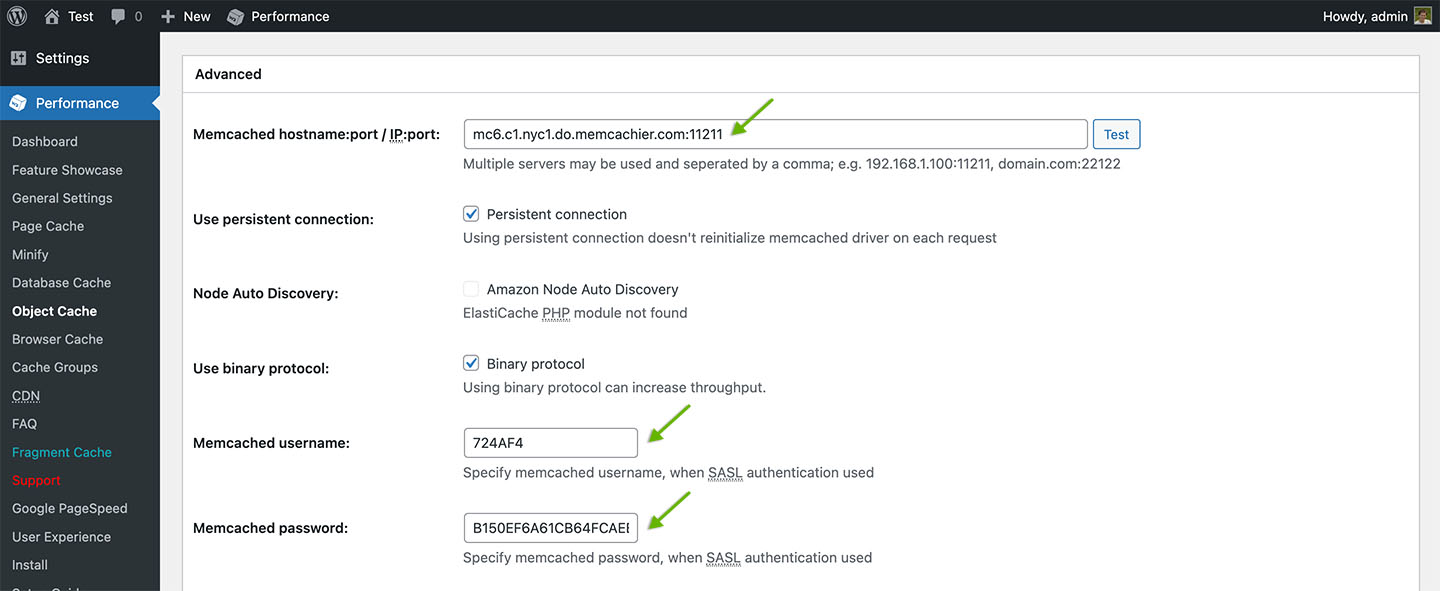
Next, to configure your cache, click Performance, then Object Cache.
Under Advanced, enter your MemCachier cache’s server(s) in Memcached hostname:port / IP:port.
Then, enter your MemCachier cache’s username and password in Memcached username and Memcached password respectively.
Make sure Binary protocol is checked.
Finally, save the settings.
The W3 Total Cache Object Cache is now configured to use MemCachier. You’ll see the following notices at the top of the page:
Plugin configuration successfully updated.
Object caching via memcached is currently enabled
Note that a memcached testing bug was fixed in W3 Total Cache version 2.3.2, released on May 9, 2023.
The bug was related to testing Memcached using SASL authentication and would incorrectly show correctly configured and working caches as not working. When using older versions of the plugin, you will see the following notice after saving settings:
The following memcached servers are not responding or not running:
Object Cache: your_server.memcachier.com:11211.
This message will automatically disappear once the issue is resolved.
Also, due to the same bug, if you clicked the Test button beside Memcached hostname:port / IP:port, you would get an error notification, Test Failed.
Update the W3 Total Cache plugin to the latest version, and those errors will disappear.
Check Memcached is working
To verify you cache is working, check your MemCachier Analytics dashboard.
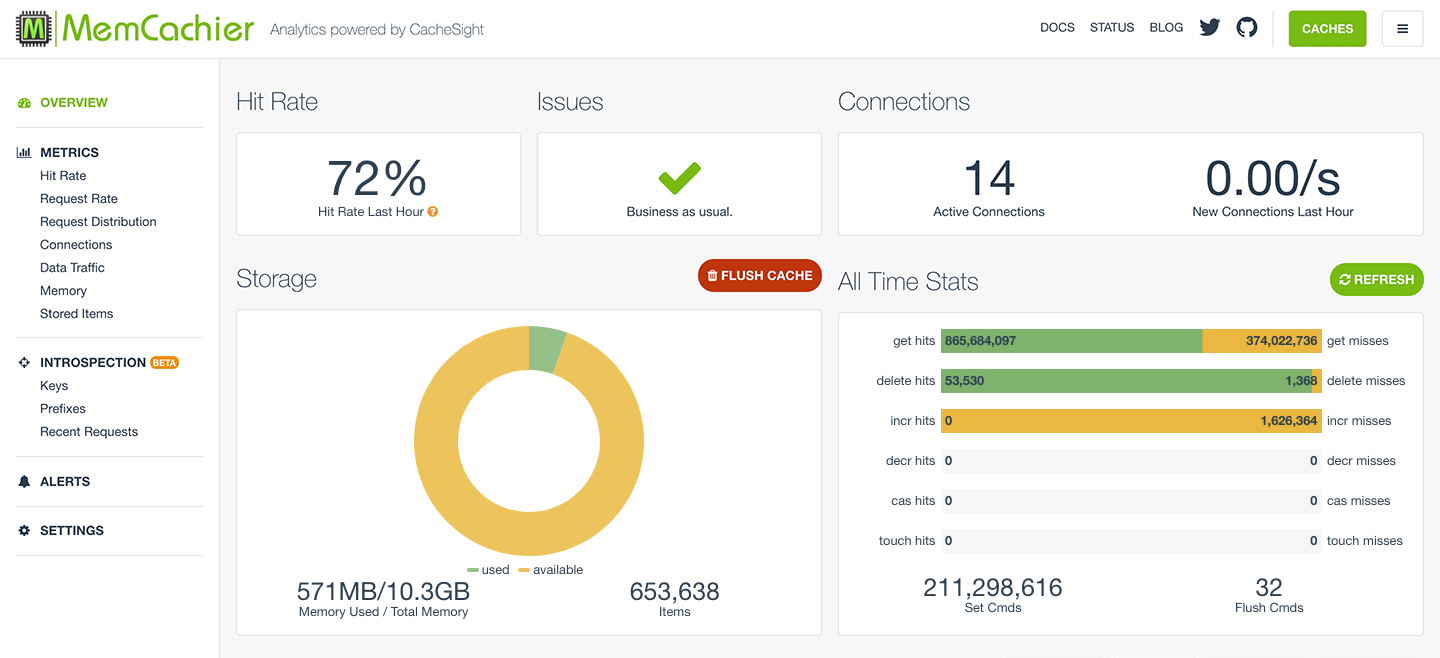
To access your application’s analytics dashboard run:
$ heroku addons:open memcachier
Notice the stats change when you refresh your WordPress website. On the All Time Stats card, you’ll see misses increase initially as items are missed, then stored in your cache. Then, you’ll see hits increase as those items are served from the cache.
WP Object Cache
Another way to use MemCachier with WordPress is with our WordPress Object Cache backend. It integrates the MemCachier caching service with WP Object Cache.
Note, the W3 Total Cache plugin features object caching, so there is no need to use this technique if you are using that plugin. In fact, it would likely be problematic to do so.
If you still want to use WP Object Cache instead of W3 Total Cache, see our tutorial Build a WordPress One-Click application on DigitalOcean and scale it with Memcache. The tutorial uses DigitalOcean as hosting but the WP Object Cache installation part is generally applicable.
Node.js
For Node.js we recommend the use of the memjs client library. It is written and supported by MemCachier itself! To install, use npm:
$ npm install memjs
Using it is straight-forward as memjs understands the MEMCACHIER_SERVERS,
MEMCACHIER_USERNAME and MEMCACHIER_PASSWORD
environment variables that the MemCachier add-on setups.
For example:
var memjs = require('memjs')

var mc = memjs.Client.create(process.env.MEMCACHIER_SERVERS, {
  failover: true,  // default: false
  timeout: 1,      // default: 0.5 (seconds)
  keepAlive: true  // default: false
})

mc.set('hello', 'memcachier', {expires:0}, function(err, val) {
  if(err != null) {
    console.log('Error setting value: ' + err)
  }
})

mc.get('hello', function(err, val) {
  if(err != null) {
    console.log('Error getting value: ' + err)
  }
  else {
    console.log(val.toString('utf8'))
  }
})
Java
For Java we recommend using the XMemcached client. There is also the SpyMemcached client which we have recommended in the past. Many MemCachier customers reported problems with SpyMemcached in the presence of network issues. SpyMemcached seems to have trouble coping with connection timeouts or resets. For this reason we now recommend XMemcached.
We also recommend using Apache Maven or
Gradle as a build tool. Here we show the dependency
configuration for Maven but they are similar for Gradle.
If you aren’t using Maven or Gradle and are instead using
Apache Ant or your own build system, then
simply add the xmemcached or spymemcached jar file as a dependency of your application.
XMemcached
To use XMemcached with Maven you need to add the xmemcached library to
your dependencies in your pom.xml file:
<dependency>
  <groupId>com.googlecode.xmemcached</groupId>
  <artifactId>xmemcached</artifactId>
  <version>2.4.3</version>
</dependency>
If you are using a version older than 2.4.3, please update to the latest version as it contains important bug fixes.
Once your build system is configured, you can start adding caching to your Java app:
import net.rubyeye.xmemcached.MemcachedClient;
import net.rubyeye.xmemcached.MemcachedClientBuilder;
import net.rubyeye.xmemcached.XMemcachedClientBuilder;
import net.rubyeye.xmemcached.auth.AuthInfo;
import net.rubyeye.xmemcached.command.BinaryCommandFactory;
import net.rubyeye.xmemcached.exception.MemcachedException;
import net.rubyeye.xmemcached.utils.AddrUtil;

import java.lang.InterruptedException;
import java.net.InetSocketAddress;
import java.io.IOException;
import java.util.List;
import java.util.concurrent.TimeoutException;

public class App {
  public static void main( String[] args ) {
    List<InetSocketAddress> servers =
      AddrUtil.getAddresses(System.getenv("MEMCACHIER_SERVERS").replace(",", " "));
    AuthInfo authInfo =
      AuthInfo.plain(System.getenv("MEMCACHIER_USERNAME"),
                     System.getenv("MEMCACHIER_PASSWORD"));

    MemcachedClientBuilder builder = new XMemcachedClientBuilder(servers);

    // Configure SASL auth for each server
    for(InetSocketAddress server : servers) {
      builder.addAuthInfo(server, authInfo);
    }

    // Use binary protocol
    builder.setCommandFactory(new BinaryCommandFactory());
    // Connection timeout in milliseconds (default: )
    builder.setConnectTimeout(1000);
    // Reconnect to servers (default: true)
    builder.setEnableHealSession(true);
    // Delay until reconnect attempt in milliseconds (default: 2000)
    builder.setHealSessionInterval(2000);

    try {
      MemcachedClient mc = builder.build();
      try {
        mc.set("foo", 0, "bar");
        String val = mc.get("foo");
        System.out.println(val);
      } catch (TimeoutException te) {
        System.err.println("Timeout during set or get: " +
                           te.getMessage());
      } catch (InterruptedException ie) {
        System.err.println("Interrupt during set or get: " +
                           ie.getMessage());
      } catch (MemcachedException me) {
        System.err.println("Memcached error during get or set: " +
                           me.getMessage());
      }
    } catch (IOException ioe) {
      System.err.println("Couldn't create a connection to MemCachier: " +
                         ioe.getMessage());
    }
  }
}
You may wish to look the xmemcached
Wiki or
JavaDocs.
SpyMemcached
We’ve built a small Java example, using SpyMemcached with Jetty.
Source code or
.
To use SpyMemcached with Maven you need to add the spymemcached library to
your dependencies in your pom.xml file:
<dependency>
  <groupId>spy</groupId>
  <artifactId>spymemcached</artifactId>
  <version>2.12.3</version>
  <scope>provided</scope>
</dependency>
Once your build system is configured, you can start adding caching to your Java app:
import java.io.IOException;
import net.spy.memcached.AddrUtil;
import net.spy.memcached.MemcachedClient;
import net.spy.memcached.ConnectionFactoryBuilder;
import net.spy.memcached.auth.PlainCallbackHandler;
import net.spy.memcached.auth.AuthDescriptor;

public class Foo {
  public static void main(String[] args) {
    AuthDescriptor ad = new AuthDescriptor(
        new String[] { "PLAIN" },
        new PlainCallbackHandler(System.getenv("MEMCACHIER_USERNAME"),
                                 System.getenv("MEMCACHIER_PASSWORD")));
    try {
      MemcachedClient mc = new MemcachedClient(
          new ConnectionFactoryBuilder()
              .setProtocol(ConnectionFactoryBuilder.Protocol.BINARY)
              .setAuthDescriptor(ad).build(),
          AddrUtil.getAddresses(System.getenv("MEMCACHIER_SERVERS")));

      mc.set("foo", 0, "bar");
      System.out.println(mc.get("foo"));
    } catch (IOException ioe) {
      System.err.println("Couldn't create a connection to MemCachier: \nIOException "
              + ioe.getMessage());
    }
  }
}
For convenience, you may want to set the above code up as a new MemCachierClient
class:
package com.memcachier.examples.java;

import java.io.IOException;
import java.net.InetSocketAddress;
import java.util.ArrayList;
import java.util.List;

import javax.security.auth.callback.CallbackHandler;

import net.spy.memcached.ConnectionFactory;
import net.spy.memcached.ConnectionFactoryBuilder;
import net.spy.memcached.MemcachedClient;
import net.spy.memcached.auth.AuthDescriptor;
import net.spy.memcached.auth.PlainCallbackHandler;

public class MemCachierClient extends MemcachedClient {

   public MemCachierClient(String username, String password, String servers) throws IOException {
       this(new SASLConnectionFactoryBuilder().build(username, password), getAddresses(servers));
   }

   public MemCachierClient(ConnectionFactory cf, List<InetSocketAddress> addrs) throws IOException {
       super(cf, addrs);
   }

   private static List<InetSocketAddress> getAddresses(String servers) {
       List<InetSocketAddress> addrList = new ArrayList<InetSocketAddress>();
       for (String server : servers.split(",")) {
           String addr = server.split(":")[0];
           int port = Integer.parseInt(server.split(":")[1]);
           addrList.add(new InetSocketAddress(addr, port));
       }
       return addrList;
   }
}

class SASLConnectionFactoryBuilder extends ConnectionFactoryBuilder {
   public ConnectionFactory build(String username, String password){
       CallbackHandler ch = new PlainCallbackHandler(username, password);
       AuthDescriptor ad = new AuthDescriptor(new String[]{"PLAIN"}, ch);
       this.setProtocol(Protocol.BINARY);
       this.setAuthDescriptor(ad);
       return this.build();
   }
}
It is possible that you will run into Java exceptions about the class loader. (See Spymemcached issue 155. The reported issue also contains a suggested work around.
You may wish to look the spymemcached
JavaDocs or some
more example code to
help in using MemCachier effectively.
There is also a guide on using
WebRunner,
Heroku’s framework to handle sessions with MemCachier.
Spring Boot
We’ve built a small Spring Boot example.
Source code or
.
We also have a tutorial on using Spring Boot with MemCachier
here.
In order to use memcache in Spring you can use
simple-spring-memcached.
It works with both, the XMemcached (recommended) or the SpyMemcached client.
Simple Spring XMemcached
We recommend you use Simple Spring Memcached with the XMemcached client. In
order to do so you need to add the respective dependencies to your pom.xml:
<dependency>
  <groupId>com.google.code.simple-spring-memcached</groupId>
  <artifactId>xmemcached-provider</artifactId>
  <version>4.0.0</version>
</dependency>
<dependency>
  <groupId>com.googlecode.xmemcached</groupId>
  <artifactId>xmemcached</artifactId>
  <version>2.4.3</version>
</dependency>
For version 4.0.0 of simple-spring-memcached it is important that you
explicitly import XMemcached version 2.4.3 as it contains important bug fixes.
To configure Simple Spring Memcached with XMemcached, add the following configuration class to your application:
import java.net.InetSocketAddress;
import java.util.List;
import java.util.Map;
import java.util.HashMap;
import org.springframework.context.annotation.Bean;
import org.springframework.context.annotation.Configuration;
import com.google.code.ssm.CacheFactory;
import com.google.code.ssm.config.AbstractSSMConfiguration;
import com.google.code.ssm.config.DefaultAddressProvider;
import com.google.code.ssm.providers.xmemcached.XMemcachedConfiguration;
import com.google.code.ssm.providers.xmemcached.MemcacheClientFactoryImpl;
import net.rubyeye.xmemcached.auth.AuthInfo;
import net.rubyeye.xmemcached.utils.AddrUtil;

@Configuration
public class MemCachierConfig extends AbstractSSMConfiguration {

  @Bean
  @Override
  public CacheFactory defaultMemcachedClient() {
    String serverString = System.getenv("MEMCACHIER_SERVERS").replace(",", " ");
    List<InetSocketAddress> servers = AddrUtil.getAddresses(serverString);
    AuthInfo authInfo = AuthInfo.plain(System.getenv("MEMCACHIER_USERNAME"),
                                       System.getenv("MEMCACHIER_PASSWORD"));
    Map<InetSocketAddress, AuthInfo> authInfoMap =
      new HashMap<InetSocketAddress, AuthInfo>();
    for(InetSocketAddress server : servers) {
      authInfoMap.put(server, authInfo);
    }

    final XMemcachedConfiguration conf = new XMemcachedConfiguration();
    conf.setUseBinaryProtocol(true);
    conf.setAuthInfoMap(authInfoMap);

    final CacheFactory cf = new CacheFactory();
    cf.setCacheClientFactory(new MemcacheClientFactoryImpl());
    cf.setAddressProvider(new DefaultAddressProvider(serverString));
    cf.setConfiguration(conf);
    return cf;
  }
}
Now you can use the Simple Spring Memcached annotations in your Spring application.
Simple Spring SpyMemcached
If you want to use Simple Spring Memcached with SpyMemcached you need to add the respective dependencies to your pom.xml:
<dependency>
  <groupId>com.google.code.simple-spring-memcached</groupId>
  <artifactId>spymemcached-provider</artifactId>
  <version>4.0.0</version>
</dependency>
To configure Simple Spring Memcached with SpyMemcached, add the following configuration class to your application:
import org.springframework.context.annotation.Bean;
import org.springframework.context.annotation.Configuration;
import com.google.code.ssm.CacheFactory;
import com.google.code.ssm.config.AbstractSSMConfiguration;
import com.google.code.ssm.config.DefaultAddressProvider;
import com.google.code.ssm.providers.spymemcached.SpymemcachedConfiguration;
import com.google.code.ssm.providers.spymemcached.MemcacheClientFactoryImpl;
import net.spy.memcached.auth.AuthDescriptor;
import net.spy.memcached.auth.PlainCallbackHandler;

@Configuration
public class MemCachierConfig extends AbstractSSMConfiguration {

  @Bean
  @Override
  public CacheFactory defaultMemcachedClient() {
    String serverString = System.getenv("MEMCACHIER_SERVERS");
    AuthDescriptor ad = new AuthDescriptor(new String[] { "PLAIN" },
                new PlainCallbackHandler(System.getenv("MEMCACHIER_USERNAME"),
                                         System.getenv("MEMCACHIER_PASSWORD")));

    final SpymemcachedConfiguration conf = new SpymemcachedConfiguration();
    conf.setUseBinaryProtocol(true);
    conf.setAuthDescriptor(ad);

    final CacheFactory cf = new CacheFactory();
    cf.setCacheClientFactory(new MemcacheClientFactoryImpl());
    cf.setAddressProvider(new DefaultAddressProvider(serverString));
    cf.setConfiguration(conf);
    return cf;
  }
}
Now you can use the Simple Spring Memcached annotations in your Spring application.
Use Simple Spring Memcached annotations
To apply caching to functions Simple Spring Memcached provides three main types of annotations:
- @ReadThrough*Cache tries to get a value from the cache. If it does not exist it will execute the function and store the return value in the cache to make sure it is available the next time the function is called.
- @Invalidate*Cache deletes key value pairs from the cache.
- @Update*Cache updates the values for stored keys.
Each type of annotation comes in 3 flavors (to replace the * above):
- Single applies the caching method to a single key that is specified by
a parameter of the annotated function marked with the
@ParameterValueKeyProviderannotation. - Multi applies the caching method to a collection of keys and works the
same as
Singlebut the annotated parameter needs to be aCollection. - Assign applies the caching method to an assigned key defined within the annotation.
These 9 annotations are the meat of Simple Spring Memacached but it offers more annotations to aid your caching needs. For more information consult the Simple Spring Memcached documentation.
Some examples
- Probably the most used annotation is
@ReadThroughSingleCache. It caches the result of complex computation with a key depending on the namespace and the input value. The cached value never expires.
  @ReadThroughSingleCache(namespace = "ComplexComuptation", expiration = 0)
  public ComplexSerializableResult compute(@ParameterValueKeyProvider Long input) {
    // ...
    return result;
  }
- It is important to delete stale data and
@InvalidateAssignCachedoes exactely that for a given key:
  @InvalidateAssignCache(namespace = "TableA", assignedKey = "SumOfColumnX")
  public void saveValueToTableA(TableAObject value) {
    //...
  }
More examples can be found in the Simple Spring Memcached documentation.
Use Spring Caching integration
Spring also has native caching annotations and simple-spring-memcached can
be configured so Spring’s integrated caching is backed by memcache. While it is
a good idea to use Spring’s caching integration if you want the flexibility to
change the underlying store at any time, we generally recommend using the
annotations provided by Simple Spring Memcached as they are specifically
designed to be used with Memcache.
Enabling memcache for Spring’s cache integration requires an additional
dependency in your pom.xml file:
<dependency>
  <groupId>com.google.code.simple-spring-memcached</groupId>
  <artifactId>spring-cache</artifactId>
  <version>4.0.0</version>
</dependency>
To use these annotations you need create a CacheManager bean and set the
@EnableCaching annotation. Concretely, extend the MemCachierConfig shown
above as follows:
// ...
import java.util.Arrays;
import org.springframework.cache.annotation.EnableCaching;
import org.springframework.cache.CacheManager;
import com.google.code.ssm.Cache;
import com.google.code.ssm.spring.ExtendedSSMCacheManager;
import com.google.code.ssm.spring.SSMCache;

@EnableCaching
@Configuration
public class MemCachierConfig extends AbstractSSMConfiguration {

  @Bean
  @Override
  public CacheFactory defaultMemcachedClient() {
    // ...
  }

  @Bean
  public CacheManager cacheManager() throws Exception {
    // Use SSMCacheManager instead of ExtendedSSMCacheManager if you do not
    // need to set per key expiration
    ExtendedSSMCacheManager cacheManager = new ExtendedSSMCacheManager();
    Cache cache = this.defaultMemcachedClient().getObject();
    // SSMCache(cache, 0, false) creates a cache with default key expiration
    // of 0 (no expiration) and flushing disabled (allowClear = false)
    cacheManager.setCaches(Arrays.asList(new SSMCache(cache, 0, false)));
    return cacheManager;
  }
}
Now you can use Spring’s caching annotations, most importantly @Cacheble,
@CacheEvict, and @CachePut.
Note: Spring’s annotations require a cache name. The default cache name
configured by Simple Spring Memcached is "default".
@Cacheableperforms similarly to the@ReadThrough*Cacheannotations explained above: it tries to get a value from the cache but if unavailable, it will execute the function and store the result for future calls to this function with the given parameters.
  @Cacheable("default#3600")
  public ComplexSerializableResult compute(Long input) {
    // ...
    return result;
  }
@Cacheable does not have native support setting expiration times. However,
if you use the ExtendedSSMCacheManager you can set an expriation time by
appending #<seconds> to the cache name. The example above sets the
expiration to one hour. Omitting this appendix falls back to the configured
default expiration time.
@CacheEvictdeletes a value from the cache. This is important to get rid of stale data.
  @CacheEvict("default")
  public void updateValue(ValueId id) {
    //...
  }
@CachePutallows you to add values to the cache and is a great way to optimize your cache. It supports the same options as the@Cacheableannotation.
  @CachePut("default")
  public Value updateValue(ValueId id) {
    //...
    return value;
  }
For more information on these caching annotations and their options consult Spring’s caching documentation and the Spring Caching Integration secion of the Simple Spring Memcached documentation.
Go
Here we explain how you setup and use MemCachier in Go.
We recommend the mc memcache client. It
supports the binary protocol and SASL authentication and was specifically
designed to work well with MemCachier.
However, if you prefer to use gomemcache
we have a fork of gomemcache that works
with MemCachier.
Recommended client: mc
This client is supports the binary protocol and SASL authentication and is maintained by MemCachier. To install it run:
$ go get github.com/memcachier/mc
Next, configure your memcached client in the following way:
username := os.Getenv("MEMCACHIER_USERNAME")
password := os.Getenv("MEMCACHIER_PASSWORD")
server := os.Getenv("MEMCACHIER_SERVERS")

c := mc.NewMC(server, username, password)
defer c.Quit()
This will create a memcache client with default parameters. If you prefer, you can also configure the memcache client like so:
username := os.Getenv("MEMCACHIER_USERNAME")
password := os.Getenv("MEMCACHIER_PASSWORD")
server := os.Getenv("MEMCACHIER_SERVERS")

config := mc.DefaultConfig()
config.Hasher = mc.NewModuloHasher()         // default
config.Retries = 2                           // default
config.RetryDelay = 200 * time.Millisecond   // default
config.Failover = true                       // default
config.ConnectionTimeout = 2 * time.Second   // default
config.DownRetryDelay = 60 * time.Second     // default
config.PoolSize = 1                          // default
config.TcpKeepAlive = true                   // default
config.TcpKeepAlivePeriod = 60 * time.Second // default
config.TcpNoDelay = true                     // default
c := mc.NewMCwithConfig(server, username, password, config)
defer c.Quit()
After this, you can start writing cache code in your app:
exp := 0 // seconds if less than 30 days, unix timestamp if more
flags := 0
cas := 0
_, err := c.Set("foo", "bar", flags, exp, cas)
if err != nil {
    fmt.Printf("Failed to set value: %s\n", err)
}

val, _, _, err := c.Get("foo")
if err != nil {
    fmt.Printf("Failed to fetch value: %s\n", err)
}
fmt.Printf("Got value: %s\n", val)
Alternative client: gomemcache
We highly recommed to use the mc client since it was designed to work well
with MemCachier but using gomemcache is also possilbe. While gomemcache is
a popular memcache client it only supports the ASCII protocol. We have a fork
that allows you to use this client with MemCachier anyway.
To install our version of gomemcache:
$ go get github.com/memcachier/gomemcache
Next, configure your memcached client in the following way:
username := os.Getenv("MEMCACHIER_USERNAME")
password := os.Getenv("MEMCACHIER_PASSWORD")
servers := os.Getenv("MEMCACHIER_SERVERS")

mc := memcache.New(strings.Split(servers, ",")...)
mc.SetAuth(username, []byte(password))
After this, you can start writing cache code in your app:
err := mc.Set(&memcache.Item{Key: "foo", Value: []byte("my value")})
if err != nil {
    fmt.Printf("Failed to set value: %s\n", err)
}

val, err := mc.Get("foo")
if err != nil {
    fmt.Printf("Failed to fetch value: %s\n", err)
}
fmt.Printf("Got value: %s\n", val)
Gin
We’ve built a small Gin example.
Source code or
.
We also have a tutorial on using Gin and MemCachier together
here.
In Gin you can use the standard mc interface to get and set values
as described in our Go documentation to cache results of expensive
computations or database queries:
package main

import (
  "os"
  "fmt"
  "github.com/memcachier/mc"
)

func main() {
  username := os.Getenv("MEMCACHIER_USERNAME")
  password := os.Getenv("MEMCACHIER_PASSWORD")
  servers := os.Getenv("MEMCACHIER_SERVERS")

  mcClient := mc.NewMC(servers, username, password)
  defer mcClient.Quit()

  _, err := mcClient.set("foo", "bar", 0, 0, 0)
  if err != nil {
    fmt.Printf("Failed to set value: %s\n", err)
  }

  val, _, _, err := c.Get("foo")
  if err != nil {
    fmt.Printf("Failed to fetch value: %s\n", err)
  }
  fmt.Printf("Got value: %s\n", val)
}
In addition there are two Gin specific ways to use Memcache:
- Cache rendered views
- Store sessions
Cache rendered views
To cache rendered views you need the gin-contrib/cache library. Now you can
use the CachePage middleware like so:
package main

import (
  "os"
  "github.com/gin-gonic/gin"
  "github.com/gin-contrib/cache"
  "github.com/gin-contrib/cache/persistence"
)

func main() {
    username := os.Getenv("MEMCACHIER_USERNAME")
  password := os.Getenv("MEMCACHIER_PASSWORD")
  servers := os.Getenv("MEMCACHIER_SERVERS")

  mcStore := persistence.NewMemcachedBinaryStore(servers, username, password, persistence.FOREVER)

    router := gin.New()
  router.GET("/", cache.CachePage(mcStore, persistence.DEFAULT, func(c *gin.Context) {
    // ...
  }))
}
Whenever the view changes, e.g., when the content changes, you need to make
sure to invalidate the cached view so it will be re-rendered.
This can be done by deleting the cached item (for the root route in this
case):
mcStore.Delete(cache.CreateKey("/"))
Storing Sessions in Memcache
On Heroku it is a good idea to store sessions in Memcache instead of in a file on disk for two reasons:
- Dynos only have an ephemeral filesystem that is not persisted across restarts.
- You might have multiple dynos which will not share the same ephemeral filesystem.
Memcache works well for sessions that time out, however, since Memcache is a cache and thus not persistent, saving long-lived sessions in Memcache might not be ideal. For long-lived sessions consider a permanent storage option such as your database.
To use sessions in Gin you need gin-contrib/session. You can easily add it
to your Gin app like so:
package main

import (
  "os"
  "github.com/memcachier/mc"
  "github.com/gin-contrib/sessions"
  "github.com/gin-contrib/sessions/memcached"
)

func main() {
    username := os.Getenv("MEMCACHIER_USERNAME")
  password := os.Getenv("MEMCACHIER_PASSWORD")
  servers := os.Getenv("MEMCACHIER_SERVERS")

  mcClient := mc.NewMC(servers, username, password)
  defer mcClient.Quit()

    router := gin.New()
  sessionStore := memcached.NewMemcacheStore(mcClient, "", []byte("secret"))
  router.Use(sessions.Sessions("mysession", sessionStore))
}
Rust
For Rust we recommend the use of the memcached-rs client library. Since version 0.4 it supports SASL authentication and can be used to connect to MemCachier.
Using memcached-rs requires the MEMCACHIER_SERVERS, MEMCACHIER_USERNAME and
MEMCACHIER_PASSWORD environment
variables that the MemCachier add-on setups.
The setup looks as follows:
extern crate memcached;

use std::env;

use memcached::proto::{Operation, ProtoType};
use memcached::Client;

fn main() {
    let servers = env::var("MEMCACHIER_SERVERS").unwrap();
    let username = env::var("MEMCACHIER_USERNAME").unwrap();
    let password = env::var("MEMCACHIER_PASSWORD").unwrap();


    let mut client = Client::connect_sasl(servers.split(',').map(|s| format!("{}{}", "tcp://", s))
                                                            .map(|s| (s, 1))
                                                            .collect::<Vec<(String, usize)>>()
                                                            .as_slice(),
                                          ProtoType::Binary,
                                          &username, &password).unwrap();

    client.set(b"hello", b"MemCachier", 0xdeadbeef, 2).unwrap();
    let (value, flags) = client.get(b"hello").unwrap();


    println!("Got: {}", std::str::from_utf8(&value).unwrap());
    assert_eq!(&value[..], b"MemCachier");
    assert_eq!(flags, 0xdeadbeef);
}
Client library support
MemCachier will work with any memcached binding that supports SASL authentication and the binary protocol. In the following you can find a list of all clients known to us including a description of their most important features. This list is by no means exhaustive and if you know of a client not on this list, don’t hesitate to contact us. All clients marked as supported have been tested with our service.
Clojure
| Library | Supported | Binary protocol | SASL authentication | Cluster support |
|---|---|---|---|---|
| Xmemcached | yes | yes | yes | yes |
Go
| Library | Supported | Binary protocol | SASL authentication | Cluster support |
|---|---|---|---|---|
| mc | yes | yes | yes | yes |
| gomemcache | limited1 | no | limited1 | yes |
| gomemcached | ? | yes | yes | no |
| memcache2 | no | no | no | yes |
| gomemcache (zeayes) | no | yes | no | yes |
1 We have a fork that does ASCII auth and an outstanding PR in the main repository. 2 A high performance fork of gomemcache.
Haskell
| Library | Supported | Binary protocol | SASL authentication | Cluster support |
|---|---|---|---|---|
| memcache | yes | yes | yes | ? |
| memcached | ? | ? | ? | ? |
Java
| Library | Supported | Binary protocol | SASL authentication | Cluster support |
|---|---|---|---|---|
| Xmemcached | yes | yes | yes | yes |
| spymemcached (mirror) | yes | yes | yes | yes |
| Memcached-Java-Client | no | yes | no | ? |
| Folsom | ? | yes | no | ? |
Node.js
| Library | Supported | Binary protocol | SASL authentication | Cluster support |
|---|---|---|---|---|
| memjs | yes | yes | yes | yes |
| memcached | no | no | no | ? |
| memcache | no | no | no | ? |
PHP
| Library | Supported | Binary protocol | SASL authentication | Cluster support |
|---|---|---|---|---|
| php-memcached1 | yes | yes | yes | yes |
| php-memcache-sasl | yes | yes | yes | yes |
| memcached.php | ? | no | no | ? |
| php-memcache | no | yes | yes | ? |
1 Requires libmemcached.
Python
| Library | Supported | Binary protocol | SASL authentication | Cluster support |
|---|---|---|---|---|
| pylibmc1 | yes | yes | yes | yes |
| python-binary-memcached | yes | yes | yes | yes |
| python-memcached | no | no | no | ? |
| pymemcache | no | no | no | no |
| ultramemcache2 | no | no | no | ? |
1 Requires libmemcached which in turn requires libsasl2-modules for session caching support with SASL.
2 C++ bindings.
Ruby
| Library | Supported | Binary protocol | SASL authentication | Cluster support |
|---|---|---|---|---|
| dalli | yes | yes | yes | yes |
| memcached1 | ? | ? | ? | ? |
1 Requires libmemcached.
Rust
| Library | Supported | Binary protocol | SASL authentication | Cluster support |
|---|---|---|---|---|
| memcache | no | yes | no | ? |
| bmemcached | no | yes | no | ? |
| memcached-rs | no | yes | no | ? |
Scala
| Library | Supported | Binary protocol | SASL authentication | Cluster support |
|---|---|---|---|---|
| Shade | yes | yes | yes | ? |
| memcontinuationed | no | no | no | ? |
Sample applications
We’ve built a number of working sample apps, too. Keep in mind they expect
MEMCACHIER_SERVERS, MEMCACHIER_USERNAME, and MEMCACHIER_PASSWORD to be
in the environment.
- Sinatra (Heroku)
- Rails (Heroku)
- Rack::Cache (Heroku)
- Django (Heroku)
- PHP (Heroku)
- Node.js (Heroku)
- Java (Heroku)
- Flask (Heroku)
- Gin (Heroku)
- Spring Boot (Heroku)
- Express.js (Heroku)
- Laravel (Heroku)
We also have a collection of example code that can be a useful reference source.
Local usage
To test your Heroku application locally, you will need to run a local memcached server. MemCachier can only run in Heroku, but because MemCachier and memcached speak the same protocol, you shouldn’t have any issues testing locally. Installation depends on your platform.
This will install memcached without SASL authentication support. This is generally what you want as client code can still try to use SASL auth and memcached will simply ignore the requests which is the same as allowing any credentials. So your client code can run without modification locally and on Heroku.
On Ubuntu:
$ sudo apt-get install memcached
On macOS (with Homebrew):
$ brew install memcached
For Windows you will need to build memcached from source.
For further information and resources (such as the memcached source code) please refer to the Memcached.org homepage
To run memcached simply execute the following command:
$ memcached -v
MemCachier Analytics
MemCachier analytics surfaces the most important metrics for you, so you can understand your cache’s performance at a glance.
The analytics dashboard enables developers to measure performance and troubleshoot issues for Memcached. Make sure your caching strategy is working as planned with unique insight into its performance.
To access your application’s analytics dashboard run:
$ heroku addons:open memcachier
MemCachier analytics are powered by CacheSight. See the CacheSight documentation for a detailed explanation of all of our analytics dashboard features.
All dashboard features are also available via our API
Analytics API V2
Note, you can also access features available on the analytics dashboard via the API.
Authentication
MemCachier uses credentials to allow access to the API. After you’ve created a cache, you can find your cache ID and credentials on the Settings page of your analytics dashboard . Only credentials that have the API capability will be allowed to use this API.
MemCachier expects for your credentials to be included in the header of all API requests.
curl https://analytics.memcachier.com/api/v2/caches/<cache_id>/<action> \
  --user <username>:<password>
Make sure to replace <username>:<password> and <cache_id> with your credential
username and password, and your cache ID, found on the Settings page of your analytics dashboard.
Info
Returns all information relating to a cache. This includes cache, credential, and cluster related information.
HTTP Request
GET https://analytics.memcachier.com/api/v2/caches/<cache_id>/info
Responses
| Status | Response |
|---|---|
| 200 | A cache object |
| 400 | The specified cache ID is invalid (not a number). |
| 401 | Unauthorized to access cache with this ID. |
| 403 | Forbidden to access cache with this ID. |
| 5XX | Unexpected error. |
Example
curl https://analytics.memcachier.com/api/v2/caches/<cache_id>/info \
  --user <username>:<password>
Returns
{
  "id": 4,
  "name": "ABCDEF",
  "label": "string",
  "cache_type": "memcachier",
  "plan": 26214400,
  "provider": "ec2",
  "enabled": true,
  "cluster_name": "string",
  "servers": [
    "string"
  ],
  "credentials": [
    {
      "id": 0,
      "cache_id": 0,
      "sasl_username": "string",
      "sasl_password": "pa$$word",
      "write_capability": true,
      "flush_capability": true,
      "api_capability": true,
      "primary": true
    }
  ],
  "can_switch": true,
  "can_manage_credentials": true,
  "can_update_capabilities": true
}
Credentials
List Credentials
The endpoint returns a list of all the credentials connected to the cache.
HTTP Request
GET https://analytics.memcachier.com/api/v2/caches/<cache_id>/credentials
Responses
| Status | Response |
|---|---|
| 200 | A list of credentials |
| 400 | The specified cache ID is invalid (not a number). |
| 401 | Unauthorized to access cache with this ID. |
| 403 | Forbidden to access cache with this ID. |
| 5XX | Unexpected error. |
Example
curl https://analytics.memcachier.com/api/v2/caches/<cache_id>/credentials \
  --user <username>:<password>
Returns
[
  {
    "id": 0,
    "cache_id": 0,
    "sasl_username": "string",
    "sasl_password": "pa$$word",
    "write_capability": true,
    "flush_capability": true,
    "api_capability": true,
    "primary": true
  },
  // ...
]
Create Credentials
This endpoint creates a new set of credentials which can be used to connect to the cache.
Note, development caches cannot manage credentials.
HTTP Request
POST https://analytics.memcachier.com/api/v2/caches/<cache_id>/credentials
Responses
| Status | Response |
|---|---|
| 201 | The newly created credential set. |
| 400 | The specified cache ID is invalid (not a number). |
| 401 | Unauthorized to access cache with this ID. |
| 403 | Not allowed to manage credentials, or Forbidden to access cache with this ID. |
| 5XX | Unexpected error. |
Example
curl -X POST https://analytics.memcachier.com/api/v2/caches/<cache_id>/credentials \
  --user <username>:<password>
Returns
{
  "id": 0,
  "cache_id": 0,
  "sasl_username": "string",
  "sasl_password": "pa$$word",
  "write_capability": true,
  "flush_capability": true,
  "api_capability": true,
  "primary": true
}
Update Credentials
This endpoint updates the capabilities of a specific set of credentials.
Note, sasl_username is your credential_username.
HTTP Request
PATCH https://analytics.memcachier.com/api/v2/caches/<cache_id>/credentials/<credential_username>
Request Body
Note, if you omit a capability from the request body its value will be set to false.
{
  "write_capability": boolean,
  "flush_capability": boolean,
  "api_capability": boolean
}
Responses
| Status | Response |
|---|---|
| 200 | Update successful |
| 400 | The specified cache ID is invalid (not a number). |
| 401 | Unauthorized to access cache with this ID. |
| 403 | Not allowed to manage credentials, or Forbidden to access cache with this ID. |
| 5XX | Unexpected error. |
Example
curl -X PATCH https://analytics.memcachier.com/api/v2/caches/<cache_id>/credentials/<credential_username> \
  --user <username>:<password> \
  -H 'Content-Type: application/json' \
  -d '{"write_capability":true,"flush_capability":false,"api_capability":true}'
Returns
{
  "flush_capability": false,
  "write_capability": false,
  "api_capability": true,
}
Delete Credentials
This endpoint deletes a set of credentials.
HTTP Request
DELETE https://analytics.memcachier.com/api/v2/caches/<cache_id>/credentials/<credential_username>
Responses
| Status | Response |
|---|---|
| 200 | Delete successful |
| 400 | The specified cache ID is invalid (not a number). |
| 401 | Unauthorized to access cache with this ID. |
| 403 | Not allowed to manage credentials, or Forbidden to access cache with this ID. |
| 5XX | Unexpected error. |
Example
curl -X DELETE https://analytics.memcachier.com/api/v2/caches/<cache_id>/credentials/<credential_username> \
  --user <username>:<password>
Promote Credentials
This endpoint promotes a set of credentials to be your primary credentials.
HTTP Request
POST https://analytics.memcachier.com/api/v2/caches/<cache_id>/credentials/primary/<credential_username>
Responses
| Status | Response |
|---|---|
| 200 | Update successful |
| 400 | The specified cache ID is invalid (not a number). |
| 401 | Unauthorized to access cache with this ID. |
| 403 | Forbidden to access cache with this ID. |
| 5XX | Unexpected error. |
Example
curl -X POST https://analytics.memcachier.com/api/v2/caches/<cache_id>/credentials/primary/<credential_username> \
  --user <username>:<password>
Returns
{
  "id": 0,
  "cache_id": 0,
  "sasl_username": "string",
  "sasl_password": "pa$$word",
  "write_capability": true,
  "flush_capability": true,
  "api_capability": true,
  "primary": true
}
Management
Rotate SSO Token
Rotate SSO secret for analytics dashboard, invalidating dashboard URLs.
HTTP Request
POST https://analytics.memcachier.com/api/v2/caches/<cache_id>/rotate_sso
Responses
| Status | Response |
|---|---|
| 200 | SSO rotation successful |
| 400 | The specified cache ID is invalid (not a number). |
| 401 | Unauthorized to access cache with this ID. |
| 403 | Forbidden to access cache with this ID. |
| 5XX | Unexpected error. |
Example
curl -X POST https://analytics.memcachier.com/api/v2/caches/<cache_id>/rotate_sso \
  --user <username>:<password>
Returns
string
Enable Cache
Enable a disabled cache.
HTTP Request
POST https://analytics.memcachier.com/api/v2/caches/<cache_id>/enable_cache
Responses
| Status | Response |
|---|---|
| 200 | Enabled cache successfully |
| 400 | The specified cache ID is invalid (not a number). |
| 401 | Unauthorized to access cache with this ID. |
| 403 | Forbidden to access cache with this ID. |
| 5XX | Unexpected error. |
Example
curl -X POST https://analytics.memcachier.com/api/v2/caches/<cache_id>/enable_cache \
  --user <username>:<password>
Switch Cluster
Switch to a different cluster.
HTTP Request
POST https://analytics.memcachier.com/api/v2/caches/<cache_id>/switch_cluster
Responses
| Status | Response |
|---|---|
| 200 | Cluster change successful |
| 400 | The specified cache ID is invalid (not a number). |
| 401 | Unauthorized to access cache with this ID. |
| 403 | Forbidden to access cache with this ID. |
| 5XX | Unexpected error. |
Example
curl -X POST https://analytics.memcachier.com/api/v2/caches/<cache_id>/switch_cluster \
  --user <username>:<password>
Returns
New cluster name.
string
Commands
Flush
Flush the cache.
HTTP Request
POST https://analytics.memcachier.com/api/v2/caches/<cache_id>/flush
Responses
| Status | Response |
|---|---|
| 204 | Flushed cache successfully |
| 400 | Failed to flush cache, or The specified cache ID is invalid (not a number). |
| 404 | Cache not found. |
| 5XX | Unexpected error. |
Example
curl -X POST https://analytics.memcachier.com/api/v2/caches/<cache_id>/flush \
  --user <username>:<password>
Reset Stats
Reset stats.
HTTP Request
POST https://analytics.memcachier.com/api/v2/caches/<cache_id>/reset_stats
Responses
| Status | Response |
|---|---|
| 204 | Reset stats successfully |
| 400 | Failed to reset stats, or The specified cache ID is invalid (not a number). |
| 404 | Cache not found. |
| 5XX | Unexpected error. |
Example
curl -X POST https://analytics.memcachier.com/api/v2/caches/<cache_id>/reset_stats \
  --user <username>:<password>
Get Stats
Get stats for a cache.
HTTP Request
GET https://analytics.memcachier.com/api/v2/caches/<cache_id>/stats
Responses
| Status | Response |
|---|---|
| 200 | Stats for this cache |
| 400 | Failed to get stats, or The specified cache ID is invalid (not a number). |
| 404 | Cache not found. |
| 5XX | Unexpected error. |
Example
curl https://analytics.memcachier.com/api/v2/caches/<cache_id>/stats \
  --user <username>:<password>
Returns
{
  "auth_cmds": 0,
  "auth_errors": 0,
  "bytes": 0,
  "bytes_read": 0,
  "bytes_written": 0,
  "cas_badval": 0,
  "cas_hits": 0,
  "cas_misses": 0,
  "cmd_delete": 0,
  "cmd_flush": 0,
  "cmd_get": 0,
  "cmd_set": 0,
  "cmd_touch": 0,
  "curr_connections": 0,
  "curr_items": 0,
  "decr_hits": 0,
  "decr_misses": 0,
  "delete_hits": 0,
  "delete_misses": 0,
  "evictions": 0,
  "expired": 0,
  "get_hits": 0,
  "get_misses": 0,
  "incr_hits": 0,
  "incr_misses": 0,
  "limit_maxbytes": 0,
  "time": 0,
  "total_connections": 0,
  "total_items": 0,
  "touch_hits": 0,
  "touch_misses": 0
}
Insight
Get Processed Stats Aggregate
Get processed stats aggregate for all servers.
The granularity of the timeseries depends on the start and end time. Up to 24 hours gets 1 minute granularity, up to 1 week gets 10 minute granularity, up to 3 month gets hour granularity, and above that gets day granularity.
HTTP Request
GET https://analytics.memcachier.com/api/v2/caches/<cache_id>/insight/processed_stats
Query Parameters
| Parameter | Default | Description |
|---|---|---|
| names | No default. Required. | The name(s) of the stats. Possible values: auth_cmds_rate, auth_errors_rate, bytes, bytes_read_rate, bytes_write_rate, cas_badval_rate, cas_fraction, cas_hit_rate, cas_rate, connection_rate, connections, decr_fraction, decr_hit_rate,decr_rate, delete_fraction, delete_hit_rate, delete_rate, eviction_rate, flush_fraction, flush_rate, get_expired_rate, get_fraction, get_hit_rate, get_rate, hit_rate, incr_fraction, incr_hit_rate, incr_rate, items,max_bytes, request_rate, set_fraction, set_rate, touch_fraction, touch_hit_rate, touch_rate |
| startTime | 24h ago | The start time of the timeseries data. |
| endTime | Now | The end time of the timeseries data. |
Responses
| Status | Response |
|---|---|
| 200 | Processed stats for this cache. |
| 400 | Failed to query InfluxDB, or InfluxDB query returned error, or query parameter names is required, or the specified cache ID is invalid (not a number). |
| 404 | Cache not found. |
| 5XX | Unexpected error. |
Example
curl https://analytics.memcachier.com/api/v2/caches/<cache_id>/insight/processed_stats?names=auth_cmds_rate,auth_errors_rate,bytes&startTime=2023-01-08T15:20:00Z&endTime=2023-01-10T15:20:00Z \
  --user <username>:<password>
Returns
[
  {
    "name": "processed_stats",
    "columns": [
      "time",
      "auth_cmds_rate",
      "auth_errors_rate",
      "bytes"
    ],
    "values": [
      [
        "2023-01-10T15:20:00Z",
        0,
        0,
        0
      ],
      ...
    ]
  }
]
Get Processed Stats Per Server
Get processed stats per server.
The granularity of the timeseries depends on the start and end time. Up to 24 hours gets 1 minute granularity, up to 1 week gets 10 minute granularity, up to 3 month gets hour granularity, and above that gets day granularity.
HTTP Request
GET https://analytics.memcachier.com/api/v2/caches/<cache_id>/insight/processed_stats/per_server
Query Parameters
| Parameter | Default | Description |
|---|---|---|
| names | No default. Required. | The name(s) of the stats. Possible values: auth_cmds_rate, auth_errors_rate, bytes, bytes_read_rate, bytes_write_rate, cas_badval_rate, cas_fraction, cas_hit_rate, cas_rate, connection_rate, connections, decr_fraction, decr_hit_rate,decr_rate, delete_fraction, delete_hit_rate, delete_rate, eviction_rate, flush_fraction, flush_rate, get_expired_rate, get_fraction, get_hit_rate, get_rate, hit_rate, incr_fraction, incr_hit_rate, incr_rate, items,max_bytes, request_rate, set_fraction, set_rate, touch_fraction, touch_hit_rate, touch_rate |
| startTime | 24h ago | The start time of the timeseries data. |
| endTime | Now | The end time of the timeseries data. |
Responses
| Status | Response |
|---|---|
| 200 | Processed stats for this cache. |
| 400 | Failed to query InfluxDB, or InfluxDB query returned error, or query parameter names is required, or the specified cache ID is invalid (not a number). |
| 404 | Cache not found. |
| 5XX | Unexpected error. |
Example
curl https://analytics.memcachier.com/api/v2/caches/<cache_id>/insight/processed_stats/per_server?names=auth_cmds_rate,auth_errors_rate,bytes&startTime=2023-01-08T15:20:00Z&endTime=2023-01-10T15:20:00Z \
  --user <username>:<password>
Returns
[
  {
    "name": "processed_stats",
    "tags": {
      "server": "your.server.memcachier.com:11211"
    },
    "columns": [
      "time",
      "hit_rate",
      "bytes",
      "max_bytes"
    ],
    "values": [
      [
        "2023-01-10T15:20:00Z",
        0,
        0,
        0
      ],
      ...
    ]
  },
  ...
]
Get Latency
Get latency for cache in nanoseconds, grouped by server. The granularity of the timeseries depends on the start and end time. Up to 24 hours gets 20s granularity, up to 1 week gets 10 minute granularity, up to 3 month gets hour granularity, and above that gets day granularity.
HTTP Request
GET https://analytics.memcachier.com/api/v2/caches/<cache_id>/insight/latency
Query Parameters
| Parameter | Default | Description |
|---|---|---|
| startTime | 24h ago | The start time of the timeseries data. |
| endTime | Now | The end time of the timeseries data. |
Responses
| Status | Response |
|---|---|
| 200 | Latency for this cache in nanoseconds. |
| 400 | Failed to query InfluxDB, or InfluxDB query returned error, or query parameter names is required, or the specified cache ID is invalid (not a number). |
| 404 | Cache not found. |
| 5XX | Unexpected error. |
Example
curl https://analytics.memcachier.com/api/v2/caches/<cache_id>/insight/latency?startTime=2023-01-08T15:20:00Z&endTime=2023-01-10T15:20:00Z \
  --user <username>:<password>
Returns
[
  {
    "name": "latency",
    "tags": {
      "server": "your.server.memcachier.com:11211"
    },
    "columns": [
      "time",
      "duration"
    ],
    "values": [
      [
        "2023-01-08T15:20:00Z",
        2416805.75
      ],
      ...
    ]
  },
  ...
]
Alerts
List Alerts
Get all alerts.
HTTP Request
GET https://analytics.memcachier.com/api/v2/caches/<cache_id>/alerts
Responses
| Status | Response |
|---|---|
| 200 | An array of alert objects. |
| 400 | Alerts could not be retrieved. |
| 5XX | Unexpected error. |
Example
curl https://analytics.memcachier.com/api/v2/caches/<cache_id>/alerts \
  --user <username>:<password>
Returns
[
  {
  "id": 4,
  "trigger_type": "string", // "hit_rate" or "memory_usage"
  "trigger_threshold": 90,  // percentage 0-100
  "delivery_config_id": 4,
  "description": "string",
  "enabled": true
  },
  ...
]
Create Alert
Create a new alert.
HTTP Request
POST https://analytics.memcachier.com/api/v2/caches/<cache_id>/alerts
Request Body
{
  "trigger_type": "string", // "hit_rate" or "memory_usage"
  "trigger_threshold": 0, // percentage 0-100
  "delivery_config_id": 0,
  "description": "string",
  "enabled": boolean
}
Responses
| Status | Response |
|---|---|
| 201 | Added alert successfully. |
| 400 | The alert could not be added. An alert requires a type. |
| 5XX | Unexpected error. |
Example
curl -X POST https://analytics.memcachier.com/api/v2/caches/<cache_id>/alerts \
  --user <username>:<password> \
  -H 'Content-Type: application/json' \
  -d '{"trigger_type":"hit_rate","trigger_threshold":50,"delivery_config_id":1,"description":"This is a description.","enabled":true}'
Returns
{
  "id": 4,
  "trigger_type": "hit_rate",
  "trigger_threshold": 50,
  "delivery_config_id": 1,
  "description": "This is a description.",
  "enabled": true
}
Get Alert
Get an alert by ID.
HTTP Request
GET https://analytics.memcachier.com/api/v2/caches/<cache_id>/alerts/<alert_id>
Responses
| Status | Response |
|---|---|
| 200 | An alert object. |
| 400 | The specified alert ID is invalid (not a number). |
| 5XX | Unexpected error. |
Example
curl https://analytics.memcachier.com/api/v2/caches/<cache_id>/alerts/<alert_id> \
  --user <username>:<password>
Returns
{
  "id": 4,
  "trigger_type": "string", // "hit_rate" or "memory_usage"
  "trigger_threshold": 80, // percentage 0-100
  "delivery_config_id": 4,
  "description": "string",
  "enabled": true
}
Update Alert
Updates an alert.
HTTP Request
PUT https://analytics.memcachier.com/api/v2/caches/<cache_id>/alerts/<alert_id>
Request Body
{
  "id": 0,
  "trigger_type": "string", // "hit_rate" or "memory_usage"
  "trigger_threshold": 0, // percentage 0-100
  "delivery_config_id": 0,
  "description": "string",
  "enabled": boolean
}
Responses
| Status | Response |
|---|---|
| 201 | Updated alert successfully. |
| 400 | The specified alert ID is invalid (not a number), or the alert could not be updated. |
| 5XX | Unexpected error. |
Example
curl -X PUT https://analytics.memcachier.com/api/v2/caches/<cache_id>/alerts/<alert_id> \
  --user <username>:<password> \
  -H 'Content-Type: application/json' \
  -d '{"id":<alert_id>,"enabled":false}'
Returns
{
  "id": 4,
  "trigger_type": "string", // "hit_rate" or "memory_usage"
  "trigger_threshold": 50, // percentage 0-100
  "delivery_config_id": 1,
  "description": "string",
  "enabled": false,
}
Delete Alert
Deletes an alert.
HTTP Request
DELETE https://analytics.memcachier.com/api/v2/caches/<cache_id>/alerts/<alert_id>
Responses
| Status | Response |
|---|---|
| 201 | Deleted alert successfully. |
| 400 | The specified alert ID is invalid (not a number), or the alert could not be deleted. |
| 5XX | Unexpected error. |
Example
curl -X DELETE https://analytics.memcachier.com/api/v2/caches/<cache_id>/alerts/<alert_id> \
  --user <username>:<password>
List Delivery Configs
List alert delivery configs.
HTTP Request
GET https://analytics.memcachier.com/api/v2/caches/<cache_id>/alerts/configs
Responses
| Status | Response |
|---|---|
| 200 | An array of alert delivery configs. |
| 400 | Alert delivery configs could not be retrieved. |
| 5XX | Unexpected error. |
Example
curl https://analytics.memcachier.com/api/v2/caches/<cache_id>/alerts/configs \
  --user <username>:<password>
Returns
[
  {
    "id": 1,
    "delivery_type": "string", // "email" or "slack"
    "email": "string",
    "slack_url": "string",
    "slack_channel": "string"
  },
  ...
]
Create Delivery Config
Create an alert delivery config.
HTTP Request
POST https://analytics.memcachier.com/api/v2/caches/<cache_id>/alerts/configs
Request Body
{

"delivery_type": "string", // "email" or "slack"
"email": "string",
"slack_url": "string",
"slack_channel": "string"
}
Responses
| Status | Response |
|---|---|
| 201 | Added alert delivery config successfully. |
| 400 | The alert delivery config could not be added. An alert delivery config requires a type. |
| 5XX | Unexpected error. |
Example
curl -X POST https://analytics.memcachier.com/api/v2/caches/<cache_id>/alerts/configs \
  --user <username>:<password> \
  -H 'Content-Type: application/json' \
  -d '{"delivery_type":"slack","slack_url":"https://hooks.slack.com/services/...","slack_channel":"#alerts"}'
Returns
{
  "id": 1,
  "delivery_type": "slack",
  "email": "",
  "slack_url": "https://hooks.slack.com/services/...",
  "slack_channel": "#alerts"
}
Delete Delivery Config
Delete an alert delivery config.
HTTP Request
DELETE https://analytics.memcachier.com/api/v2/caches/<cache_id>/alerts/configs/<config_id>
| Status | Response |
|---|---|
| 204 | Delete successful. |
| 400 | The specified alert delivery config ID is invalid (not a number), or the alert delivery config could not be deleted. |
| 5XX | Unexpected error. |
Example
curl -X DELETE https://analytics.memcachier.com/api/v2/caches/<cache_id>/alerts/configs/<config_id> \
  --user <username>:<password>
Introspection
Get Logs
Get the last 100 log lines for cache.
HTTP Request
GET https://analytics.memcachier.com/api/v2/caches/<cache_id>/introspection/recent_logs
Responses
| Status | Response |
|---|---|
| 200 | Recent logs per server. |
| 400 | The specified cache ID is invalid (not a number). |
| 401 | Unauthorized to access cache with this ID. |
| 403 | Forbidden to access cache with this ID. |
| 5XX | Unexpected error. |
Example
curl https://analytics.memcachier.com/api/v2/caches/<cache_id>/introspection/recent_logs \
  --user <username>:<password>
Returns
{
  "a.b.c.example-server.com:12345": [
    {
      "timestamp": "2023-01-11T10:10:44Z",
      "key": "",
      "command": "STATS",
      "status": "OK",
      "size": 0
    },
    ...
  ]
}
Get Compound Stats
Get compound stats for cache.
HTTP Request
GET https://analytics.memcachier.com/api/v2/caches/<cache_id>/introspection/compound_stats
Query Parameters
| Parameter | Default | Description |
|---|---|---|
| startTime | 24h ago | The start time of the timeseries data. |
| endTime | Now | The end time of the timeseries data. |
Responses
| Status | Response |
|---|---|
| 200 | An array of compound stats. |
| 400 | The specified cache ID is invalid (not a number). |
| 401 | Unauthorized to access cache with this ID. |
| 403 | Forbidden to access cache with this ID. |
| 5XX | Unexpected error. |
Example
curl https://analytics.memcachier.com/api/v2/caches/<cache_id>/introspection/compound_stats?startTime=2023-01-08T15:20:00Z&endTime=2023-01-10T15:20:00Z \
  --user <username>:<password>
Returns
[
  {
    "name": "compound_stats",
    "columns": [
      "time",
      "num_keys",
      "total_size",
      "total_hits_rate",
      "total_misses_rate",
      "total_mutations_rate"
    ],
    "values": [
      [
        "2023-01-10T15:20:00Z",
        0,
        0,
        0,
        0,
        0
      ],
      ...
    ]
  }
]
Get Popular Items
Get popular items for cache.
HTTP Request
GET https://analytics.memcachier.com/api/v2/caches/<cache_id>/introspection/popular_items
Responses
| Status | Response |
|---|---|
| 200 | A popular items object |
| 400 | The specified cache ID is invalid (not a number). |
| 401 | Unauthorized to access cache with this ID. |
| 403 | Forbidden to access cache with this ID. |
| 5XX | Unexpected error. |
Example
curl https://analytics.memcachier.com/api/v2/caches/<cache_id>/introspection/popular_items \
  --user <username>:<password>
Returns
{
  "time_slice": 186554450945,
  "most_hit_keys": [
    {
      "name": "string",
      "popularity": 0
    },
    ...
  ],
  "most_missed_keys": [
    {
      "name": "string",
      "popularity": 0
    },
    ...
  ],
  "most_mutated_keys": [
    {
      "name": "string",
      "popularity": 0
    },
    ...
  ],
  "popular_prefixes": [
    {
      "name": "string",
      "popularity": 0
    },
    ...
  ]
}
Get Key Stats
Get stats for a key by its name.
HTTP Request
GET https://analytics.memcachier.com/api/v2/caches/<cache_id>/introspection/key_stats
Query Parameters
| Parameter | Default | Description |
|---|---|---|
| key | No default. Required. | The name of the key. |
Responses
| Status | Response |
|---|---|
| 200 | A popular items object |
| 400 | The specified cache ID is invalid (not a number). |
| 401 | Unauthorized to access cache with this ID. |
| 403 | Forbidden to access cache with this ID. |
| 5XX | Unexpected error. |
Example
curl https://analytics.memcachier.com/api/v2/caches/<cache_id>/introspection/key_stats?key=<key_name> \
  --user <username>:<password>
Returns
[
  {
    "timestamp": "2019-08-24T14:15:22Z",
    "name": "string",
    "size": 0,
    "hit_count": 0,
    "miss_count": 0,
    "mutation_count": 0,
    "in_cache": true
  }
]
Get Watched Prefixes
Get all watched prefixes for cache.
HTTP Request
GET https://analytics.memcachier.com/api/v2/caches/<cache_id>/introspection/prefixes
Responses
| Status | Response |
|---|---|
| 200 | An array of prefixes. |
| 400 | The specified cache ID is invalid (not a number). |
| 401 | Unauthorized to access cache with this ID. |
| 403 | Forbidden to access cache with this ID. |
| 5XX | Unexpected error. |
Example
curl https://analytics.memcachier.com/api/v2/caches/<cache_id>/introspection/prefixes \
  --user <username>:<password>
Returns
[
  {
    "id": 1,
    "name": "string",
  },
  ...
]
Watch Prefix
Watch a prefix. Start collecting stats for a prefix.
HTTP Request
POST https://analytics.memcachier.com/api/v2/caches/<cache_id>/introspection/prefixes
Responses
| Status | Response |
|---|---|
| 200 | Prefix watched. Returns a prefix. |
| 400 | The specified cache ID is invalid (not a number). |
| 401 | Unauthorized to access cache with this ID. |
| 403 | Forbidden to access cache with this ID. |
| 5XX | Unexpected error. |
Example
curl -X POST https://analytics.memcachier.com/api/v2/caches/<cache_id>/introspection/prefixes \
  --user <username>:<password> \
  -H 'Content-Type: application/json' \
  -d '{"name":"my_prefix"}'
Returns
{
  "id": 1,
  "name": "string",
}
Unwatch Prefix
Unwatch a prefix. Stop collecting stats for a prefix.
HTTP Request
DELETE https://analytics.memcachier.com/api/v2/caches/<cache_id>/introspection/prefixes/<prefix_id>
Responses
| Status | Response |
|---|---|
| 204 | Prefix unwatched. |
| 400 | The specified cache ID is invalid (not a number). |
| 401 | Unauthorized to access cache with this ID. |
| 403 | Forbidden to access cache with this ID. |
| 5XX | Unexpected error. |
Example
curl -X DELETE https://analytics.memcachier.com/api/v2/caches/<cache_id>/introspection/prefixes/<prefix_id> \
  --user <username>:<password> \
Get Prefix Stats
Get stats for a watched prefix.
HTTP Request
GET https://analytics.memcachier.com/api/v2/caches/<cache_id>/introspection/prefixes/<prefix_id>/stats
Query Parameters
| Parameter | Default | Description |
|---|---|---|
| startTime | 24h ago | The start time of the timeseries data. |
| endTime | Now | The end time of the timeseries data. |
Responses
| Status | Response |
|---|---|
| 200 | An array of prefix stats. |
| 400 | The specified cache ID is invalid (not a number). |
| 401 | Unauthorized to access cache with this ID. |
| 403 | Forbidden to access cache with this ID. |
| 5XX | Unexpected error. |
Example
curl https://analytics.memcachier.com/api/v2/caches/<cache_id>/introspection/prefixes/<prefix_id>/stats?startTime=2023-01-08T15:20:00Z&endTime=2023-01-10T15:20:00Z \
  --user <username>:<password>
Returns
[
  {
    "name": "prefix_stats",
    "columns": [
      "time",
      "num_keys",
      "total_size",
      "total_hits_rate",
      "total_misses_rate",
      "total_mutations_rate"
    ],
    "values": [
      [
        "2023-01-16T10:50:00Z",
        0,
        0,
        0,
        0,
        0
      ],
      ...
    ]
  }
]
Get Prefix Popular Items
Get popular items for a watched prefix.
HTTP Request
GET https://analytics.memcachier.com/api/v2/caches/<cache_id>/introspection/prefixes/<prefix_id>/popular_items
Responses
| Status | Response |
|---|---|
| 200 | An popular items object. |
| 400 | The specified cache ID is invalid (not a number). |
| 401 | Unauthorized to access cache with this ID. |
| 403 | Forbidden to access cache with this ID. |
| 5XX | Unexpected error. |
Example
curl https://analytics.memcachier.com/api/v2/caches/<cache_id>/introspection/prefixes/<prefix_id>/popular_items \
  --user <username>:<password>
Returns
{
  "time_slice": 186554450945,
  "most_hit_keys": [
    {
      "name": "string",
      "popularity": 0
    },
    ...
  ],
  "most_missed_keys": [
    {
      "name": "string",
      "popularity": 0
    },
    ...
  ],
  "most_mutated_keys": [
    {
      "name": "string",
      "popularity": 0
    },
    ...
  ],
  "popular_prefixes": [
    {
      "name": "string",
      "popularity": 0
    },
    ...
  ]
}
Credentials
In order to connect a memcache client to MemCachier, you use a username and password listed on the analytics dashboard for your cache. Each cache can have multiple sets of credentials. One of these sets of credentials is distinguished as primary, meaning that it is linked to the Heroku MemCachier addon.
From the Credentials panel on the analytics dashboard, it
is possible to create new credentials, delete existing credentials and
promote secondary credentials to primary credentials. This makes it
possible to rotate credentials by creating a new set of secondary
credentials and promoting them to primary.
Promoting a set of secondary credentials to primary
causes an update of the MEMCACHIER_USERNAME and
MEMCACHIER_PASSWORD configuration variables on your Heroku app and a
restart of your dynos to pick up the new values.
Each set of credentials for a cache can be given different capabilities, in the sense that sets of credentials can be restricted to read-only access to the cache, or prevented from flushing the cache via the memcache API. These capabilities are controlled by checkboxes on the Credentials panel of the analytics dashboard. (The exact error conditions that a client will receive if it attempts to perform an action for which it does not have the capability depends on the details of the client library used. The most common cases are likely to be for the Dalli Ruby library and the pylibmc Python library. For both of these client libraries, attempting to set a cache entry using credentials that do not have the write capability will simply result in a “value not set” response from the library.)
Disabled Caches
Development caches are disabled after 30 days of inactivity. Disabled caches can no longer be accessed (authentication will fail). To use the caches again it can be re-enabled on the analytics dashboard under the Settings panel.
Encrypted Connections (TLS)
We generally don’t recommend using TLS to secure your connection. Why?
Memcache is normally only used when performance is important and so
low latency is critical. This means we expect your MemCachier cache
and your application that accesses it runs in the same datacenter, for
example the Amazon EC2 us-east-1 datacenter. All your traffic are
running over, and only over, the internal datacenter network. This is
a highly secure network that can’t be sniffed on or
tampered with. For example, your web application is probably speaking
HTTPS, but the HTTPS connection is very likely terminated at a load
balancer, and then unsecured HTTP used to talk between the load
balancer and your application.
It is possible to connect to MemCachier using TLS encrypted sockets. While no existing clients support TLS connections natively, we provide a buildpack for Heroku customers that proxies the connection to MemCachier and wraps it in a TLS connection. This can be useful for the extra paranoid among us, or to securely access your cache from outside the datacenter.
The buildpack installs and sets up stunnel on localhost listening on port 11211. It configures stunnel to connect to the MemCachier servers specified in your environment variable and to verify certificates as signed by the MemCachier Root CA.
Use the buildpack in conjunction with another buildpack that actually runs your app, using Heroku’s multiple buildpack feature:
$ heroku buildpacks:add https://github.com/memcachier/memcachier-tls-buildpack.git
Finally, configure your app to connect to localhost:11211 instead of
using the MEMCACHIER_SERVERS environment variable, but, leave your
MEMCACHIER_SERVERS environment variable unchanged as the TLS
buildpack uses it to connect to MemCachier.
Upgrading and downgrading
Changing your plan, either by upgrading or downgrading, can be done easily at any time through Heroku.
- No code changes are required.
- Your cache won’t be lost or reset*.
- You are charged by the hour for plans, so try experimenting with different cache sizes with low cost.
* When moving between the development plan to a production plan, you will lose your cache. This is unavoidable due to the strong separation between the development and production clusters.
Using MemCachier
Please refer to your client or framework documentation for how to use MemCachier effectively.
MemCachier Guides:
- Advanced Memcache Usage
- Building a Rails App with MemCachier
- Scale Django with MemCachier
- Scale Laravel with MemCachier
- Scale Express.js with MemCachier
- Rails + Rack::Cache + MemCachier
- Java Webapp Runner Guide
- Heroku’s Guide to Caching
Framework and Client Documentation:
- Dalli (Ruby Client) API
- Rails Caching Guide
- PHP Memcached client
- CakePHP Caching Guide
- Pylibmc (Pytnon Client) API
- Django Caching Guide
- MemJS (node.js client) API
- Spymemcached JavaDocs
Key-Value size limit (1MB)
MemCachier has a maximum size that a key-value object can be of
1MB. This applies to both key-value pairs created through a set
command, or existing key-value pairs grown through the use of an
append or prepend command. In the later case, the size of the
key-value pair with the new data added to it, must still be less than
1MB.
The 1MB limit applies to the size of the key and the value together. A key of size 512KB with a value of 712KB would be in violation of the 1MB limit.
The reason for this has partially to do with how memory is managed in MemCachier. A limitation of the high performance design is a restriction on how large key-value pairs can become. Another reason is that storing values larger than 1MB doesn’t normally make sense in a high-performance key-value store. The network transfer time in these situations becomes the limiting factor for performance. A disk cache or even a database makes sense for this size value.
Errors about app trying to connect to localhost
By default, most memcache client look for the environment variables,
MEMCACHE_SERVERS, MEMCACHE_USERNAME and MEMCACHE_PASSWORD for
their configuration. These variables are used when the initialization
code for the memcache client doesn’t specifically specify these values.
If these environment variables aren’t set, clients generally default
to connecting to 127.0.0.1:11211 (i.e., localhost), with no username
and password.
The MemCachier add-on sets the MEMCACHIER_SERVERS,
MEMCACHIER_USERNAME and MEMCACHIER_PASSWORD environment variables.
So you need to either set the equivalent MEMCACHE_* variables from
these, or pass these values to your client when you create a new one
in your code.
For example, pseudo-code for the first approach is:
env[MEMCACHE_SERVERS] = env[MEMCACHIER_SERVERS]
env[MEMCACHE_USERNAME] = env[MEMCACHIER_USERNAME]
env[MEMCACHE_PASSWORD] = env[MEMCACHIER_PASSWORD]
While pseudo-code for the second approach is:
memClient = new MemcacheClient(ENV['MEMCACHIER_SERVERS'],
                               ENV['MEMCACHIER_USERNAME'],
                               ENV['MEMCACHIER_PASSWORD'])
Please be careful that you have setup the your client in all locations. Many frameworks, such as Rails, use memcache in multiple ways and may require you to setup initialization properly in a few locations. Generally the first approach is preferred as it is global while the second approach is local to each initialization.
For example, with Ruby on Rails, you’ll need to setup cache_store,
Rack::Cache and the session_store.
Support
All MemCachier support and runtime issues should be submitted via one of the Heroku Support channels. You can also reach us directly at support@memcachier.com. We encourage you to CC us on any urgent support tickets sent to Heroku.
Please include your MEMCACHIER_USERNAME with support tickets.
Any non-support related issues or product feedback is welcome via email at: support@memcachier.com.
Any issues related to MemCachier service are reported at MemCachier Status.
Please also follow us on Twitter, @memcachier, for status and product announcements.