Table of Contents [expand]
Last updated February 13, 2025
Asynchronous provisioning allows Partners to perform out-of-band provisioning in a first-class way. It’s meant mainly for Partners who need extended time to set up their Add-on service, but can be used by anyone.
This gives all Partners the ability to implement behavior similar to heroku pg:wait, and will help make automated app setup and orchestration easier and less error-prone.
Example Workflow
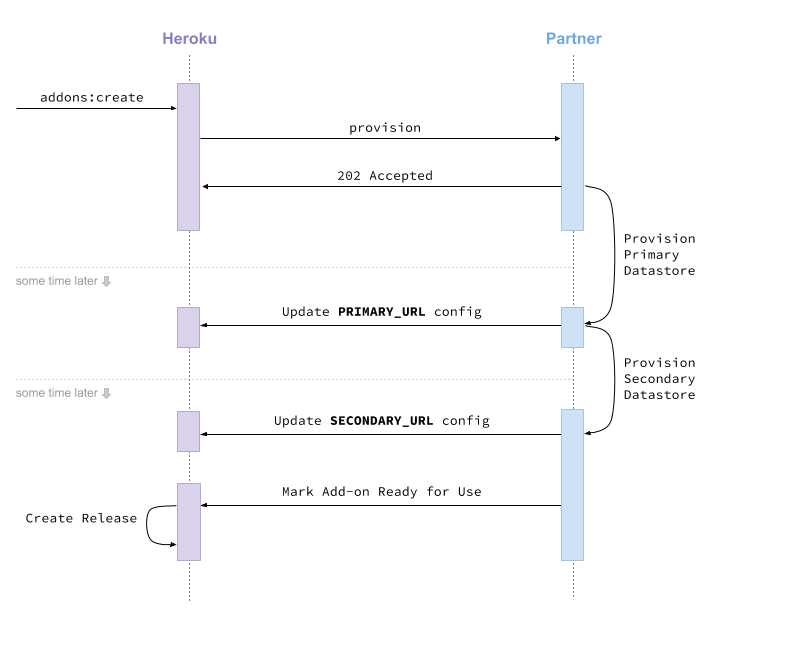
This is a fairly contrived example, but illustrates the power of async provisioning. In this example, the Partner spins up two datastores: a primary and secondary. They do this sequentially to setup replication.
- The Partner responds to the provision request with a 202 Accepted and continues to provision its infrastructure.
- They first provision the primary and update the Add-on’s config with the connection string. This does not restart the app.
Then they provision a secondary and update the Add-on’s config with that connection string. This still does not restart the app.
Finally, they make an explicit call to Heroku to tell us that they are done and the Add-on (and all of its components) are fully provisioned and ready for use. This is when the app restarts.
You’ll see the specifics of each part of this process below in the “Implementation” section.
Things to Know
Billing
The customer will be billed as soon as the add-on starts provisioning. This means the time and cost of provisioning your service is accounted for in how much a customer pays. As such, you should make every effort to provision expediently so customers get value from your service as quickly as possible.
Unprovisioned Add-ons
Add-ons that take longer than 12 hours to provision (or those your service fails to mark as “provisioned” via the API in that time period) will be considered failed and removed from the user’s app. The customer will not be charged in this case and therefore no money will be passed on to the Partner.
Implementation
Respond to the provision request with a 202 Accepted
When you receive a provision request from Heroku:
- Create the record (typically Account) that will represent this Add-on instance in your system,
- Enqueue a job to provision the time-consuming aspects of your service,
- And finally, respond with:
- The id of the Account (or whatever) that you created above,
- A message to the user, and
- A 202 Accepted response code.
Example Provisioning Response
status 202
JSON.encode({
  id: account.id,
  message: "Your add-on is being provisioned. It will be available shortly."
})
This tells Heroku to keep your add-on in a provisioning state, during which config updates will not trigger an app restart. You must explicitly mark the Add-on as provisioned and ready for use before the app will be restarted.
Update the Add-on’s Config
Once provisioning is complete, update the Add-on’s config with whatever the app needs to consume your service. This will not cause a release of the app, so if you would like to update many vars, one at a time during provisioning, you may do so.
Please see documentation on the Add-on Config endpoint. You will need to be using the Platform API for Partners to access this endpoint.
PATCH /addons/01234567-89ab-cdef-0123-456789abcdef/config
Host: api.heroku.com:443
Content-Type: application/json
Accept: application/vnd.heroku+json; version=3
Authorization: Bearer 2af695e0-93e3-4821-ac2e-95f68435f128

{
  "config": [
    {
      "name": "MY_ADDON",
      "value": "bar"
    }
  ]
}
For some add-ons, the actual environment variable set on an application may be different than the key. All environment variables that you send should have the same prefix: your add-on’s name, capitalized. However, within the context of a Heroku app, the prefix may be different for a variety of reasons.
For example, if your add-on is named fast-db and you are setting FAST_DB_URL, the variable name on the application will default to FAST_DB_URL but would be PRIMARY_DB_URL if the user added the add-on with the prefix PRIMARY_DB.
Finish Add-on Provisioning
The final step is to tell Heroku that the Add-on is fully provisioned and ready for use. If this step is not taken within 12 hours of the provisioning request, it will be considered to have failed and be removed. To indicate provisioning has completed, use the provision Add-on Action endpoint.
POST /addons/:uuid/actions/provision
At this point the user’s app will restart and have the appropriate environment variables set to consume your service.
Handling Add-on Provisioning Failure
If the provisioning has failed, you should tell Heroku that the Add-on is now deprovisioned using the deprovision Add-on Action endpoint.
POST /addons/:uuid/actions/deprovision
At this point the resource will be removed from the user’s app, and they will not be charged.
Summary
Async provisioning allows Add-on partners to communicate provisioning status to Heroku so as to allow for better automation and orchestration. Partners need to make a few changes to how they integrate with our APIs and have the feature specifically enabled. Contact the Heroku Ecosystem Engineering team with any implementation-related questions.