Last updated June 05, 2025
This article describes the steps involved in releasing an add-on on the Heroku Elements Marketplace. For more information on add-on development, see Building an Add-on.
For more information on the benefits of becoming an add-on partner, see the Heroku Ecosystem Partner Program page.
Add-on Release Stages
Every add-on progresses through three release stages: alpha, beta, and general availability (GA). As your add-on meets the requirements for each stage and advances, it becomes visible to a wider audience. Upon reaching GA, it can offer paid plans to Heroku customers.
| Release stage | Can offer paid plans | Visible in Elements Marketplace | Requires partner support |
|---|---|---|---|
| Alpha | No | No | No |
| Beta | No | Yes | Yes |
| General Availability | Yes | Yes | Yes |
Alpha Stage
All add-ons start in alpha. While in this stage, add-ons are still in initial development, and they have no feature or support requirements. They don’t appear in the Elements Marketplace or in search results.
An alpha add-on can only be installed by its developers and individuals that are explicitly granted access. These individuals can include internal testers or early adopters that you invited in order to gather user feedback. Alpha users test your add-on by installing the free “Test” add-on plan, which is the only plan allowed during this stage.
It’s common for add-on partners to create a -staging version of their add-on that stays permanently in alpha. This version allows you to test new features “full stack”, and point this -staging add-on to staging versions of your integration infrastructure. You can use staging versions as you’re building a new add-on too, to give you a safe place to test as you reach integration milestones.
Advancing to Beta
To progress from alpha to beta, complete the tasks listed in your add-on’s Heroku Partner Portal Next Steps tab. Each task walks you through its requirements. Complete each task in order.
Before you get started, be sure to review our support and security policies.
Step 1: Request Business Approval
Share details about your company and add-on. This information helps us get in contact with you, tells us where your add-on fits in the marketplace, and builds your add-on listing. After completing the requirements, click the Request Business Approval button.
Describe Add-on Benefits
On the Benefits page of the Partner Portal, describe in moderate detail what your add-on provides to Heroku customers. This content appears as prominent paragraphs on your add-on’s marketplace page.
You can use Maruku flavored markdown to add rich text to your benefits content.
For example, the Heroku Postgres add-on specifies two benefits: “Connect, Use, and Develop” and “Scale and Grow”:
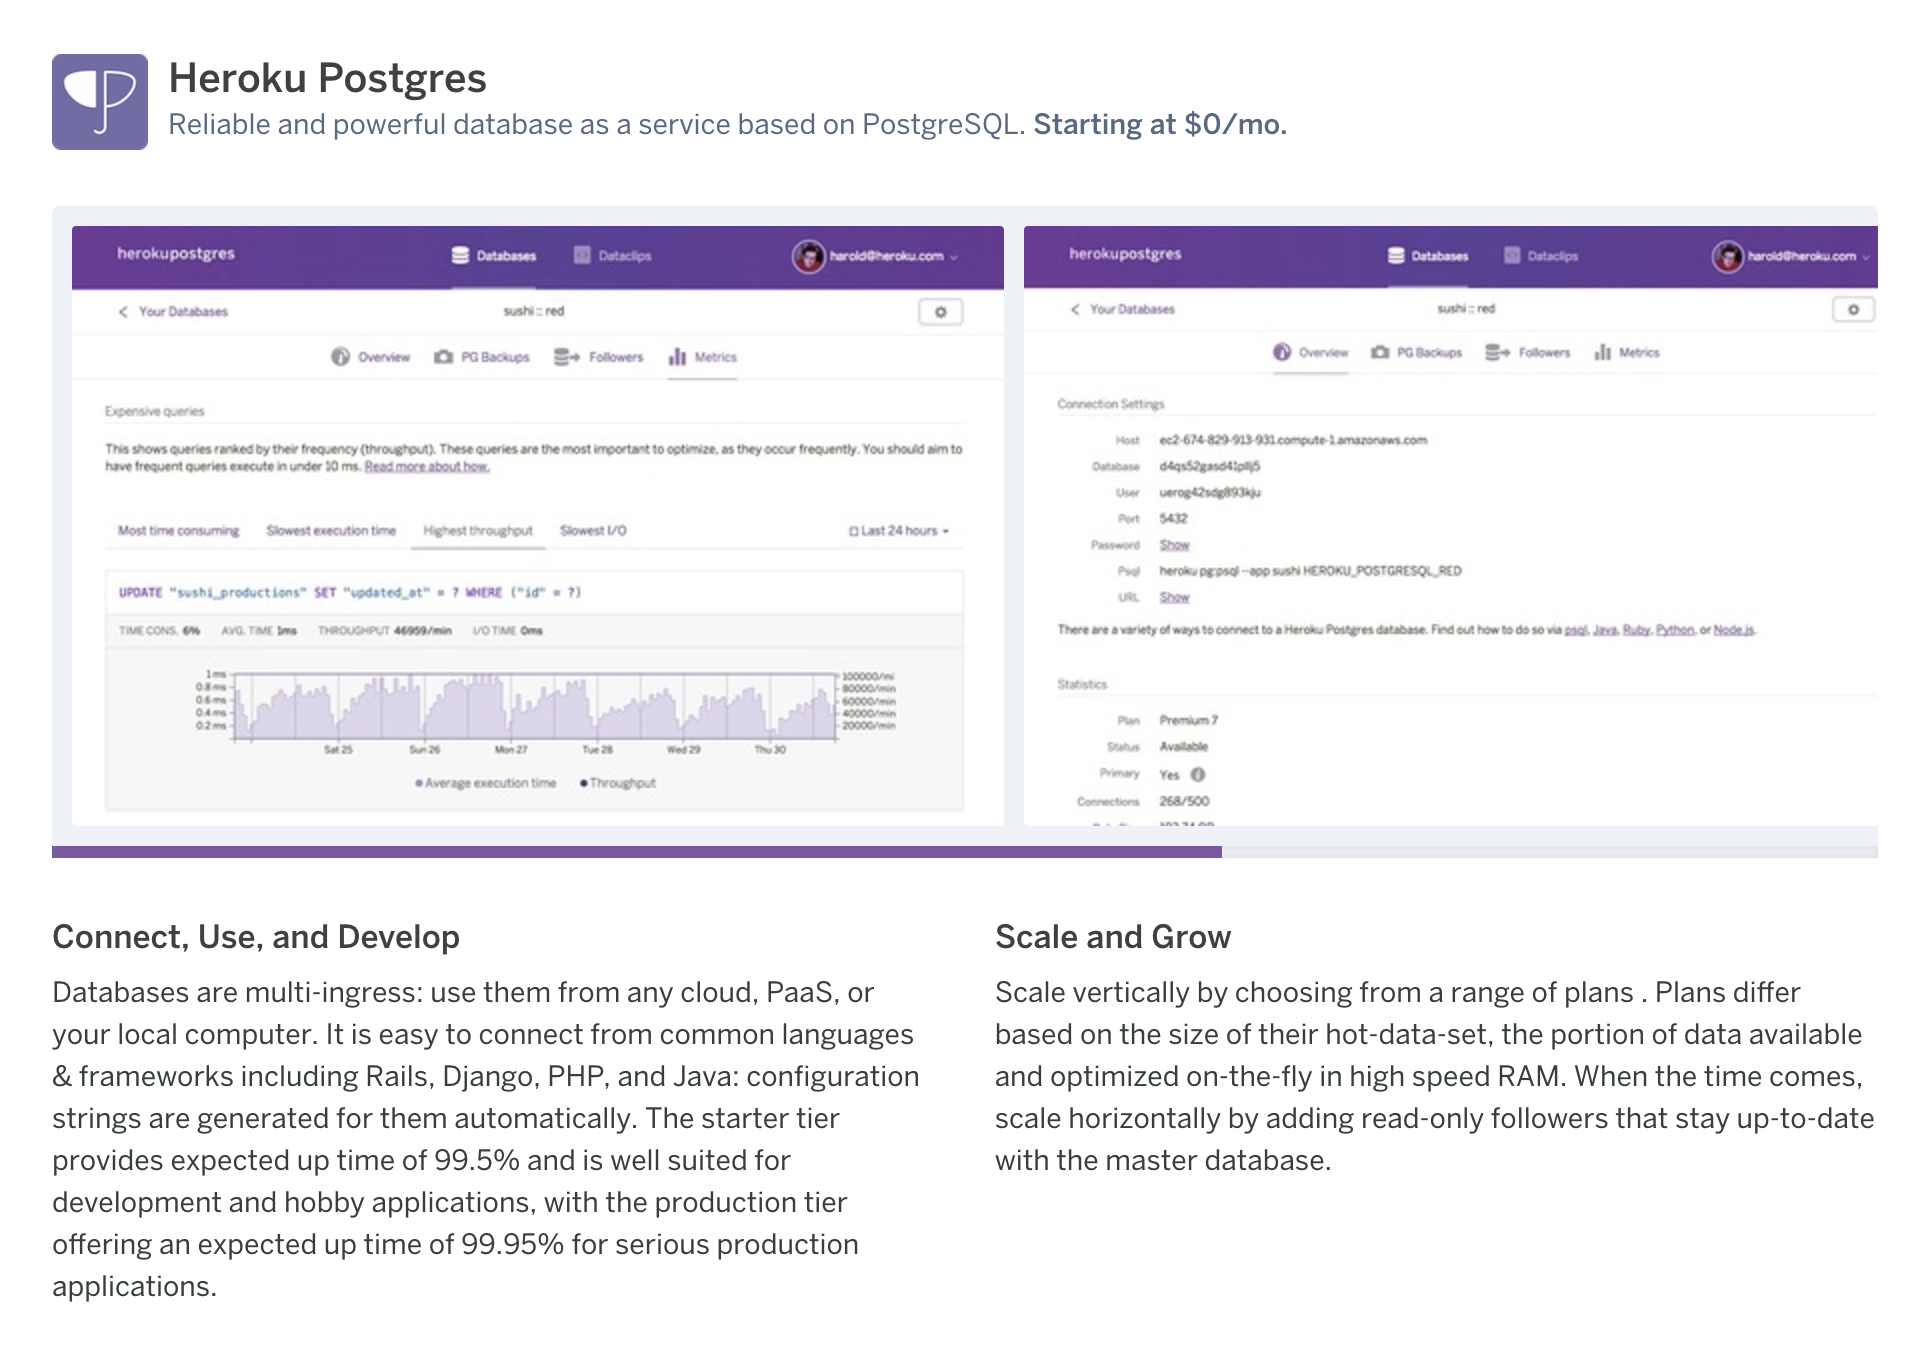
Describe Add-on Features
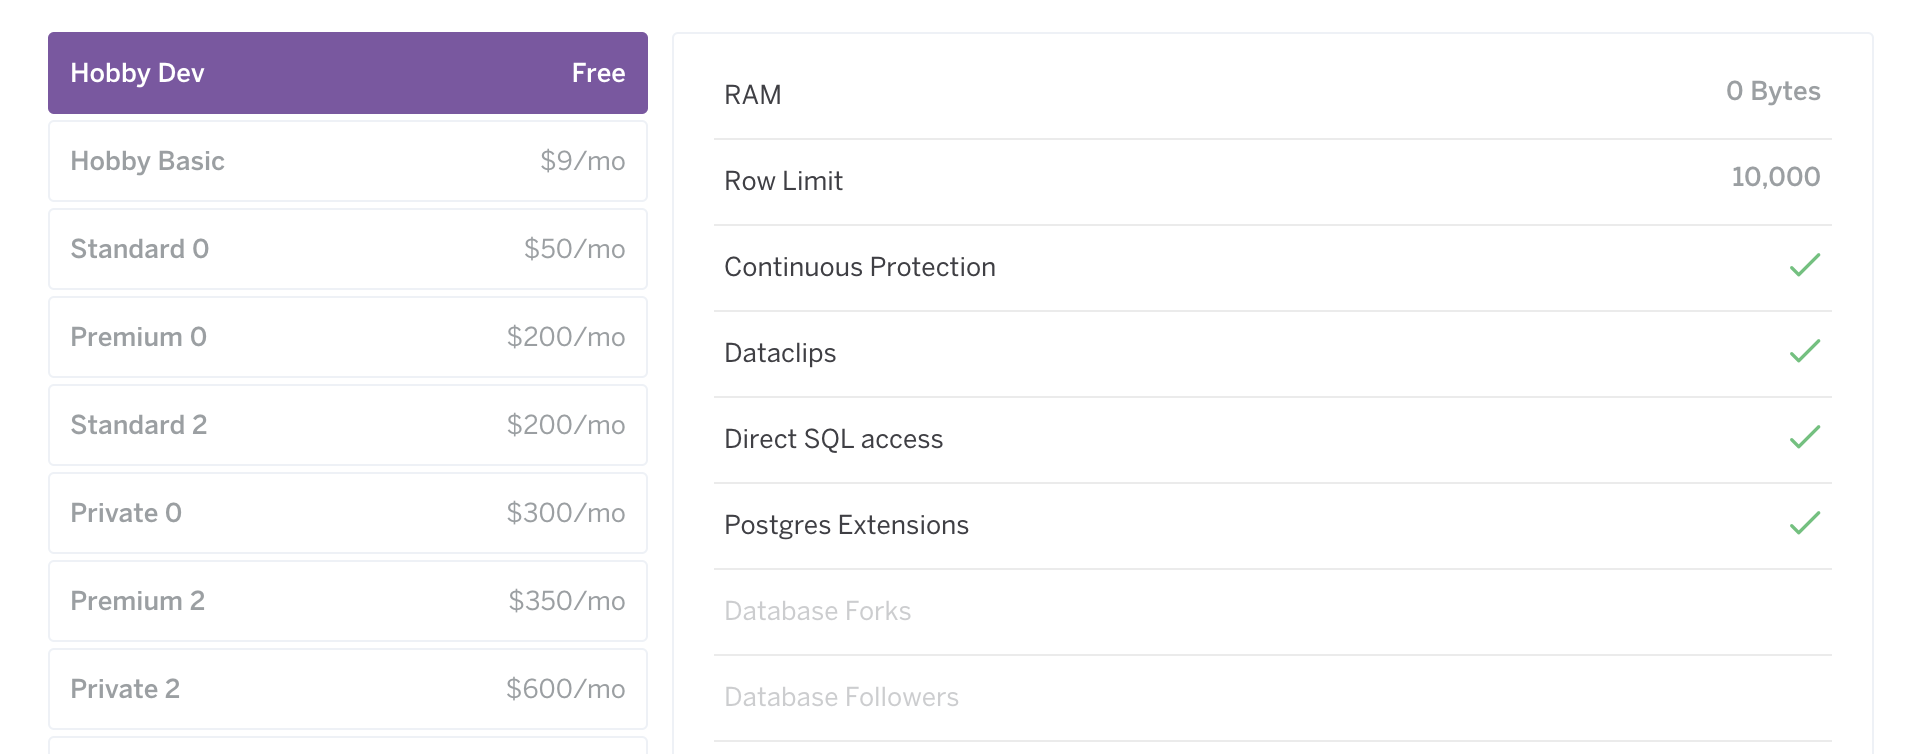
You specify your add-on’s features on the Features page of the Partner Portal. This feature list should at least include every aspect of your add-on that might differ across different plans. For example, Heroku Postgres lists items such as “RAM”, “Row Limit”, and “Connection Limit”, all of which differ across plans:
We strongly suggest you receive business approval from Heroku before you start work on your add-on integration. This approval ensures you get feedback before beginning development if the service you plan to offer isn’t a marketplace fit.
Step 2a: Meet the Beta Test Users Requirement
We require a minimum of 15 unique app owners to install and test your add-on. If a user provisioned and deprovisioned your add-on, the user’s app doesn’t count towards this requirement.
The test user requirement is intended to prove you can operate a service, solicit feedback from potential customers, and work on any unexpected issues that can occur. Ideally, this process proves the viability of the add-on and business model within your own company and prepares you for dealing with supporting customers in the future.
Step 2b: Meet the Add-on Documentation Requirement
Follow the Add-on Documentation Guidelines to create your Dev Center article and submit it for review.
Step 2c: Meet the Beta Add-on Integration Testing Requirement
To test your add-on integration, initiate an automatic review. The automatic review checks for a valid add-on manifest, and tests that your add-on provisions, deprovisions, and reprovisions correctly.
- Go to the
Logstab for your add-on in the Partner Portal. - Click the
Request Automatic Reviewbutton.
If your add-on requires buildpacks, third-party libraries, or mandatory options specified in the CLI command to successfully provision, it fails the automatic review. Open a support ticket instead to request a technical approval.
Step 2d: Request a Technical Approval
After completing the test user, add-on documentation, and add-on integration testing requirements, click the Request Technical Approval button. After submitting your request, the Heroku Ecosystem Engineering team reviews your add-on implementation and notifies you of their decision.
Step 3: Progress to Beta
To continue the progression after completing all other beta steps, click the Progress to Beta button.
Beta Stage
When an add-on reaches the beta stage, it’s listed publicly in the Heroku Elements Marketplace (with a “BETA” label), and all Heroku customers can provision it.
Your add-on publishes to the marketplace immediately upon progressing to beta. You can locate it at https://elements.heroku.com/<your add-on slug>. The marketplace search index reindexes daily, so it can take up to 24 hours before it returns your add-on in search results.
Like alpha add-ons, beta add-ons have a single, free plan called “Test.” The beta stage provides the opportunity for you to gather insights and feedback from a larger collection of customers. Use this information to make any improvements or changes to your add-on before submitting it for advancement to GA.
Unlike alpha add-ons, beta add-ons must provide timely support. Beta add-on partners gain access to the Heroku support dashboard and must address customer support tickets that are assigned to the partner.
Partners are expected to acknowledge and respond to all Heroku customer tickets within 48 hours. All issues aren’t expected to be resolved within this timeframe; technical issues can sometimes take significantly longer to address.
See Add-on Support for more information on support requirements.
Advancing to GA
To progress from beta to GA, complete the tasks listed in your add-on’s Heroku Partner Portal Next Steps tab. Each task walks you through its requirements. Complete each task in order.
Step 1a: Meet the GA Test Users Requirement
If this is your company’s first add-on, there must be a minimum of 100 unique app owners with your add-on installed and tested.
If your company already has an add-on in GA state, the minimum is 65.
If a user provisioned and deprovisioned your add-on, the user’s app doesn’t count towards this requirement.
Step 1b: Meet the GA Add-on Integration Testing Requirement
To test your add-on integration, initiate an automatic review. The automatic review checks for a valid add-on manifest, and tests that your add-on provisions, deprovisions, and reprovisions correctly.
- Go to the
Logstab for your add-on in the Partner Portal. - Click the
Request Automatic Reviewbutton.
If your add-on requires buildpacks, third-party libraries, or mandatory options specified in the CLI command to successfully provision, it fails the automatic review. Open a support ticket instead to request a technical approval.
Step 1c: Request a Technical Approval
After completing the GA test user and add-on integration testing requirements, request a technical approval. After submitting your request, the Heroku Ecosystem Engineering team reviews your add-on implementation and notifies you of their decision.
Step 1c: Request Pricing Approval
Configure the free and paid plans you want to offer for your add-on. Add-ons must define one or more associated plans before advancing from beta to GA. Each plan can specify a different price, including free, along with a different set of available features and usage thresholds.
Heroku must approve pricing plans. Click the Request Pricing Approval button after configuring plans.
See Add-on Plans and Pricing for guidance on adding plans.
Step 2: Become an Approved Supplier
Provide your company’s billing details to receive an invite to Supplierforce, Salesforce’s supplier management platform.
See the Supplier Training Guide and Supplierforce FAQs for more information about the onboarding process.
Step 3: Progress to GA
To complete the progression after all other steps, click the Progress to GA button.
General Availability Stage (GA)
When your add-on reaches GA, the “BETA” tag is removed from its marketplace listing. You can offer multiple free and paid plans to Heroku customers. The original free “Test” plan that was available in the alpha and beta stages gets disabled and users can’t provision no new instances of it.
After reaching GA, be sure to continue gathering product feedback and improving your service to meet your customers’ needs and drive additional adoption.
At some point after your add-on reaches GA, you can modify your available plans to better serve your customers’ needs. Heroku must approve of any such modifications before they’re widely available. See Add-on Plans and Pricing for more info.
Shutting Down an Add-on
In the event that you want to discontinue support for an add-on, complete the add-on shutdown intake form to begin the shutdown process. Shutdowns are subject to Salesforce approval based on the salesforce.com License and Distribution Agreement for the Heroku Elements Marketplace between you and Salesforce.
The high-level steps of the add-on shutdown process for your reference:
- The add-on partner submits the add-on shutdown intake form.
- Heroku requests the add-on partner to fill out an add-on shutdown FAQ (as needed).
- Heroku schedules a call with the add-on partner to review FAQ and discuss shutdown details (as needed).
- Heroku sends a minimum of three email communications to customers regarding the shutdown for GA add-ons. Heroku sends the first email 60 days before the desired shutdown date. For beta add-ons, Heroku sends a minimum of 2 email communications, with the first being 30 days before the shutdown.
- Heroku removes all installations of the add-on from all Heroku apps.
Add-on Plans and Pricing
See Add-on Plans and Pricing for info on configuring, modifying, and disabling add-on plans.