Table of Contents [expand]
- Provisioning the add-on
- Local setup
- Connect MariaDB with your favorite language
- Connect MariaDB with Ruby on Rails
- Connect MariaDB with PHP
- Connect MariaDB with Wordpress
- Connect MariaDB with Symfony and Doctrine
- Connect MariaDB with Laravel
- Connect MariaDB with PHP Codeigniter
- Connect MariaDB with Node.js
- Connect MariaDB with Node.js/NestJS/TypeORM
- Connect MariaDB with Prisma
- Connect MariaDB with Django
- Connect MariaDB with Java/Spring
- Connect MariaDB with Groovy/Grails
- Connect to Stackhero dashboard
- Connect to PhpMyAdmin
- Create a user on MariaDB
- How to use MariaDB CLIs (mysql, mysqldump etc…)
- How to dump a MariaDB database
- Reclaim disk space after data deletion
- Upgrading your plan
- Removing the add-on
- Support
- Additional resources
Last updated November 22, 2024
This add-on is operated by Stackhero
MariaDB (MySQL) on dedicated instances with very attractive prices.
Stackhero for MariaDB provides a managed MariaDB instance running on a fully dedicated instance.
With your Stackhero for MariaDB add-on you will get:
- A private instance (dedicated VM) for high performances and security
- TLS encryption (aka SSL)
- A full access to PhpMyAdmin
- An automatic backup every 24 hours
- One click to update to new MariaDB versions
All MariaDB/MySQL clients can connect to Stackhero for MariaDB and there is a MariaDB/MySQL client library for almost every language out there, including Ruby, Node.js, Java, Python, Clojure and Erlang.
Provisioning the add-on
Stackhero for MariaDB can be attached to a Heroku application via the CLI:
A list of all plans available can be found here.
$ heroku addons:create ah-mariadb-stackhero --app <your app name>
-----> Adding ah-mariadb-stackhero to sharp-mountain-4005... done
After you provision Stackhero for MariaDB, you’ll have 4 new config variables available:
- STACKHERO_MARIADB_HOST: the add-on host domain
- STACKHERO_MARIADB_PORT: the add-on port
- STACKHERO_MARIADB_ROOT_PASSWORD: the password for the root user
- STACKHERO_MARIADB_DATABASE_URL: the MySQL compatiable URL (mysql://...)
- STACKHERO_MARIADB_DATABASE_URL_RUBY: the Ruby Mysql compatiable URL (mysql2://...)
You can see the content of those variables via the heroku config:get command:
$ heroku config | grep STACKHERO_MARIADB_
After you install Stackhero for MariaDB, your application should be configured to fully integrate with the add-on.
Local setup
After you provision the add-on, it’s necessary to locally replicate its config variables so your development environment can operate against the service.
Use the Heroku Local command-line tool to configure, run and manage process types specified in your app’s Procfile. Heroku Local reads configuration variables from a .env file. To view all of your app’s config variables, type heroku config. Use the following command for each value that you want to add to your .env file:
$ heroku config:get STACKHERO_MARIADB_HOST -s >> .env
Credentials and other sensitive configuration values should not be committed to source-control. In Git, exclude the .env file with: echo .env >> .gitignore.
For more information, see the Heroku Local article.
Connect MariaDB with your favorite language
You can use almost any client library available for your language that is able to connect to a MariaDB or a MySQL server.
We recommend to create a dedicated user (see sections below). If you don’t want to, you can connect to MariaDB using the “root” user and the following environment variables:
- STACKHERO_MARIADB_HOST
- STACKHERO_MARIADB_PORT
- STACKHERO_MARIADB_ROOT_PASSWORD
Or you can use the MySQL compatibles URLs:
- STACKHERO_MYSQL_DATABASE_URL
- STACKHERO_MYSQL_DATABASE_URL_RUBY
Connect MariaDB with Ruby on Rails
The easiest way to connect MariaDB with Ruby on Rails is to use the DATABASE_URL environment variable.
This variable is read automatically by Ruby on Rails and you have nothing to configure in your code then.
Use this command to set the DATABASE_URL variable:
heroku config:set DATABASE_URL=`heroku config:get STACKHERO_MARIADB_DATABASE_URL_RUBY -s`
Connect MariaDB with PHP
Connect MariaDB with PHP using MySQLi (object-oriented style)
<?php

$mysqli = mysqli_init();
$mysqliConnected = $mysqli->real_connect(
  getenv('STACKHERO_MARIADB_HOST'),
  getenv('STACKHERO_MARIADB_USER'),
  getenv('STACKHERO_MARIADB_PASSWORD'),
  getenv('STACKHERO_MARIADB_USER'),
  getenv('STACKHERO_MARIADB_PORT'),
  NULL,
  MYSQLI_CLIENT_SSL
);
if (!$mysqliConnected) {
  die("Connect Error: " . $mysqli->connect_error());
}

echo 'Success... ' . $mysqli->host_info . "\n";

$mysqli->close();

?>
Connect MariaDB with PHP using MySQLi (procedural style)
<?php

$mysqli = mysqli_init();
$mysqliConnected = mysqli_real_connect(
  $mysqli,
  getenv('STACKHERO_MARIADB_HOST'),
  getenv('STACKHERO_MARIADB_USER'),
  getenv('STACKHERO_MARIADB_PASSWORD'),
  getenv('STACKHERO_MARIADB_USER'),
  getenv('STACKHERO_MARIADB_PORT'),
  NULL,
  MYSQLI_CLIENT_SSL
);
if (!$mysqliConnected) {
  die("Connect Error: " . mysqli_connect_error($mysqli));
}

echo 'Success... ' . mysqli_get_host_info($mysqli) . "\n";

mysqli_close($mysqli);

?>
Connect MariaDB with PHP using PDO
<?php

$pdo = new PDO(
  "mysql:host=" + getenv('STACKHERO_MARIADB_HOST') + ";port=" + getenv('STACKHERO_MARIADB_PORT') + ";dbname=" + getenv('STACKHERO_MARIADB_USER'),
  getenv('STACKHERO_MARIADB_USER'),
  getenv('STACKHERO_MARIADB_PASSWORD'),
  array(
    // See below if you have an error like "Uncaught PDOException: PDO::__construct(): SSL operation failed with code 1. OpenSSL Error messages: error:0A000086:SSL routines::certificate verify failed".
    PDO::MYSQL_ATTR_SSL_CAPATH => '/etc/ssl/certs/',
    // PDO::MYSQL_ATTR_SSL_CA => 'isrgrootx1.pem',
    PDO::MYSQL_ATTR_SSL_VERIFY_SERVER_CERT => true,
  )
);

$stm = $pdo->query("SELECT VERSION()");
$version = $stm->fetch();

echo "You are connected to a database running version " . $version[0] . "\n";

?>
Handle error “SSL operation failed with code 1”
If you encounter the error:
Uncaught PDOException: PDO::__construct(): SSL operation failed with code 1. OpenSSL Error messages: error:0A000086:SSL routines::certificate verify failed
this is probably because the /etc/ssl/certs/ directory doesn’t contain CA certificates.
If you have access to the system that is running your PHP code, you can install these certificates like this:
On Ubuntu, run
apt-get install ca-certificatesOn Alpine Linux, run
apk add ca-certificates
If you don’t have a direct access to the system running your PHP code, you can install the certificate manually:
- Download this certificate on your computer: https://letsencrypt.org/certs/isrgrootx1.pem
- Add this
isrgrootx1.pemfile to your PHP project files. - Comment the code
PDO::MYSQL_ATTR_SSL_CAPATH => '/etc/ssl/certs/' - Uncomment the code
PDO::MYSQL_ATTR_SSL_CA => 'isrgrootx1.pem'
Connect MariaDB with Wordpress
Connecting Wordpress to Stackhero MariaDB add-on is easy.
You just have to edit the Wordpress wp-config.php file and configure the database like this:
define('DB_HOST', '<XXXXXX>.stackhero-network.com');
define('DB_PORT', '<PORT>');
define('DB_NAME', 'root');
define('DB_USER', 'root');
define('DB_PASSWORD', '<yourPassword>');

// Use TLS encryption (aka SSL)
define('MYSQL_CLIENT_FLAGS', MYSQLI_CLIENT_SSL);
The important part here is the activation of TLS encryption (aka SSL). Without it the connection will not work.
Connect MariaDB with Symfony and Doctrine
Edit the .env file and define the DATABASE_URL as following:
DATABASE_URL="mysql://<USER>:<PASSWORD>@XXXXXX.stackhero-network.com:<PORT>/<USER>"
Then edit the config/packages/doctrine.yaml file and set the driver and options as following:
doctrine:
    dbal:
        url: '%env(resolve:DATABASE_URL)%'
        driver: 'pdo_mysql'
        options:
            # PDO::MYSQL_ATTR_SSL_CAPATH
            1010: '/etc/ssl/certs'
            # PDO::MYSQL_ATTR_SSL_VERIFY_SERVER_CERT
            1014: true
Handle error “SSL operation failed with code 1”
If you get an error like Uncaught PDOException: PDO::__construct(): SSL operation failed with code 1. OpenSSL Error messages: error:0A000086:SSL routines::certificate verify failed, this is probably because the /etc/ssl/certs/ directory doesn’t contain CA certificates.
If you have access to the system that is running your PHP code, you can install these certificates like this:
- On Ubuntu/Debian, run
sudo apt-get install ca-certificates - On Alpine Linux, run
apk add ca-certificates
If you don’t have a direct access to the system running your PHP code, you can install the certificate manually:
- Download this certificate on your computer: https://letsencrypt.org/certs/isrgrootx1.pem
- Add this
isrgrootx1.pemfile to your Symfony project. - Edit the
config/packages/doctrine.yamlfile and set thedriverandoptionsas following:yaml doctrine: dbal: url: '%env(resolve:DATABASE_URL)%' driver: 'pdo_mysql' options: # PDO::MYSQL_ATTR_SSL_CA 1009: 'isrgrootx1.pem' # PDO::MYSQL_ATTR_SSL_VERIFY_SERVER_CERT 1014: true
Connect MariaDB with Laravel
Edit the file config/database.php and replace the mysql with the following configuration:
'mysql' => [
  'driver' => 'mysql',
  'host' => env('STACKHERO_MARIADB_HOST'),
  'port' => env('STACKHERO_MARIADB_PORT'),
  'username' => env('STACKHERO_MARIADB_USER'),
  'password' => env('STACKHERO_MARIADB_PASSWORD'),
  'database' => env('STACKHERO_MARIADB_USER'),
  'charset' => 'utf8mb4',
  'collation' => 'utf8mb4_unicode_ci',
  'prefix' => '',
  'prefix_indexes' => true,
  'strict' => true,
  'engine' => null,
  'sslmode' => 'require',
  'options' => extension_loaded('pdo_mysql')
    ? array_filter([
      // See above if you have an error like "Uncaught PDOException: PDO::__construct(): SSL operation failed with code 1. OpenSSL Error messages: error:0A000086:SSL routines::certificate verify failed".
      PDO::MYSQL_ATTR_SSL_CAPATH => '/etc/ssl/certs/',
      // PDO::MYSQL_ATTR_SSL_CA => 'isrgrootx1.pem',
      PDO::MYSQL_ATTR_SSL_VERIFY_SERVER_CERT => true,
    ])
    : [],
],
Connect MariaDB with PHP Codeigniter
In your database.php, put this code:
$db['default'] = array(
  'hostname' => getenv('STACKHERO_MARIADB_HOST'),
  'port' => getenv('STACKHERO_MARIADB_PORT'),
  'username' => getenv('STACKHERO_MARIADB_USER'),
  'password' => getenv('STACKHERO_MARIADB_PASSWORD'),
  'database' => getenv('STACKHERO_MARIADB_USER'),
  'dbdriver' => 'mysqli',
  'dbprefix' => '',
  'pconnect' => TRUE,
  'char_set' => 'utf8',
  'dbcollat' => 'utf8_general_ci',
  'encrypt' => array() // Important: activate TLS encryption
);
Connect MariaDB with Node.js
In this example we will use mysql2 package with promises support.
To install it simply run this command: npm install --save mysql2
const mysql = require('mysql2/promise');

(async () => {
  const db = await mysql.createConnection({
    host: process.env.STACKHERO_MARIADB_HOST,
    port: process.env.STACKHERO_MARIADB_PORT,
    user: 'root',
    password: process.env.STACKHERO_MARIADB_ROOT_PASSWORD,
  });

  // Create database stackherotest if not exists yet
  await db.query('CREATE DATABASE IF NOT EXISTS stackherotest');


  // Create table users if not exists yet
  await db.query('CREATE TABLE IF NOT EXISTS `stackherotest`.`users` '
    + '('
    + '`userId` INT UNSIGNED NOT NULL,'
    + '`name` VARCHAR(128) NOT NULL,'
    + '`address` TEXT NOT NULL,'
    + '`email` VARCHAR(265) NOT NULL'
    + ') '
    + 'ENGINE = InnoDB;');


  // Insert a fake user
  await db.query(
    'INSERT INTO `stackherotest`.`users` (`userId`, `name`, `address`, `email`) VALUES ?',
    [
      [
        Math.round(Math.random() * 100000), // Generate a fake userId
        'User name', // column 'name'
        'User address', // column 'address'
        'user@email.com' // column 'email'
      ]
    ]
  );


  // Count number of rows in table users
  const [ usersCount ] = await db.query('SELECT COUNT(*) AS `cpt` FROM `stackherotest`.`users`');
  console.log(`There is now ${usersCount[0].cpt} in table "users"`);


  // Close the connection to MariaDB
  await db.end();

})().catch(error => {
  console.error('');
  console.error('🐞 An error occurred!');
  console.error(error);
  process.exit(1);
});
Connect MariaDB with Node.js/NestJS/TypeORM
To connect from Node.js/NestJS/TypeORM, you have to add the ssl option like in this example:
TypeOrmModule.forRoot({
  type: 'mysql',
  host: process.env.STACKHERO_MARIADB_HOST,
  port: process.env.STACKHERO_MARIADB_PORT,
  username: 'root',
  password: process.env.STACKHERO_MARIADB_ROOT_PASSWORD,
  database: 'root',
  entities: [],
  synchronize: true,
  ssl: {}
})
Connect MariaDB with Prisma
To connect from Prisma, you have to add the sslaccept=strict option so the SSL encryption will be enabled.
Here is an example using the user “root” and connect to the database “root”:
datasource db {
  provider = "mysql"
  url = `mysql://root:${process.env.STACKHERO_MARIADB_ROOT_PASSWORD}@${process.env.STACKHERO_MARIADB_HOST}:${process.env.STACKHERO_MARIADB_PORT}/root?sslaccept=strict`
}
Connect MariaDB with Django
If not yet installed, install the mysqlclient module which will be used to connect to MariaDB:
pip install mysqlclient
Then open your settings.py and put this:
import environ
env = environ.Env()
environ.Env.read_env()

DATABASES = {
  'default': {
    'ENGINE': 'django.db.backends.mysql',
    'HOST': env('STACKHERO_MARIADB_HOST'),
    'PORT': env('STACKHERO_MARIADB_PORT'),
    'OPTIONS': {
      'ssl_mode': 'REQUIRED',
    },
    'NAME': 'root',
    'USER': 'root',
    'PASSWORD': env('STACKHERO_MARIADB_ROOT_PASSWORD')
  }
}
Connect MariaDB with Java/Spring
To connect your SPRING app, you have to import the STACKHERO_MARIADB_DATABASE_URL environment variable SPRING_DATASOURCE_URL and prefix it with jdbc:.
You can do it with this command:
heroku config:set SPRING_DATASOURCE_URL=jdbc:`heroku config:get STACKHERO_MARIADB_DATABASE_URL -s`
Connect MariaDB with Groovy/Grails
You can use the following example to connect your Grails app to MariaDB:
dataSource {
  pooled = true
  driverClassName = "com.mysql.cj.jdbc.Driver"
  dialect = org.hibernate.dialect.MySQL8Dialect
  // SSL-specific properties
  properties {
    useSSL = true
    requireSSL = true
    verifyServerCertificate = true
    sslMode = "required"
  }
}

environments {
  production {
    dataSource {
      dbCreate = "none"
      url = "jdbc:mysql://" + System.env.STACKHERO_MYSQL_HOST + ":" + System.env.STACKHERO_MYSQL_PORT + "/root?useSSL=true&requireSSL=true&verifyServerCertificate=true&sslMode=required" // "/root" has to be changed with the database you want to connect to.
      username = "root" // TODO: It's a good practice to create a dedicated user and not using the "root" credentials.
      password = System.env.STACKHERO_MYSQL_ROOT_PASSWORD // TODO: It's a good practice to create a dedicated user and not using the "root" credentials.
      properties {
        maxActive = 50
        minEvictableIdleTimeMillis = 1800000
        timeBetweenEvictionRunsMillis = 1800000
        numTestsPerEvictionRun = 3
        testOnBorrow = true
        testWhileIdle = true
        testOnReturn = false
        validationQuery = "SELECT 1"
      }
    }
  }
}
Connect to Stackhero dashboard
Stackhero dashboard allows you to see your instance usage, restart it, and apply updates. It also gives you the ability to access the PhpMyAdmin UI to consult your MariaDB data directly in a graphical way.
You can access the dashboard via the CLI:
$ heroku addons:open ah-mariadb-stackhero
Opening ah-mariadb-stackhero for sharp-mountain-4005
or by visiting the Heroku Dashboard and selecting the application in question. Select Stackhero for MariaDB from the Add-ons menu.
Connect to PhpMyAdmin
PhpMyAdmin is a web UI that gives you access to your MariaDB in a graphical way.
To connect to it, simply open your browser and connect to the hostname of your service (STACKHERO_MARIADB_HOST), like https://XXXXXX.stackhero-network.com.
Then log in with the root user or with any other user you have created.
Create a user on MariaDB
A best practice is to create a user for your application other than the default “root”.
The easiest way to do that is to use PhpMyAdmin.
In PhpMyAdmin, click on
User accountson top.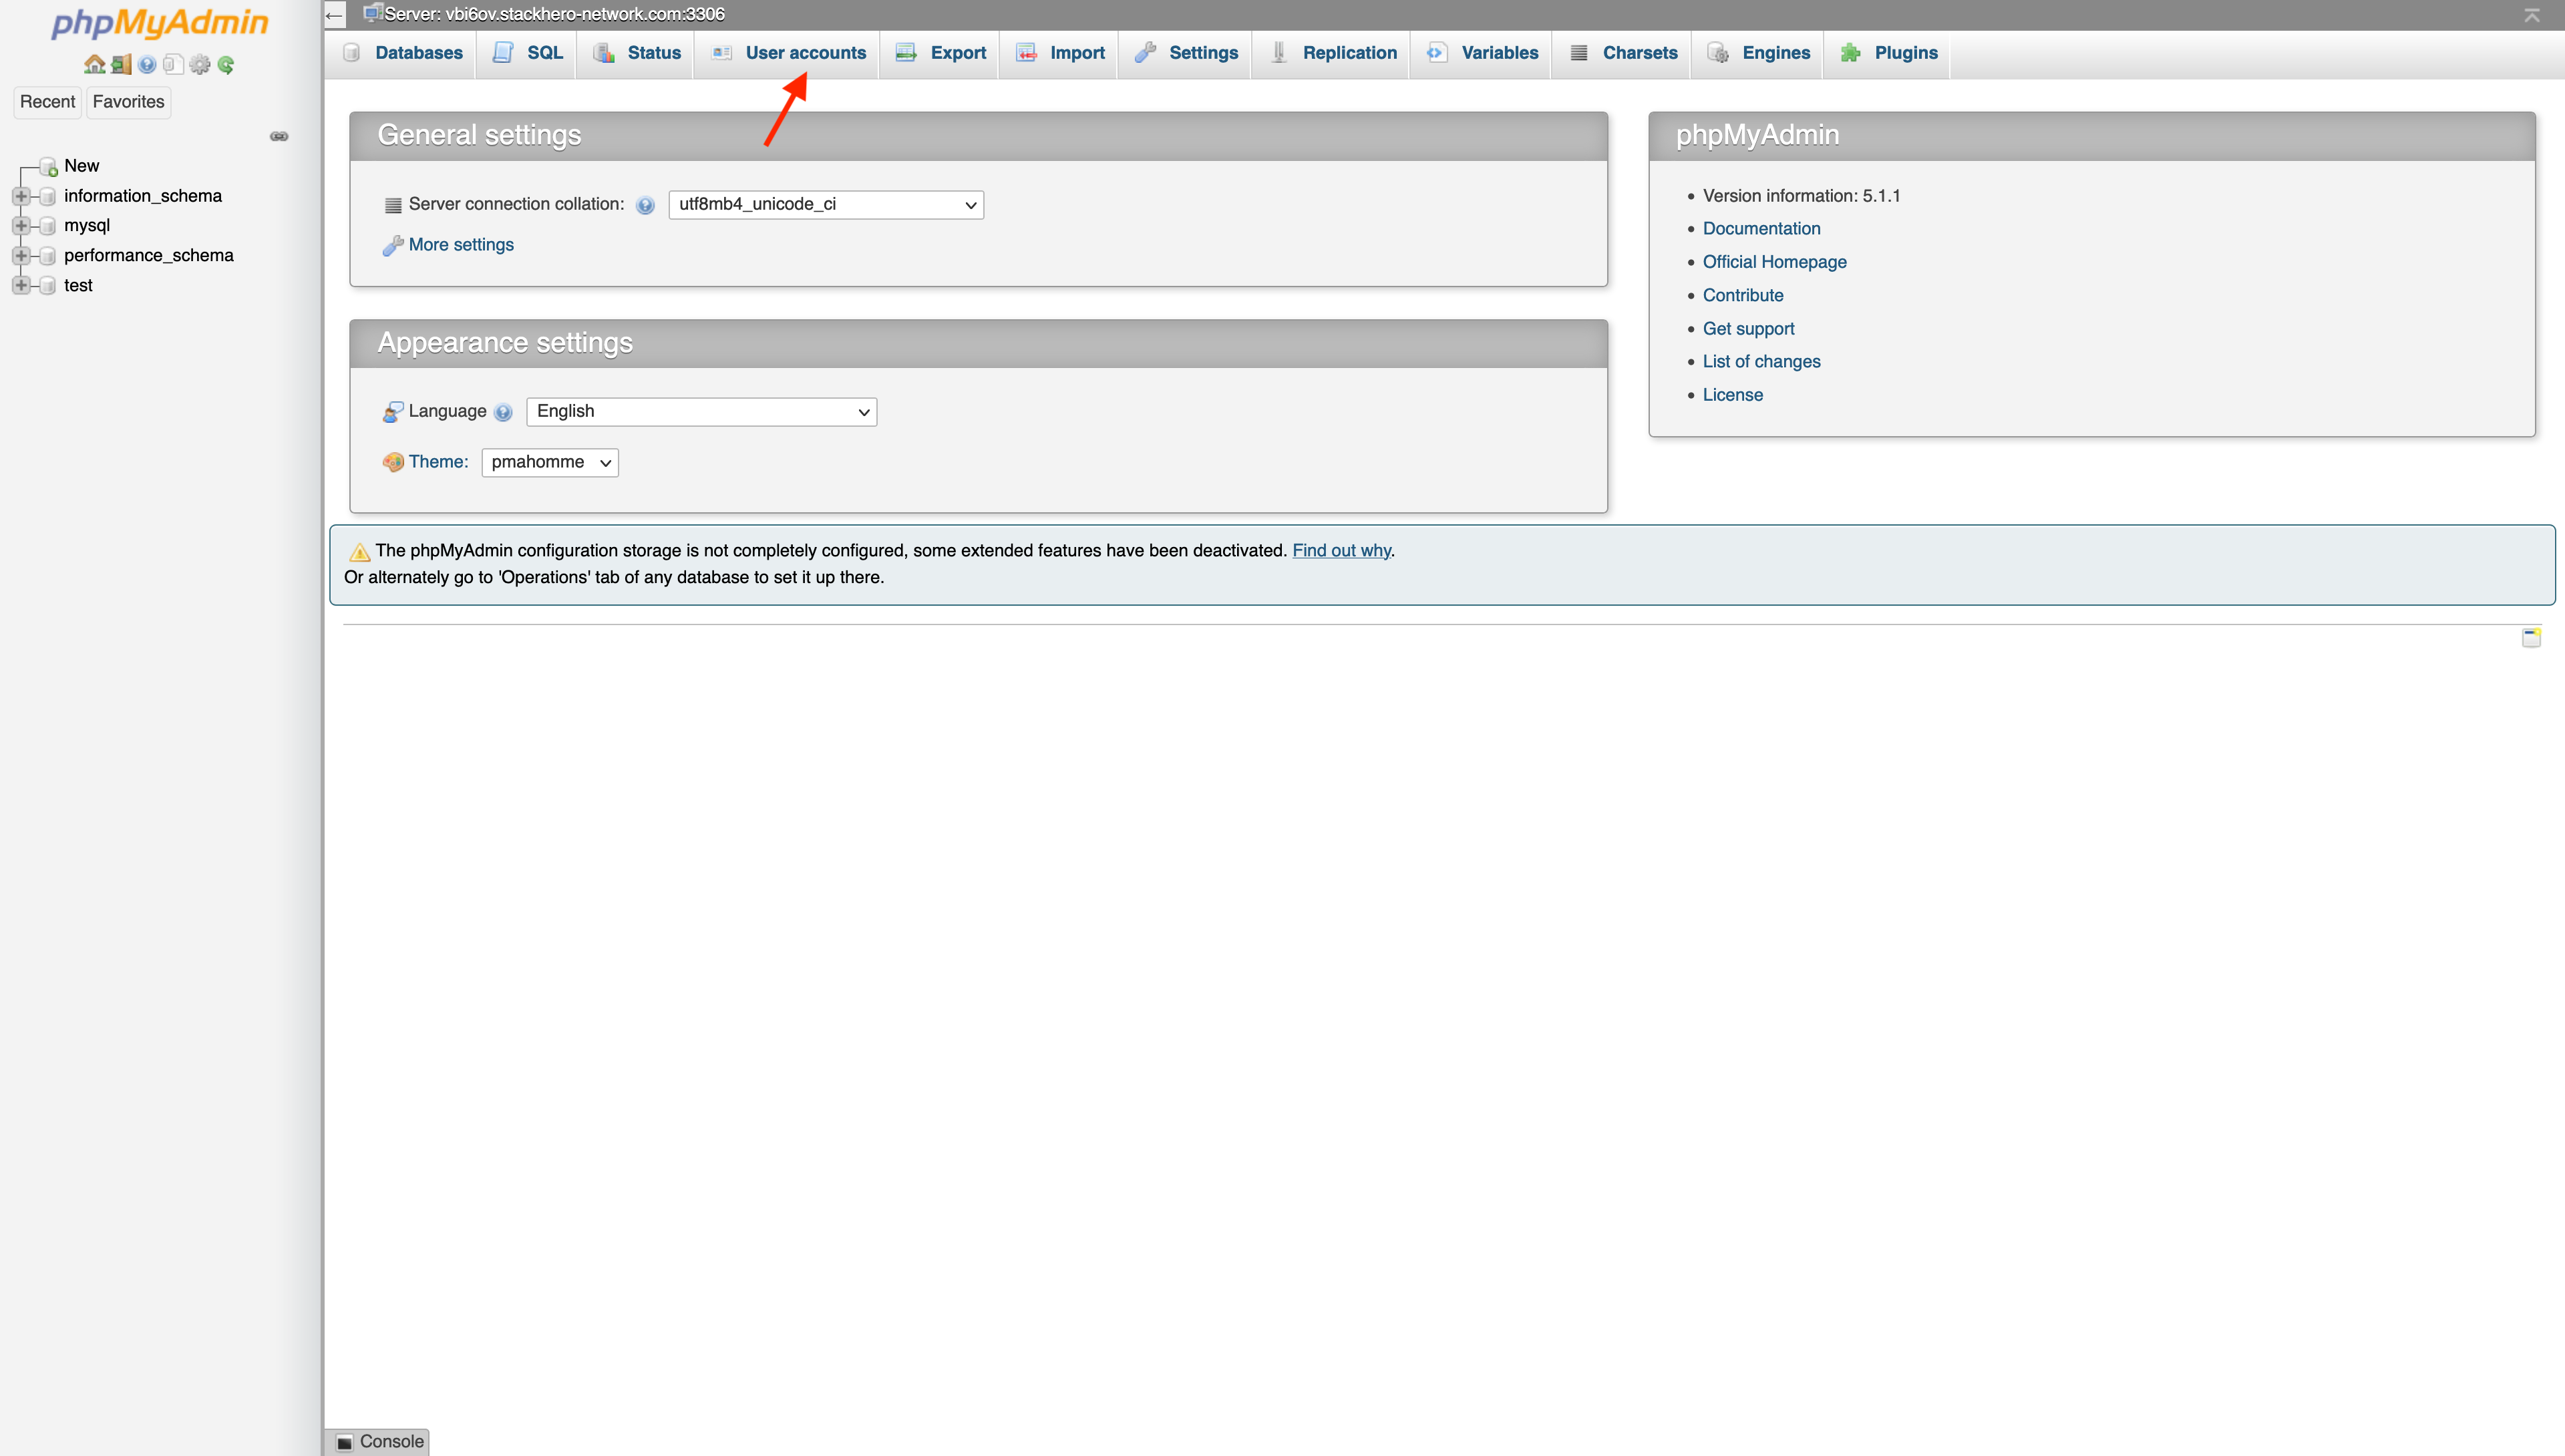
Click on
Add user account.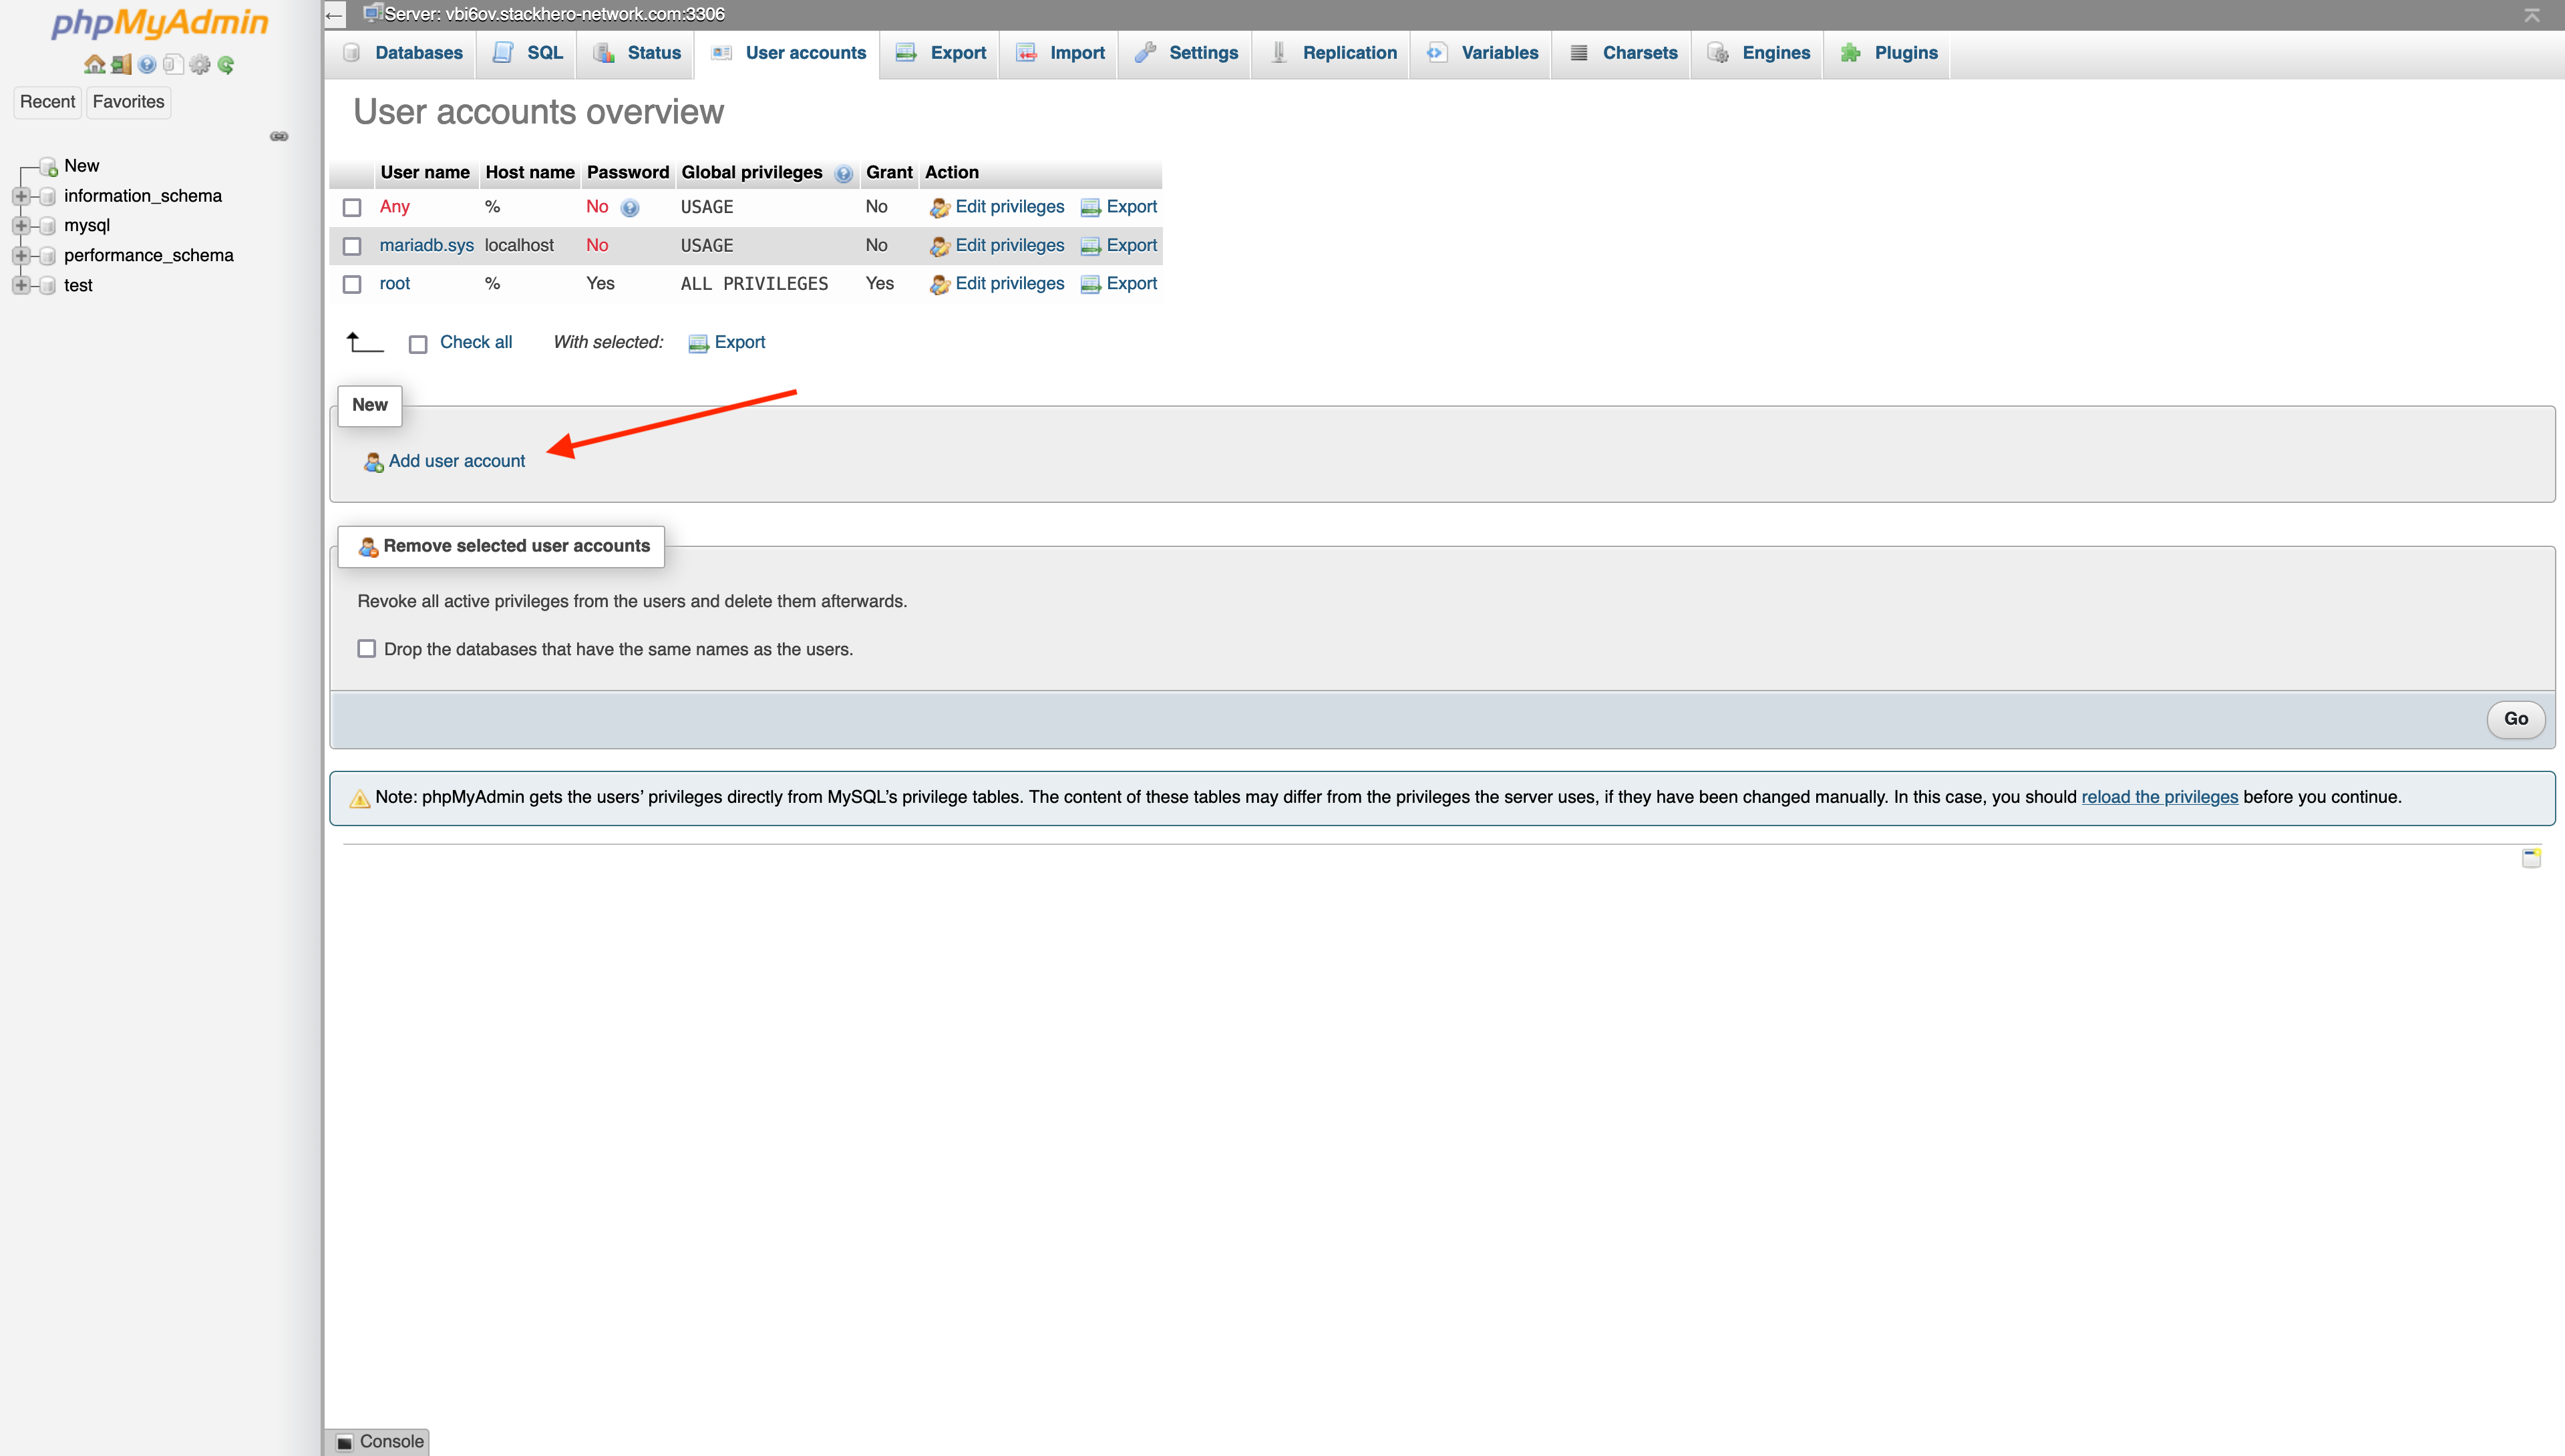
Fill the user creation form:
- Define an account name (generally your application name)
- Click on “Generate password” to get a secured password (copy it to your clipboard)
- Check the “Create database with same name and grant all privileges”
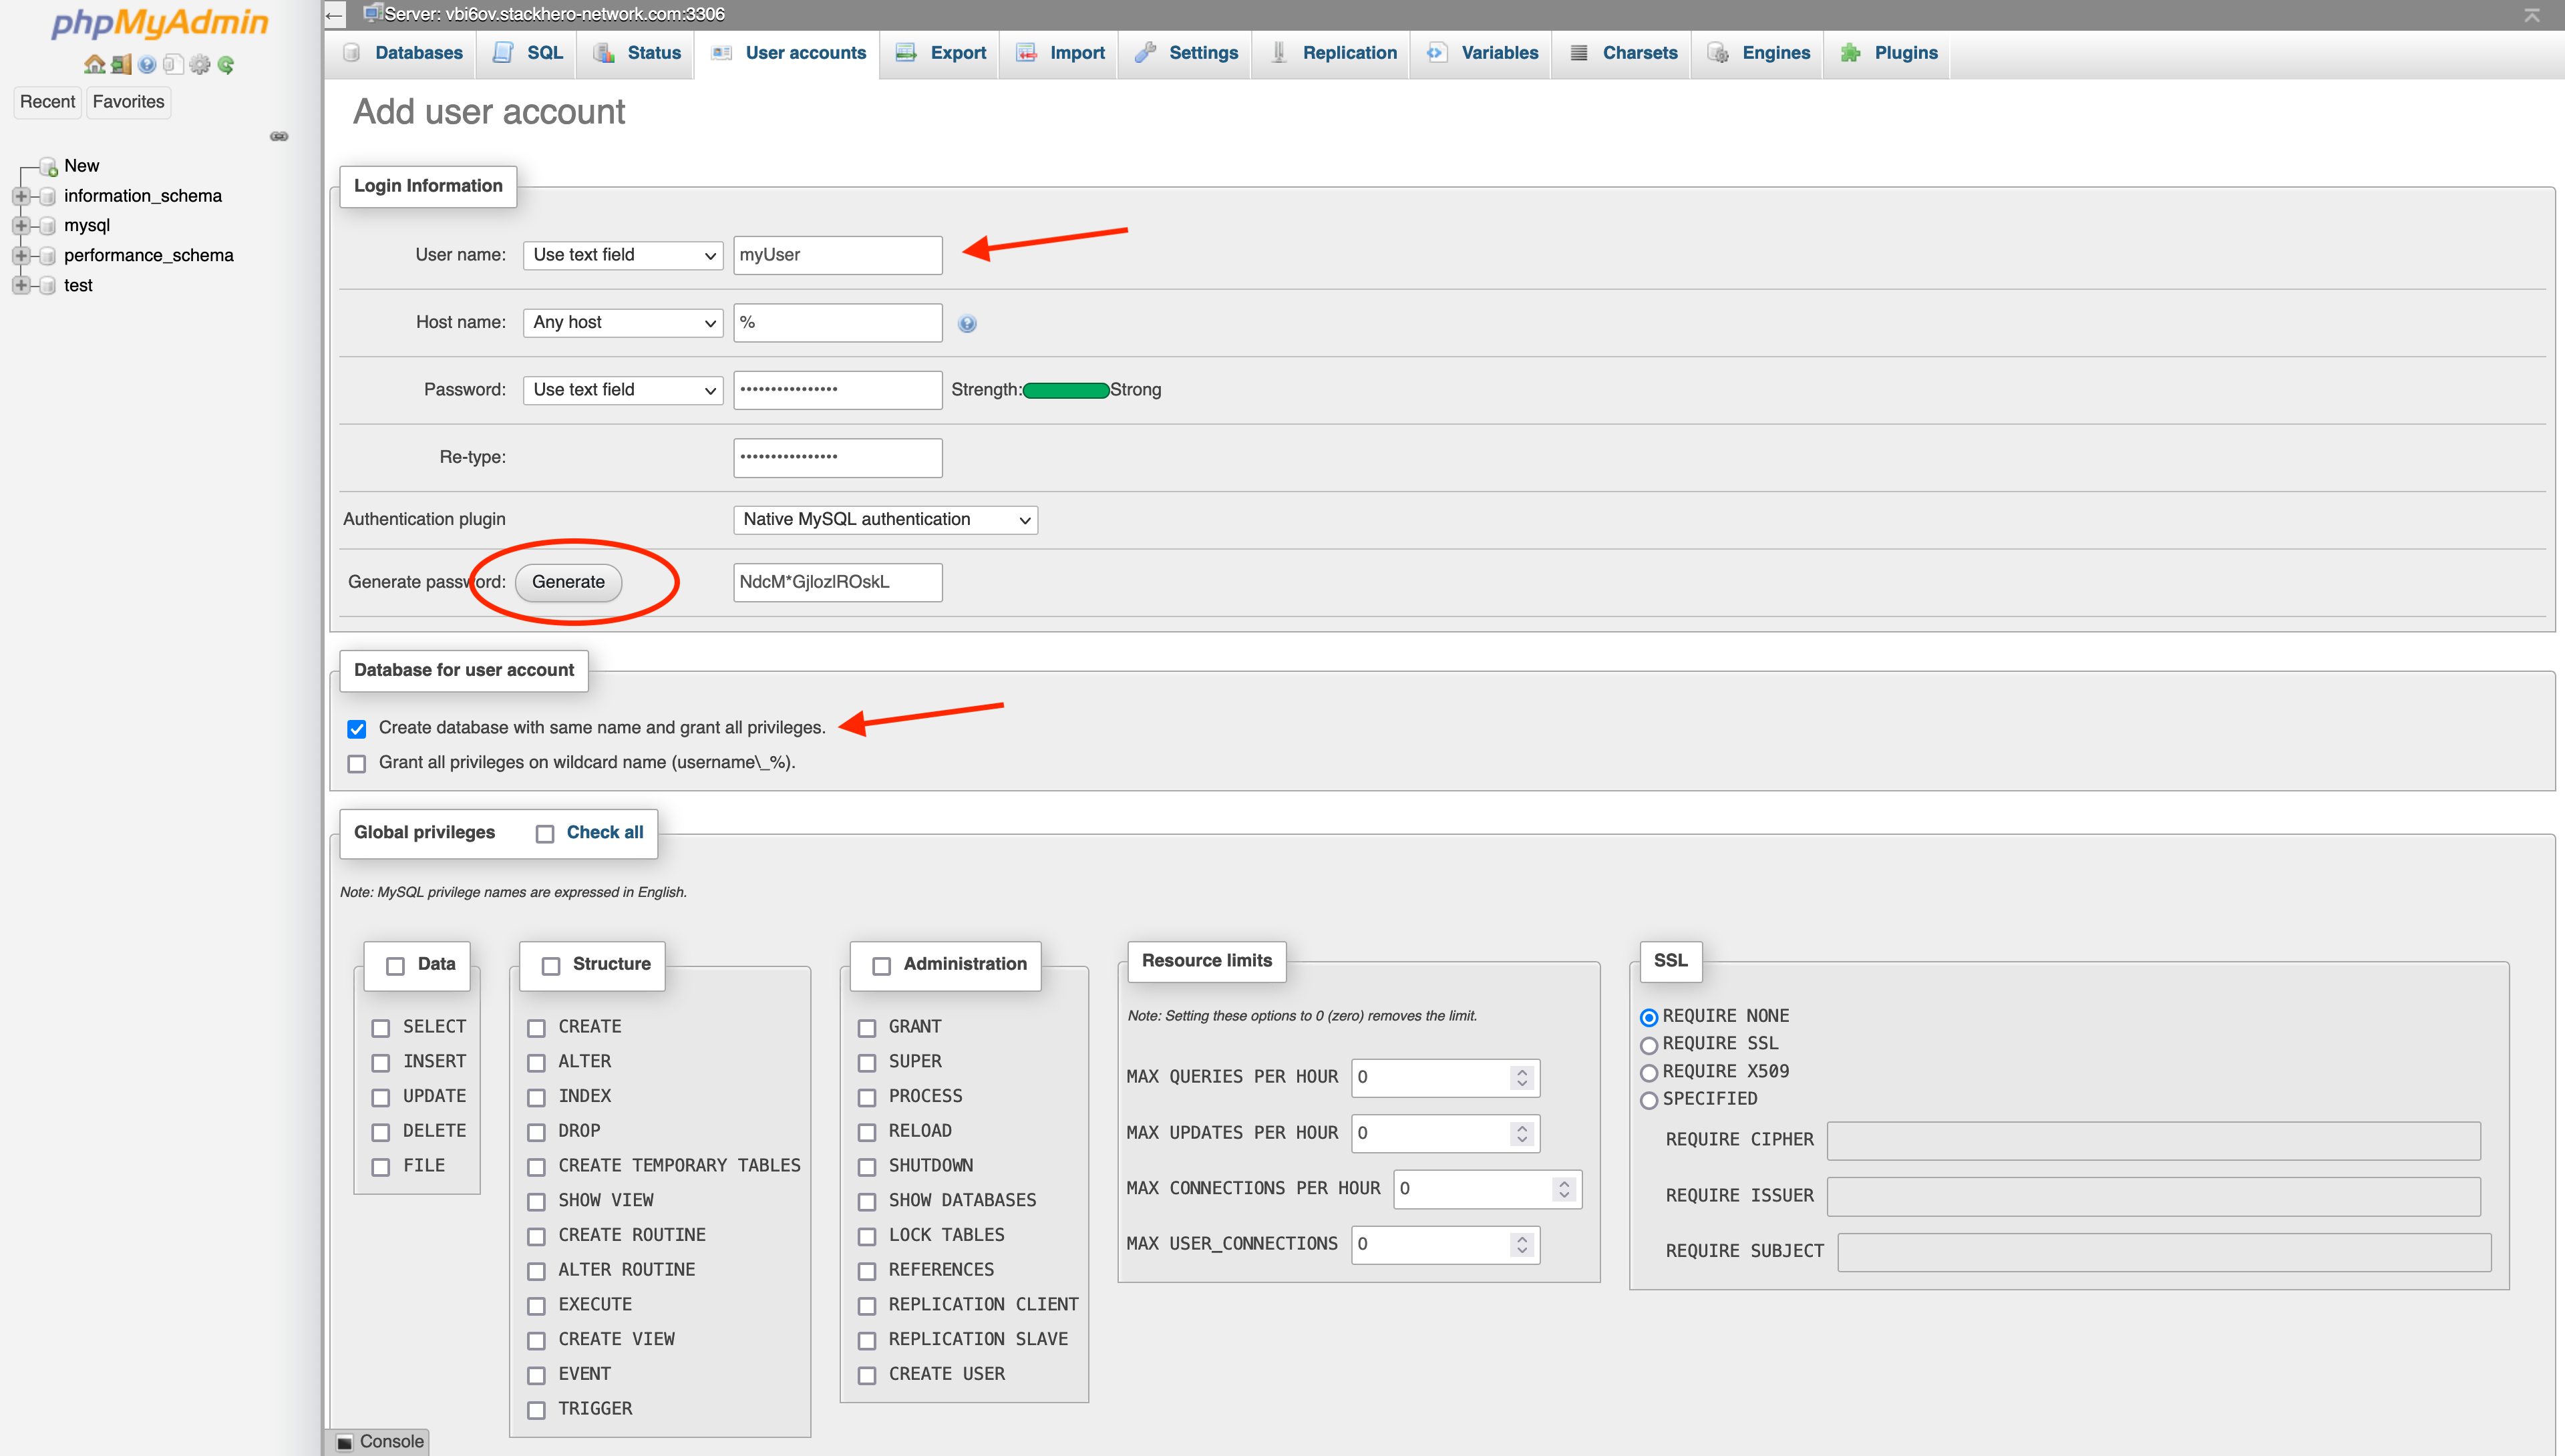
Once validated, the user will be created as its database which will get the same name as the username.
How to use MariaDB CLIs (mysql, mysqldump etc…)
MariaDB command-line tools (CLIs), such as mysql and mysqldump, are indispensable for tasks like importing or exporting data.
The most straightforward method to leverage these tools is by employing a Docker container, which streamlines the entire process.
If Docker isn’t part of your setup, no worries! An alternative is to use Code-Hero on Stackhero. Code-Hero is an all inclusive development platform that operates directly in your browser, eliminating the need for any local installations. Discover more about its advantages and start it in just 2 minutes by exploring Code-Hero on Stackhero.
To start, deploy a MariaDB container using the following command:
docker run -it -v $(pwd):/mnt mariadb:<MARIADB_VERSION> /bin/bash
Replace
<MARIADB_VERSION>with the specific version of MariaDB you require. For instance, if your application utilizes MariaDB version10.11.6-0on Stackhero, you should opt for version10.11.6, omitting the-0suffix.
After launching your container, ensure your connection works:
mysql -u root -p -h <XXXXX.stackhero-network.com> -P <PORT>
When starting the container, we have mounted your current directory to the container directory /mnt (via the argument $(pwd):/mnt).
Thanks to this, you’ll retrieve files from the current directory in /mnt and can use this directory to save data too.
As an example, to backup a database from your MariaDB service to your computer, you can use this command that will save the data to /mnt/<database>.sql:
mysqldump -u root -p -h <XXXXX.stackhero-network.com> -P <PORT> <database> > /mnt/<database>.sql
How to dump a MariaDB database
To dump a database you can use the mysqldump CLI on your computer (see above for more informations).
How to export a MariaDB database to your computer
To dump a database from a Stackhero’s instance to your computer use this command:
mysqldump -u root -p -h <XXXXX.stackhero-network.com> -P <PORT> <database> > <database>.sql
Replace <XXXXX.stackhero-network.com> and <database> and hit enter.
Mysqldump will ask you for your root password and will then download all the tables from this database to the file <database>.sql.
How to import a MariaDB database to your server
To dump a database from your computer to a Stackhero’s instance use this command:
mysql -u root -p -h <XXXXX.stackhero-network.com> -P <PORT> <database> < yourDump.sql
Replace yourDump.sql per the SQL file you want to send to Stackhero’s instance.
Reclaim disk space after data deletion
When data is deleted from a MariaDB table, the disk space occupied by this data is not immediately freed. To reclaim this space, it is necessary to execute the OPTIMIZE TABLE <table> command.
This command operates by generating a new table, transferring the existing data to this new table, and subsequently removing the original table. An important aspect to note is that during this process, the table being optimized will be locked, making it temporarily inaccessible. The duration of this lock, and consequently the entire operation, largely depends on the size of the table being optimized.
Given the intensive nature of this operation, both in terms of time and system resources, it is advisable to schedule the OPTIMIZE TABLE command during periods of low activity on your MariaDB server. This helps in minimizing the impact on database performance and availability.
Add your user to environment variables
You can now define your environment variables as follow:
$ heroku config:set STACKHERO_MARIADB_USER=<yourUserName>
$ heroku config:set STACKHERO_MARIADB_PASSWORD=<yourUserPassword>
And if you need to access them locally, for development purporse for example, you can save them to you .env file:
$ heroku config:get STACKHERO_MARIADB_USER -s  >> .env
$ heroku config:get STACKHERO_MARIADB_PASSWORD -s  >> .env
Upgrading your plan
You cannot downgrade an existing add-on.
Application owners should carefully manage the migration timing to ensure proper application function during the migration process.
Use the heroku addons:upgrade command to migrate to a new plan.
$ heroku addons:upgrade ah-mariadb-stackhero:newplan
-----> Upgrading ah-mariadb-stackhero:newplan to sharp-mountain-4005... done
       Your plan has been updated to: ah-mariadb-stackhero:newplan
Removing the add-on
You can remove Stackhero for MariaDB via the CLI:
This will destroy all associated data and cannot be undone!
$ heroku addons:destroy ah-mariadb-stackhero
-----> Removing ah-mariadb-stackhero from sharp-mountain-4005... done
Support
Stackhero for MariaDB support and runtime issues should be submitted via one of the Heroku Support channels. We recommend adding support@stackhero.io in copy for urgent issues.