Table of Contents [expand]
Last updated March 17, 2025
Using a Content Delivery Network (CDN) optimizes the delivery of static assets on your site, speeding up page loads. Offloading all requests for static assets from your web dynos also allows them to handle more requests for dynamic content. This article covers how to use Amazon CloudFront with Heroku apps.
Use a CDN add-on instead of Amazon CloudFront to streamline the provisioning process and consolidate billing.
Amazon S3 vs. Amazon CloudFront
While many developers make use of Amazon’s S3 service for serving static assets, S3 is designed for file storage, not for optimal delivery of files under load. It’s recommended to use a CDN such as Amazon CloudFront to serve static assets instead.
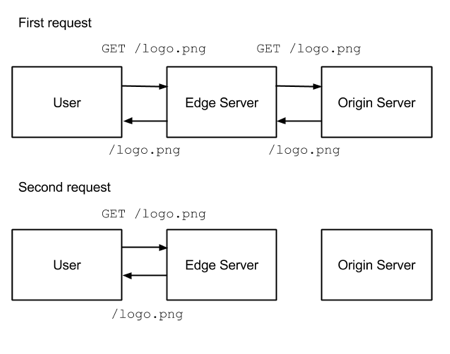
Amazon’s CloudFront service is designed as a content delivery network to serve static assets such as CSS or JavaScript files from edge cache locations.
Edge cache locations are groups of servers distributed around the world, optimized for the high throughput serving of small static files. Using latency-based DNS resolution, Amazon routes assets requests to the closest edge cache location to the end-user.
CloudFront works from what is called a distribution. A distribution is the direct equivalent of an S3 bucket. Each distribution is assigned a domain name.
An example distribution URL is d3vam04na8c92l.cloudfront.net.
Note that by using a DNS CNAME record, you can hide this domain behind something from your application e.g. cdn.mydomain.com.
A distribution draws its contents from an origin. The origin is where CloudFront draws files from if it doesn’t have a copy within the distribution. CloudFront caches files requested from the origin and returns them directly to the end-user.
Create a Distribution
- Log into you Amazon AWS account.
- Go to the CloudFront control panel.
- Select
Create distribution. - When prompted for the delivery method, select
Web.
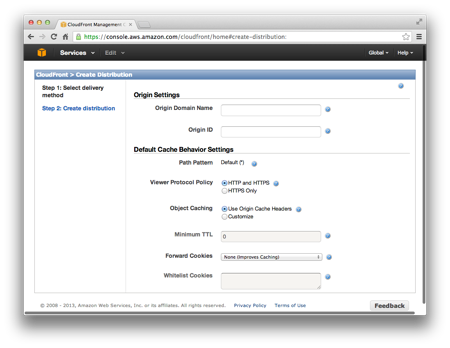
The defaults are sufficient for most applications. Refer to the inline-help for more information on the various options. If you want to alias your distribution URL with a CNAME, you must enter the domain under Origin Domain Name.
Enter the domain name for your application as the Origin Domain Name. By default, Amazon shows a list of your S3 buckets. You can type over this value.
It takes some time for Amazon to set up your distribution after its creation. It generally takes around five to ten minutes to complete. You can track the status of this via the indicators in the CloudFront user interface.
Test Your Distribution
You can manually test that your setup works by selecting the full URL of one of your static assets, such as a CSS file:
https://www.mydomain.com/stylesheets/application-6502e5a88f02b90aeb32c2dd21ea37ab.css
Try to request this file through your CloudFront endpoint:
https://d3vam04na8c92l.cloudfront.net/stylesheets/application-6502e5a88f02b90aeb32c2dd21ea37ab.css
This request returns the CSS file as it would be normally returned from your application. If the request didn’t return the file as expected, verify your CloudFront settings and ensure you’re using the correct domain for your distribution.
Note that CloudFront only works well with “fingerprinted” asset file names, that is, files with a unique name based on the content of the file. The reason for this is that CloudFront always sees application.css as one file, even if you’ve changed the contents, leading to users receiving stale versions of that file.
To serve CloudFront assets using SSL, use HTTPS on the distribution domain given to you by Amazon. You can also create CNAMEs for this purpose, though serving Cloudfront assets over your CNAME and SSL has an attached cost.
Adding CloudFront to Rails
Most versions of Rails has built-in support for CDNs. Within config/environments/production.rb set asset_host to prepend your CloudFront domain onto all asset links created via the built-in asset helpers.
# config/environments/production.rb
config.action_controller.asset_host = "<YOUR DISTRIBUTION SUBDOMAIN>.cloudfront.net"
Only assets linked via the built-in helpers, such as image_tag, get prepended. Setting asset_host doesn’t affect manually created links. Consult the Rails Asset Pipeline Documentation for more help with links.
Note that CloudFront respects and mirrors the HTTP cache headers that you return from your application. For more info, see Increasing Application Performance with HTTP Cache Headers.
CORS
If you load all the assets on your site via a CDN, you can get browser warnings or errors about using resources from different origins:
Cross-Origin Request Blocked: The Same Origin Policy disallows reading the remote resource.
Cross-origin resource sharing or CORS allows you to communicate to the browser which assets can be loaded safely. It works by setting specific headers when serving the assets. You can set headers using ActionDispatch::Static in Rails 5 or via rack-cors gem.