Skip Navigation
Show nav
Heroku Dev Center
  • Get Started
  • Documentation
  • Changelog
  • Search
  • Get Started
    • Node.js
    • Ruby on Rails
    • Ruby
    • Python
    • Java
    • PHP
    • Go
    • Scala
    • Clojure
  • Documentation
  • Changelog
  • More
    Additional Resources
    • Home
    • Elements
    • Products
    • Pricing
    • Careers
    • Help
    • Status
    • Events
    • Podcasts
    • Compliance Center
    Heroku Blog

    Heroku Blog

    Find out what's new with Heroku on our blog.

    Visit Blog
  • Log inorSign up
View categories

Categories

  • Heroku Architecture
    • Dynos (app containers)
    • Stacks (operating system images)
    • Networking & DNS
    • Platform Policies
    • Platform Principles
  • Command Line
  • Deployment
    • Deploying with Git
    • Deploying with Docker
    • Deployment Integrations
  • Continuous Delivery
    • Continuous Integration
  • Language Support
    • Node.js
    • Ruby
      • Working with Bundler
      • Rails Support
    • Python
      • Background Jobs in Python
      • Working with Django
    • Java
      • Working with Maven
      • Java Database Operations
      • Working with the Play Framework
      • Working with Spring Boot
      • Java Advanced Topics
    • PHP
    • Go
      • Go Dependency Management
    • Scala
    • Clojure
  • Databases & Data Management
    • Heroku Postgres
      • Postgres Basics
      • Postgres Getting Started
      • Postgres Performance
      • Postgres Data Transfer & Preservation
      • Postgres Availability
      • Postgres Special Topics
    • Heroku Data For Redis
    • Apache Kafka on Heroku
    • Other Data Stores
  • Monitoring & Metrics
    • Logging
  • App Performance
  • Add-ons
    • All Add-ons
  • Collaboration
  • Security
    • App Security
    • Identities & Authentication
    • Compliance
  • Heroku Enterprise
    • Private Spaces
      • Infrastructure Networking
    • Enterprise Accounts
    • Enterprise Teams
    • Heroku Connect (Salesforce sync)
      • Heroku Connect Administration
      • Heroku Connect Reference
      • Heroku Connect Troubleshooting
    • Single Sign-on (SSO)
  • Patterns & Best Practices
  • Extending Heroku
    • Platform API
    • App Webhooks
    • Heroku Labs
    • Building Add-ons
      • Add-on Development Tasks
      • Add-on APIs
      • Add-on Guidelines & Requirements
    • Building CLI Plugins
    • Developing Buildpacks
    • Dev Center
  • Accounts & Billing
  • Troubleshooting & Support
  • Integrating with Salesforce
  • Add-ons
  • All Add-ons
  • Pusher Channels
Pusher Channels

This add-on is operated by Pusher

Build realtime features your users love.

Pusher Channels

Last updated August 01, 2019

Table of Contents

  • Install Channels Gem
  • Install add-on
  • Configure for local use
  • Production credentials
  • Verifying your set up
  • Set up a view
  • Triggering events
  • Going further

Channels lets you push events to clients over a WebSocket via a simple API call. To install Channels as a Heroku add-on, simply follow the steps below.

Let’s say you want to add Channels an existing Rails 3 app. We’ll assume you’ve already created your app on Heroku.

Install Channels Gem

Start by installing the Channels gem, or adding it to your Gemfile.

$ gem install pusher
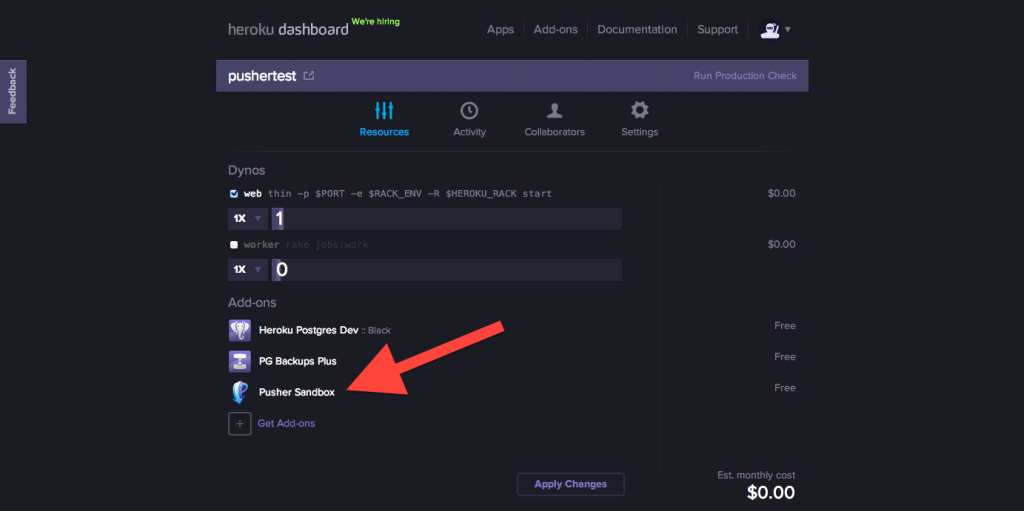
Install add-on

$ heroku addons:create pusher:sandbox

Configure for local use

Get your ‘development’ Channels credentials for your local app:

Heroku Panel

Channels application credentials

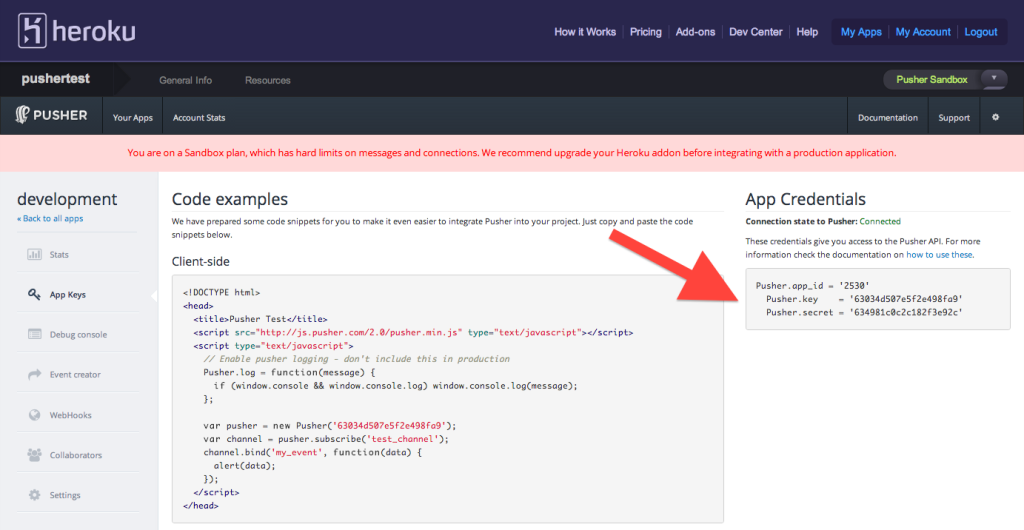
Configure your app for development mode only. In Rails, this would go in config/environments/development.rb:

require 'pusher'

Pusher.app_id = 'YOUR_CHANNELS_APP_ID'
Pusher.key = 'YOUR_CHANNELS_KEY'
Pusher.secret = 'YOUR_CHANNELS_SECRET'

Production credentials

Channels will automatically be configured to use your ‘heroku’ application when you deploy it as long as the gem is in your Gemfile:

gem 'pusher'

Verifying your set up

Set up a view

In one of your templates, you will now need to configure a Channels connection for your Javascript. The following subscribes to a channel called ‘test_channel’ and listens for the ‘greet’ event:

<script src="//js.pusher.com/4.4/pusher.min.js"></script>
<script>
// If your Heroku application is within the EU region,
// uncomment the followling lines
// Pusher.host = 'ws-eu.pusher.com';
// Pusher.sockjs_host = 'sockjs-eu.pusher.com';

var pusher = new Pusher('<%= Pusher.key %>'); // uses your APP KEY
var channel = pusher.subscribe('test_channel');
channel.bind('greet', function(data) {
  alert(data.greeting);
});
</script>

Triggering events

In your Rails controllers, you now can trigger events that your connected clients will receive. This is relatively simple:

Pusher['test_channel'].trigger('greet', {
  :greeting => "Hello there!"
})

Now every time you push to Heroku your app will be automatically configured to use the “heroku” app created in your Pusher Channels panel.

Going further

Hopefully this has given you a taste of the great stuff you can do with Channels. We recommend having a look through our Channels documentation to get an idea of what else is available.

In particular, the section on Debugging is particularly useful. Remember that you have access to your Channels dashboard from within Heroku’s panel.

Keep reading

  • All Add-ons

Feedback

Log in to submit feedback.

Ziggeo QRackajack

Information & Support

  • Getting Started
  • Documentation
  • Changelog
  • Compliance Center
  • Training & Education
  • Blog
  • Podcasts
  • Support Channels
  • Status

Language Reference

  • Node.js
  • Ruby
  • Java
  • PHP
  • Python
  • Go
  • Scala
  • Clojure

Other Resources

  • Careers
  • Elements
  • Products
  • Pricing

Subscribe to our monthly newsletter

Your email address:

  • RSS
    • Dev Center Articles
    • Dev Center Changelog
    • Heroku Blog
    • Heroku News Blog
    • Heroku Engineering Blog
  • Heroku Podcasts
  • Twitter
    • Dev Center Articles
    • Dev Center Changelog
    • Heroku
    • Heroku Status
  • Facebook
  • Instagram
  • Github
  • LinkedIn
  • YouTube
Heroku is acompany

 © Salesforce.com

  • heroku.com
  • Terms of Service
  • Privacy
  • Cookies
  • Cookie Preferences