This add-on is operated by AppDynamics
Monitor & manage complex applications to identify and resolve performance issues
AppDynamics
Last updated July 27, 2023
This article is a work in progress, or documents a feature that is not yet released to all users. This article is unlisted. Only those with the link can access it.
The AppDynamics add-on is currently in beta.
Table of Contents
The AppDynamics application performance management add-on is a technology solution that provides end-to-end business transaction centric management of the most complex and distributed applications. Auto-discovered transactions, dynamic baselining and code-level diagnostics ensure rapid issue identification and resolution to maintain an ideal user experience.
The AppDynamics add-on lets you:
- Have complete visibility of distributed applications with auto-discovered end-to-end business transactions.
- View a dynamic performance baseline to alert and address emerging issues in context of business transactions.
- Quickly isolate and resolve production application performance issues at code-level depth with minimal overhead.
- Monitor applications with minimal overhead.
- Resolve application issues quickly for exceptional end-user experience.
Supported languages
The AppDynamics add-on is available for these supported agent languages and frameworks:
Provisioning the add-on
AppDynamics can be attached to a Heroku application via the CLI:
A list of all plans available can be found here.
$ heroku addons:create appdynamics
-----> Adding appdynamics to sharp-mountain-4005... done, v18 (free)
Installing the add-on would provision a AppDynamics license and automatically creates
- AppDynamics Account
- Adds AppDynamics link to your add-ons list in Heroku UI
- Email customer with a welcome email from AppDynamics
Configure AppDynamics agent
After installing add-on, configure AppDynamics agent for your specific language or framework
NOTE: AppDynamics is currently supporting only NodeJS agent on Heroku. Other language agents support would be added shortly.
NodeJS Agent
- Modify the package.json file of your application to add appdynamics dependancy. This will download the appdynamics agent on the target dyno.
NOTE: Use nodejs agent version prior to v4.1.8
   "dependencies": {
     "appdynamics": "4.1.0",  // specify a valid version number
     "<dependency>": "<version>"
  },
- Paste the following require statement in the landing page of your application. Replace the variables with the values for your setup. See Advanced Instructions to know significance of each setting. This require statement enables the agent and controller communication.
  require("appdynamics").profile({
  controllerHostName: '<controller host name>',
  controllerPort: <controller port number>,
  controllerSslEnabled: true,      // Set to false if controllerPort is not SSL enabled
  accountName: '<AppDynamics_account_name>',
  accountAccessKey: '<AppDynamics_account_key>', //required
  applicationName: '<your app name>', // Enter a name for your application
  tierName: '<choose tier name>',   // Enter custom defined tier name
  nodeName: '<choose node name>',   // Enter custom defined node name
 });
Get the controllerHostName, accountName and accountAccessKey by clicking on Controller Login Info button on AppDynamics Account Page 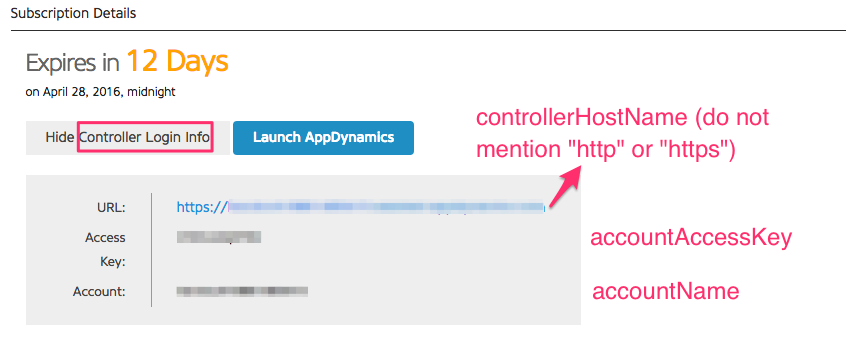 For Heroku customers, if your controller is over HTTPS, the controllerSslEnabled value will be true and the controllerPort value will be 443.
AppDynamics recommends that you insert the AppDynamics require statement as the very first line of your application source code, before any other require statement. Or, if your first line of code is a require statement of another script that contains the require(“appdynamics”) call before any other require()s, that works too.
This is a sample require statement
For Heroku customers, if your controller is over HTTPS, the controllerSslEnabled value will be true and the controllerPort value will be 443.
AppDynamics recommends that you insert the AppDynamics require statement as the very first line of your application source code, before any other require statement. Or, if your first line of code is a require statement of another script that contains the require(“appdynamics”) call before any other require()s, that works too.
This is a sample require statement
  require("appdynamics").profile({
  controllerHostName: 'sharp-mountain-4005.saastest.appdynamics.com',
  controllerPort: 443,
  controllerSslEnabled: true,  // Set to true if controllerPort is SSL
  accountName: 'sharp-mountain-4005', // Required for SaaS accounts
  accountAccessKey: 'abcd1234', // Required for SaaS accounts
  applicationName: 'SampleHerokuApp',
  tierName: 'SampleNodejs-webtier',
  nodeName: 'SampleHeroku-dyno',
  });
- Save these changes and push the changes to your remote heroku branch
$ git add .
$ git commit -m "{message}"
$ git push heroku master
Generate traffic for your deployed application. Now lets view the Dashboard to check the performance of your application
Monitoring and logging
AppDynamics activity can be observed within the Heroku log-stream
$ heroku logs -t | grep 'appdynamics'
Dashboard
The AppDynamics Controller dashboard allows you to monitor performance of your application. This can be accessed in two ways.
- Using Heroku toolbelt command
  $ heroku addons:open appdynamics
  Opening appdynamics for sharp-mountain-4005
- Using Heroku Dashboad
- From Heroku dashboard, select the application which has AppDynamics add-on installed and configured.
- In Resources tab, from the list of add-ons, select AppDynamics icon. You will be redirected via SSO to your AppDynamics account.
- Click Launch AppDynamics button to open AppDynamics controller.
In the controller, select the application you instrumented to check the performance of your application
Troubleshooting
For resolving issues related to the agent installation,
Removing the add-on
Before you uninstall AppDynamics add-on, remove the settings for AppDynamics agent.
NodeJS Agent
- Modify package.json file of your application to to remove appdynamics dependency.
     "dependencies": {
       "appdynamics": "4.1.0",  // Remove this statement
       "<dependency>": "<version>"
   },
- Remove require(“appdynamics”) statement from the landing page of your application.
require("appdynamics").profile({ }); // Remove this statement
- Finally, remove the appdynamics add-on from your heroku application using the heroku toolbelt command > warning > This will destroy all associated data and cannot be undone!
 $ heroku addons:destroy appdynamics
 -----> Removing appdynamics from sharp-mountain-4005... done, v20 (free)
Support and Feedback
All AppDynamics support and runtime issues should be submitted via one of the Heroku Support channels. Any non-support related issues or product feedback is welcome at