This add-on is operated by Fastly, Inc
Fastly is a real-time content delivery network that helps businesses scale
Fastly
Last updated August 11, 2021
Table of Contents
- Provisioning the Fastly add-on
- General HTTP caching
- Terminology
- Fastly Web Interface
- Configuring custom domains
- Enabling TLS on custom domains
- Framework-Specific configuration
- Dynamic content caching
- Verifying configuration
- Troubleshooting
- Migrating between plans
- Removing the Fastly add-on
- Support and Community
Fastly is a global content delivery network (CDN). Fastly has points of presence (POPs) all over the world and runs a highly optimized network to reduce latency to end clients. The Fastly add-on provides a way to add the power of Fastly’s global CDN to Heroku applications.
This document covers configuration of static and dynamic edge caching with Fastly for Heroku applications.
Provisioning the Fastly add-on
Fastly can be attached to a Heroku application via the CLI:
Our plans and pricing information details all available plans.
$ heroku addons:create fastly --app example-app
Creating fastly on ⬢ example-app... $25/month
Welcome to Fastly - the most flexible, modern content delivery network available! Your CDN is available immediately. See our docs for info on accelerating both static and dynamic content.
Created fastly-clear-11111
Use heroku addons:docs fastly to view documentation
After you install Fastly, your application is configured to fully integrate with the add-on. The following Fastly configuration variables are available to your Heroku application:
FASTLY_API_KEY- Your API key for making calls against the Fastly API.FASTLY_CDN_URL- The canonical URL where your application or website is available on the Fastly network. You can also add custom domains to your service.FASTLY_SERVICE_ID- The ID that uniquely identifies your Fastly service.
To view Fastly configuration variables, run the heroku config command:
$ heroku config --app example-app
=== example-app Config Vars
FASTLY_API_KEY:    xxxxfeda106982643a06ea8990exxxx
FASTLY_CDN_URL:    example-app-herokuapp-com.global.ssl.fastly.net
FASTLY_SERVICE_ID: SU1Z0isxPaozGVKXdv0eY
About the provisioning process
During the Fastly add-on provisioning process, a service is created on behalf of your application with the following default configuration:
- Service:
example-app - Backend:
example-app.herokuapp.com:80 - Domain: `example-app-herokuapp-com.global.ssl.fastly.net
The default configuration works for serving static content over HTTP and HTTPS on the example-app-herokuapp-com.global.ssl.fastly.net domain. You can the configure this default configuration using the Fastly web interface. For example, you can add a custom domain.
General HTTP caching
It’s helpful to know a little about HTTP performance and optimization before starting. If you’re familiar with HTTP caching, feel free to skip this section.
Cache control headers
HTTP Cache-Control and Surrogate-Control headers tell Fastly which content to cache and for how long to cache it. Correctly setting cache control headers on application responses can significantly impact performance. As such, we encourage you to consider which values make the most sense for your application. In general, the longer an object’s time to live (TTL), the higher the cache hit ratio, meaning fewer requests back to your dynos and better response time to clients.
A typical Cache-Control header looks like the following:
Cache-Control: public, s-maxage=2592000, max-age=86400
In the Cache-Control directives above:
publicspecifies this content can be cacheds-maxagespecifies a 30 day TTL for surrogate caches (e.g. a CDN edge cache)max-agespecifies a 24 hour TTL for other caches (e.g. browser cache)
A full list of directives is available in the specs linked above. For further explanation and examples related to Fastly, see Configuring caching.
Terminology
The following terms are useful to know to work with Fastly.
- Service - Represents the configuration for a website, application, API, or anything else to be served through Fastly. A Fastly service has at least one backend and one domain.
- Backend - The address of the Heroku dyno from which Fastly pulls content (sometimes referred to as the “origin”).
- Domain - The URL visitors use to access your application. This is how we know where to route requests for a given service.
Fastly Web Interface
Use Fastly’s web interface to make configuration changes to your Fastly service, view obtain real-time and historic CDN stats, and instantly purge cached content.
Use the following command to open an authenticated session in the Fastly web interface:
$ heroku addons:open fastly
Opening fastly for example-app...
All Fastly service configuration changes are versioned so that if a mistake is made, it can quickly be rolled back to a prior working version. In general, the process of modifying a service configuration involves:
- cloning the active service version
- modifying the configuration as needed
- sctivating the cloned version
Once a version is activated, it becomes locked and can no longer be modified. For more information about managing Fastly services, see Working with services.
Configuring custom domains
The .global.ssl.fastly.net domain created during the provisioning process works without alteration, but you might want to use a more friendly looking URL. For example, to use the custom domain www.example.com you would first add that domain to your Heroku configuration. Then you would add the same domain to your Fastly service.
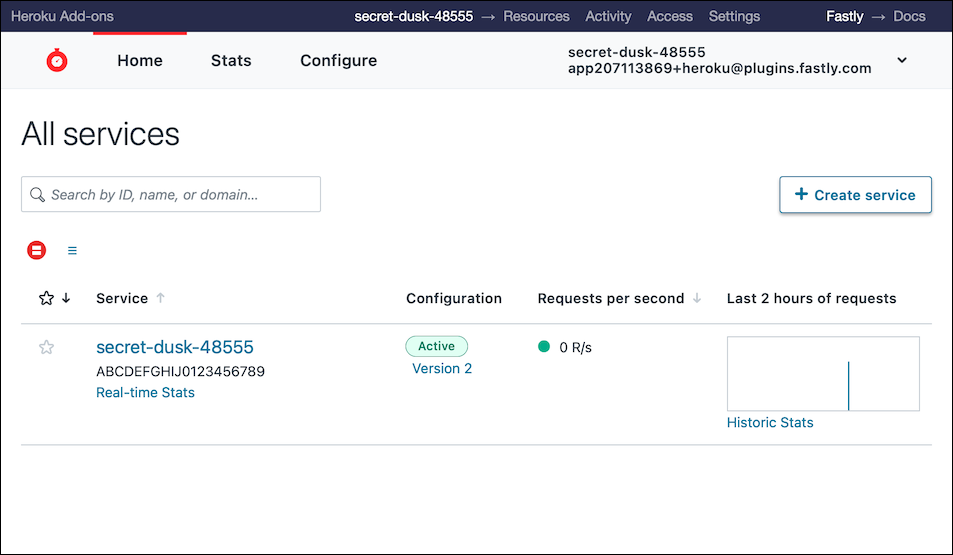
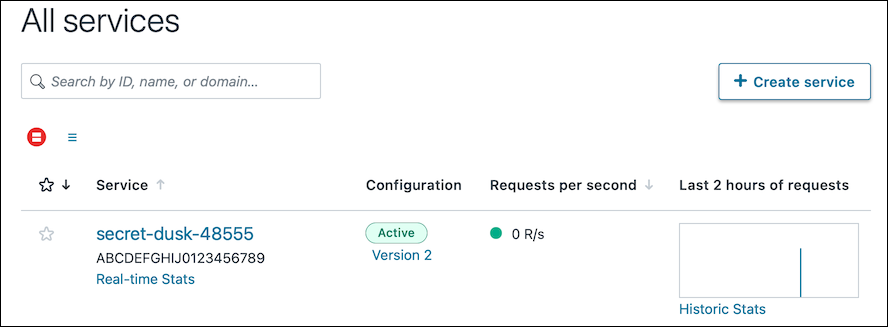
Login to the Fastly web interface. The All services page appears.
$ heroku addons:open fastlyFrom the All services page, select the Fastly service provisioned by Heroku to open the Service summary page. You can use the search box to search by ID, name, or domain.
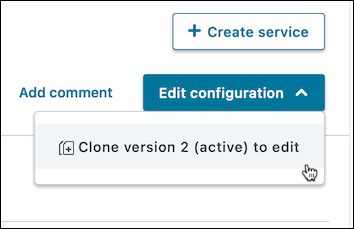
On the Service summary page, click the Edit configuration button and then select the option to clone the active version. The Domains page appears. Notice the two domains (SSL and non-SSL) listed that were added during the Fastly provisioning process.
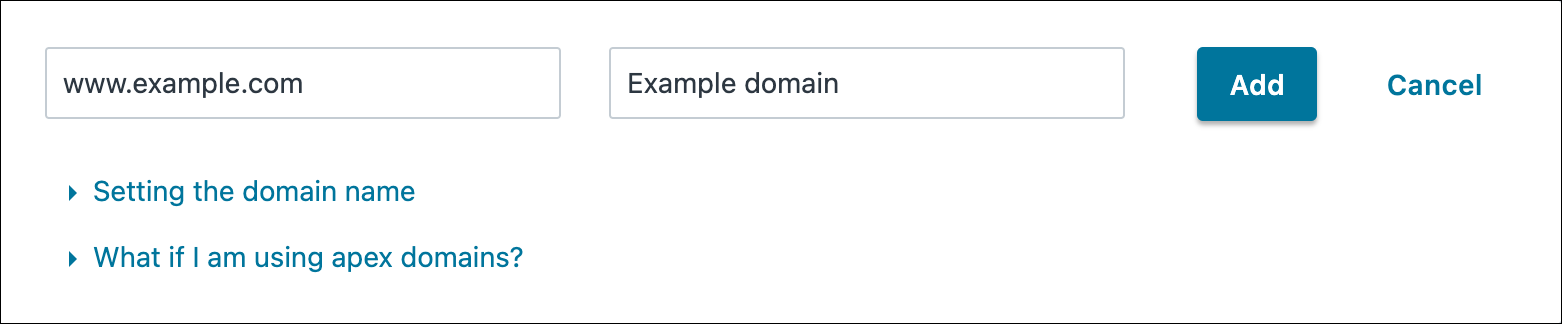
Click the Create domain button. The Create a domain page appears.
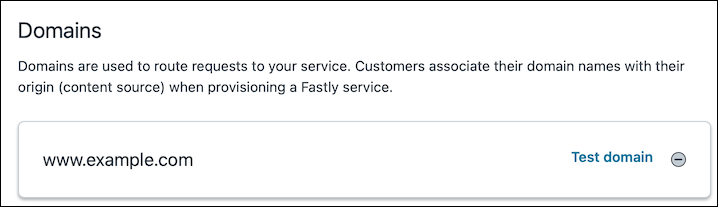
In the Domain name field, enter the name users will type in their browsers as the URL that accesses your site (e.g.,
www.example.com), followed by an optional comment that describes it.Click Add. The new domain appears in the list of domains for your service.
Click the Activate button at the top right of the screen.
Click the Test Domain link next to your new domain. Your website should appear in a new tab in your browser.
You can verify that your domain is being served through the Fastly CDN by running the following command from a terminal, replacing www.example-app.com with your custom domain:
curl -svo /dev/null www.example-app.com
In the command output look for the following headers, which are proprietary to Fastly and are added by the Fastly cache server (or servers) that processed the response. See the Fastly Header reference for more information.
< X-Served-By: cache-pdx12321-PDX
< X-Cache: MISS
< X-Cache-Hits: 0
To use TLS/SSL with this domain, follow the instructions below in the TLS/SSL section.
Creating a CNAME record with your DNS provider
Although not required to use Fastly, we recommend creating a CNAME record for your application’s top-level domain. This ensures all requests directed through Fastly immediately benefit from Fastly’s built in performance improvements.
If configuring TLS for this domain, wait to CNAME until after completing TLS configuration as the CNAME that you point to will be different.
The steps you follow will vary depending on your DNS provider’s control panel interfaces. Refer to your DNS provider’s documentation for exact instructions on how to create or update a CNAME record. When creating the record, be sure to point your domain to the value of your application’s FASTLY_CDN_URL configuration variable. See Adding CNAME records for more information.
Once the DNS entry has propagated, clients will be routed to your app through Fastly’s network.
Enabling TLS on custom domains
Not all pricing plans include TLS domains. Ensure your pricing plan supports TLS Domains before attempting to provision TLS.
The default Fastly configuration supports TLS over HTTPS on your .global.ssl.fastly.net domain. To enable TLS on a custom domain, use our Heroku CLI Plugin to provision TLS.
The CLI Plugin can be installed with:
$ heroku plugins:install heroku-fastly
Installing plugin heroku-fastly... done
Usage and examples can be found using --help:
$ heroku fastly:tls --help
Usage: heroku fastly:tls DOMAIN [VERIFICATION_TYPE]
...
To add a TLS Domain:
$ heroku fastly:tls www.example-app.com dns --app example-app
This queues your domain for TLS provisioning.
The requested domain must be configured in the active version of your service to successfully provision.
When the command completes you will need to verify ownership of your domain using one of the supported verification types - email, dns, or URL. Details on domain verification can be found in the help documentation of the heroku-fastly CLI plugin. After verification we will complete the TLS provisioning process automatically. This typically takes a few minutes.
To remove a TLS Domain:
$ heroku fastly:tls -r www.my-fast-app.com --app my-fast-app
All TLS domains are automatically removed upon removal of the Fastly add-on.
Framework-Specific configuration
This section provides suggestions for how to best integrate Fastly with several web application frameworks.
Rails (3.1+)
For static content (things like CSS, JavaScript, images) use Rails’ asset pipeline to control cache behavior. For an more detailed guide on using Fastly with Rails, check out Accelerating Rails, Part 1 and Accelerating Rails, Part 2.
To set TTLs on static content, modify config/environments/production.rb:
config.static_cache_control = 'public, s-maxage=2592000, max-age=86400'
If you have content in the /public directory that you want Fastly to cache, you may also need to set:
config.serve_static_assets = true
If you configured a custom domain with a CNAME pointing to Fastly, you don’t need to worry about configuring an asset_host since all requests will route through Fastly. Just ensure cache control headers are being set correctly with the above static_cache_control option.
If you did not configure a custom domain, you can use the FASTLY_CDN_URL config var as your asset_host. For example, in config/environments/production.rb (usually commented out by default):
config.action_controller.asset_host = ENV['FASTLY_CDN_URL']
Asset digests
Asset digests (a.k.a., “fingerprinting”) are a way to eliminate the need to invalidate cached assets when they change. Although Fastly supports instant purging, many developers like to use digests so they don’t have to do any invalidation upon deploying new assets.
To enable, use the configuration option:
config.assets.digest = true
For more details on asset digests, see the Rails Asset Pipeline Fingerprinting guide.
Sinatra
To cache static assets with Sinatra, we recommend the sinatra-asset-pipeline gem, which adds a Sprockets integration to Sinatra, much like the Rails asset pipeline.
Following from the Rails asset pipeline configuration above, you can set cache control headers and digests.
We recommend using the rack-cache middleware to configure cache settings. It’s also a good idea to use the Rack::Deflater middleware to compress responses.
Node.js
You can incorporate the express-cdn Node.js module to set up Fastly static asset caching with your Node.js applications.
The express-cdn docs don’t explicitly call out use with Fastly, but it works the same as their docs demonstrate.
In your app.js file (see this example) set the domain attribute to your FASTLY_CDN_URL (e.g., my-fast-app-herokuapp-com.global.ssl.fastly.net) or your custom domain, if using one.
var options = {
    publicDir  : path.join(__dirname, 'public')
  , viewsDir   : path.join(__dirname, 'views')
  , domain     : process.env.FASTLY_CDN_URL
  , ...
  , production : true
};
Python (Django)
If you’re using django-static you can specify the MEDIA_URL as your FASTLY_CDN_URL.
Dynamic content caching
Fastly enables rapidly changing dynamic content like REST APIs and dynamic HTML to be cached at the edge. You can integrate Fastly into your application framework to leverage dynamic caching, which takes advantage of our instant purge API. We provide various framework-specific plugins, listed below, to make it quick and easy to set up.
Dynamic caching can be integrated into an HTTP endpoint in three steps:
- Generate cache keys that map to a single object or related set of objects
- Include Cache-Control and Surrogate-Key headers on HTTP GET responses
- Issue a purge request with the resource’s cache key when the object changes (usually on HTTP POST, PUT, DELETE)
Surrogate-Keys are HTTP headers that Fastly uses to associate cache keys with response objects.
Wordpress
Fastly maintains a Wordpress plugin that automatically integrates with the Fastly purging API and includes an admin panel in wp-admin.
Verifying configuration
Make sure you’ve deployed the code changes listed above that configure your application for use with Fastly.
Caching can sometimes be confusing. The following outlines a few steps to help verify your Fastly configuration is working as expected. See also our guide on testing your setup.
Verifying static content
You can verify that static assets are being served from the CDN by viewing your application in the browser and viewing its source. Any assets served by an asset pipeline, such as a application.css in a Rails app, should be coming from the domain that matches your FASTLY_CDN_URL such as:
http://fastly-test.global.ssl.fastly.net/assets/application-048b5b7c55e3a7429fda3.css
Below are some common issues and their resolutions.
Domain does not match the current value of your app’s
FASTLY_CDN_URL. Check that your application and assets are configured correctly and that the most recent code changes have been deployed. If you’re using a custom domain and did not configure a static asset host, you should see your custom domain here.Right URL but the wrong content. Try viewing that content directly by copying and pasting your asset URL into your browser’s address bar. If you are getting an error, verify that your application is serving the right content. You can do this by taking the path in this example
/assets/application-048b5b7c55e3a7429fda3.css, and trying to view that file from your own domain instead of through the CDN. For example, if your application was hosted onexample-app.herokuapp.comyou would visit the following URL:http://example-app.herokuapp.com/assets/application-048b5b7c55e3a7429fda3.cssAsset fails to load with a 503 status code. There is probably nothing wrong with your Fastly configuration and the problem likely exists in your application. Ensure your application is serving the asset and check deploy logs to make sure there were no errors.
Another approach is to verify the files exist on the dyno as you expect. You can do this by running:
$ heroku run bashYou can then inspect the filesystem with
cdandlsto verify the presence of files andcatto verify the content.Your application is serving the correct file but it’s not going through the CDN. Try issuing a “Purge All” from the Fastly control panel or the CLI plugin. This clears all content from the cache and subsequently forces an update by making requests to your Heroku dynos.
Use “Purge All” with caution! It may take a long time to refill the cache and/or application dynos may see higher load as a result of the cache filling up.
Verifying dynamic content
Use cURL to make a request to your application and verify that the response contains cache-related headers.
curl -svo /dev/null https://www.example-app.com/path/to/content.json
If the request went though Fastly, you should see response headers that look like:
HTTP/1.1 200 OK
...
Cache-Control: public, s-maxage=2592000, maxage=86400
...
Via: 1.1 varnish
Age: 12
X-Served-By: cache-sjc3127-SJC
X-Cache: HIT
X-Cache-Hits: 1
X-Timer: S1406260210.511119,VS0,VE0
If your response doesn’t include the Via and X-Cache* headers, something is not configured correctly.
Troubleshooting
Below are solutions to issues commonly encountered during setup.
Content not found and 404’s
As long as the content is available from the application, we will never return a 404 (due to the “proxy” nature of the Fastly edge caches). If you’re seeing a 404 and are positive the content is available from your dyno, it’s possible we cached a 404 (see HTTP status codes cached by default) when the content may not have been available. In this case, purge the object that is 404'ing to force a cache refresh.
Redirect loops and forcing HTTP to HTTPS
If your application forces redirects from HTTP to HTTPS and upon installation of Fastly you see redirect loops coming from the cache, this is because you need to configure Fastly to pull content from your apps over HTTPS. By default we cache 301 redirects, which causes this redirect loop to happen.
You can fix this by updating the port of your backend to 443 (default is 80) in the Fastly configuration panel. Depending on what TTL value you use, you may need to wait for the 301 redirects to expire in the cache or issue a Purge. A Purge will force a refresh - removing the cached 301 and subsequently updating with the actual content, which will now be pulled over port 443 (the port used with SSL).
Expired assets
It is possible for our caches to serve an expired asset if the client makes a request for an expired asset and the application dyno is unavailable. You can tune this by setting the TTL (cache expiration time) with cache control headers and using stale-if-error/stale-while-revalidate directives.
Cross-origin resource sharing (CORS)
If you encounter trouble loading assets (such as fonts, especially in Firefox) that are hosted somewhere other than your application dynos, you should first ensure that the host is correctly setting the Access-Control-Allow-Origin header. If you have verified your configuration and the problem persists, you can set a CORS Access-Control-Allow-Origin header at the edge via the Fastly control panel.
Pricing and Overages
Based on the pricing plan you select, Fastly charges a monthly flat rate. Each pricing plan includes a fixed amount of bandwidth and requests. Be sure to choose a plan that roughly corresponds to your site’s traffic profile, as we take overages seriously.
We send ample warning emails when approaching plan limits along with ample overage emails. If significantly more bandwidth is used than what’s included in your plan, we may temporarily discontinue service at any time during the period of overage.
Migrating between plans
You can migrate between plans at any time. Migrating to a different plan will change bandwidth and request limits, but does not affect any cached content.
Use the heroku addons:upgrade command to migrate to a new plan:
$ heroku addons:upgrade fastly:pro --app example-app
-----> Upgrading fastly:pro to example-app... done, v18 ($100/mo)
       Your plan has been updated to: fastly:pro
Removing the Fastly add-on
Removing the Fastly add-on will destroy all cached content and service configuration. This cannot be undone!
Fastly can be removed via the CLI:
$ heroku addons:destroy fastly --app example-app
-----> Removing fastly from example-app... done, v20 ($50/mo)
Support and Community
Fastly provides a community forum for questions and troubleshooting. Support is also available through other channels.