DockHero
Last updated January 09, 2020
Table of Contents
DockHero hosts your Docker stack in AWS cloud.
If you think of Heroku add-ons in general as of boxes with some useful mechanisms inside (like databases, log analyzers, messengers etc.), then Dockhero is an empty box where you can put your own microservice described by docker-compose.yml.
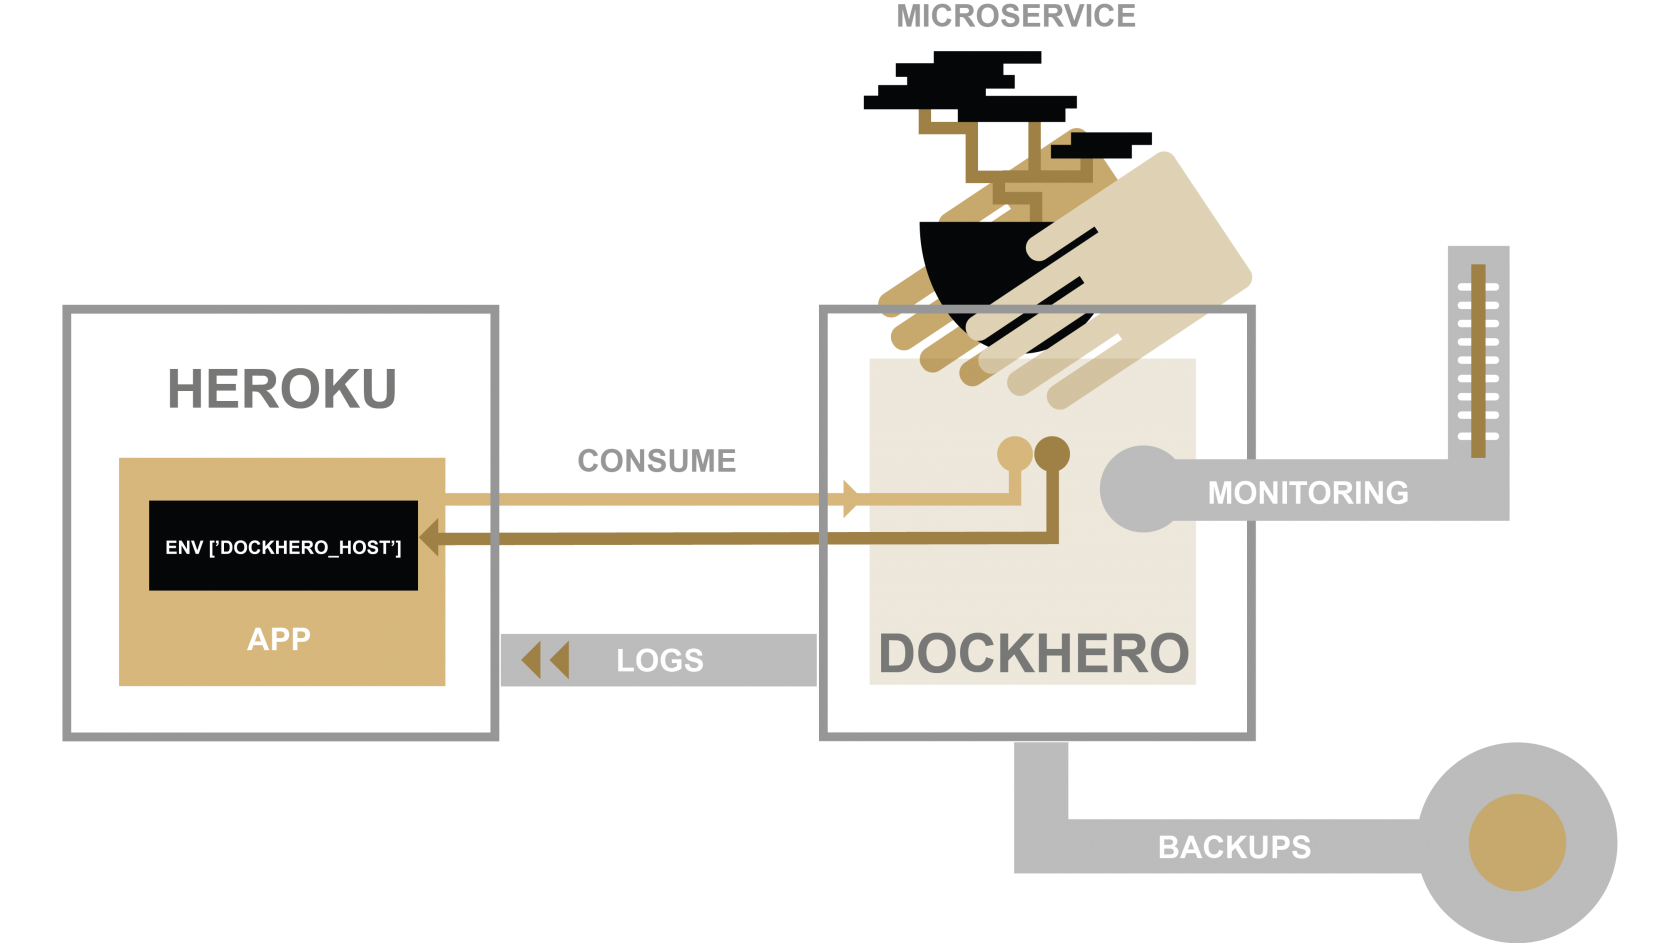
When you add DockHero add-on to your Heroku application, a new Docker machine is provisioned, and it’s address is exposed to your Heroku app via DOCKHERO_HOST environment variable.
Provisioning the add-on
DockHero can be attached to a Heroku application via the CLI:
A list of all plans available can be found here.
IMPORTANT: “hobby” plan doesn’t include backups and EC2 instance auto-healing. Make sure you use “standard” plan or higher for your production workloads.
$ heroku addons:create dockhero
-----> Adding dockhero to sharp-mountain-4005... done, v18 ($7/mo)
The actual provisioning may take up to 3 minutes. You can track the provisioning progress by logging into add-on dashboard:
$ heroku addons:open dockhero
or using CLI plugin:
$ heroku dh:wait # requires CLI plugin installed - see below
Once provisioned, you can find the address of your Docker machine among Heroku env variables:.
$ heroku config:get DOCKHERO_HOST
orange-apple-1984.dockhero.io
Installing CLI plugin
In order to access the newly provisioned machine, install Dockhero CLI plugin:
heroku plugins:install dockhero
Now you can run docker / docker-compose in the cloud using the commands below:
  heroku dh:docker
  heroku dh:compose
Find other available commands in the docs
Preparing a stackfile
In order to avoid conflicts with the local development workflow, the stack for DockHero lives in dockhero-compose.yml. That’s a regular docker-compose.yml, just named differently. See docker-compose.yml reference for the file syntax. Also there are stackfile examples available.
Use the following command to generate a sample stackfile:
$ heroku dh:generate helloworld
Writing example stack into dockhero-compose.yml...
This will create a sample dockhero-compose.yml in the root of your repo. It’s recommended that you put this file under version control.
In our example below, we’ll be building a pluggable resource which returns message of the day via HTTP. Here’s a Docker image which does that.
You should already have Docker client set up locally. Please follow the installation instructions for your platform
First, replace dockhero-compose.yml content with the following:
web:
  image: dockhero/motd-http
  ports:
    - "80:8000"
Then run your stack:
$ heroku dh:compose up -d
Creating network "dockhero_default" with driver "bridge"
Creating dockhero_web_1

$ heroku dh:compose ps
Name                  Command             State             Ports
---------------------------------------------------------------------------------
dockhero_web_1   /bin/sh -c http-server /app   Up      54.174.36.199:80->8080/tcp
Now you should be able to see a “Message Of The Day” by opening the app in your browser
$ heroku dh:open
Opening http://orange-apple-1984.dockhero.io/...
Find other useful commands in docker-compose cli reference
Using from Heroku app
In an application running on Heroku, you can fetch the host name of your Docker service from DOCKHERO_HOST environment variable. You can read the MOTD message from our example stack using the following Ruby code:
#!/usr/bin/env ruby
require 'open-uri'
response = open("http://#{DOCKHERO_HOST}/") { |f| f.read }
puts "DOCKHERO says:\n  #{response}"
Using SSL Endpoint
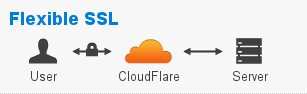
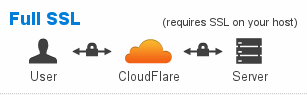
Each Dockhero addon instance comes with two CloudFlare endpoints configured: one in flexible ssl mode and another in full ssl mode. They have valid SSL certificate installed, so that you don’t need to purchase one yourself. Both endpoints are exposed to your Heroku environment:
$ heroku config:get DOCKHERO_FLEXIBLE_SSL_URL
$ heroku config:get DOCKHERO_FULL_SSL_URL
SSL is terminated at the CloudFlare edge server, then the request is sent to DockHero stack via http:// or https:// protocol depending on SSL mode (flexible or full).
With Flexible SSL, you don’t need to implement SSL in your stack at all.
With Full SSL, your stack still needs to talk SSL, but you can use a self-signed certificate. No worries, the users will see a valid CloudFlare’s certificate - find more about CloudFlare SSL in this article
Logging
DockHero activity can be identified within the Heroku log-stream by dockhero prefix:
$ heroku logs -p dockhero
You can also attach to Docker’s logs stream directly:
$ heroku dh:compose logs --follow
Troubleshooting known issues
You can run your stack in foreground mode to simplify debugging.
Remember to pull updated images and pass --build and --force-recreate options
in order for changes to apply:
$ heroku dh:compose pull
Pulling web (dockhero/dockhero-docs:hello)...
modern-fog-4352: Pulling dockhero/dockhero-docs:hello... : downloaded

$ heroku dh:compose up
Creating dockhero_web_1
Attaching to dockhero_web_1
web_1  | Starting up http-server, serving /app
web_1  | Available on:
web_1  |   http://127.0.0.1:8080
web_1  |   http://172.17.0.4:8080
web_1  | Hit CTRL-C to stop the server
After stopping your stack (especially with Ctrl-C), remember to wait until it actually goes down and reports this in the console. It usually takes 5-20 seconds.
Migrating between plans
Currently only the Test plan is supported
Removing the add-on
DockHero can be removed via the CLI.
This will destroy all associated data and cannot be undone!
$ heroku addons:destroy dockhero
-----> Removing dockhero from sharp-mountain-4005... done, v20 (free)
Support
All DockHero support and runtime issues should be submitted via one of the Heroku Support channels. For other questions or suggestions, please email us at dockhero@castle.co.
You can improve the current docs or post your own stackfile examples by forking our repo and sending a pull request.