binnacle
Last updated July 27, 2023
This article is a work in progress, or documents a feature that is not yet released to all users. This article is unlisted. Only contributors can access it.
The binnacle add-on is currently in beta.
Table of Contents
Binnacle is a Heroku add-on that provides a web service that can receive signals (HTTP POSTs with a JSON payload) and store, analyze, and in response react to those signals.
Binnacle provides a big data backend-on-demand to store large volumes of data. As each signal, arrives Binnacle stores them, analyzes them, and reacts by generating customizable outgoing signals via WebSocket/Comet pushes, Webhooks/HTTP Posts, emails, SMS and a myriad of other channels, including Slack, Twitter, and many more.
Binnacle features a core set of functionality to enable a basic management and enhancement of modern cloud-based web applications, including:
- Push Service for Near Real-time Features: You send us “signals” and we’ll broadcast those signals to listening browsers (via WebSocket, SSE, Comet, fallback transports or Web Hooks).
- Centralized/Distributed Logging: We provide the means for your applications (clients and servers) to send log messages as Binnacle signals. You can then react in near real time to those signals and we store and analyze those on your behalf.
- Exception Trapping: Binnacle drivers for your platform/language can trap unhandled errors and exceptions and send them to Binnacle. Binnacle aggregates and classifies the errors for easier tracking and analysis.
- Uptime Service: Binnacle can check on your application’s well-being by periodically watching that your app is responsive and healthy.
Binnacle’s powerful dashboard allows you to manage and monitor your applications. Binnacle is accessible via an API and currently has supported client libraries for Ruby and JavaScript.
Binnacle concepts
Signals
Signals are events that are POSTed to the Binnacle Engine and can be Log Entries, App Events, Trapped Exceptions or anything you can fit in a JSON structure.
Signal structure
A Binnacle Signal is part structured log message, part free-form JSON.
Below is the JSON payload representing a signal that will trigger the “event_123” event. The signal has three keys to identify where it is going, your account, app and the destination context:
{
  "name": "event_123",
  "contextId": "xg2ij4jyw7s4perlq49n",
  "sessionId": "session1",
  "clientEventTime": "2015-01-25T20:18:29-0700",
  "clientId": "bar",
  "ipAddress": "216.58.217.206",
  "logLevel": "INFO",
  "tags": [
    "account",
    "upgrade"
  ],
  "json": "{}"
}
The event name (name above) associated with a signal is the key field used by Binnacle filters to decide what to do with an incoming signal. Tagging can also be used to further filter, count, and analyze signals.
The sessionId, clientEventTime, clientId, ipdAddress and logLevel fields are meant to be typical logging fields associated with a signal. The different Binnacle drivers might default those values on your behalf but you can override some of them and/or configure how they are populated. For example, most Binnacle drivers will find the IP address of the sending machine and automatically populate that field.
Finally the json field is meant to be a free-form JSON payload that your applications or widgets can use to send information specific to their function. For example, the Binnacle Chat Widget for Rails uses the free form JSON field to send the body of the chat message as well as other information.
Contexts
When a signal is sent to Binnacle, the signal is targeted at a given “context”. A context is simply a channel to receive signals. A given application can have many contexts. For example, for Ruby on Rails applications Binnacle automatically generate a context for Logging and a context for Exceptions.
You can have different contexts for different purposes. For example, the previously mentioned Chat Widget can use a specific Context in your application to exchange chat messages between users of your application.
Sending signals
Signals are simple HTTP POST messages. The different Binnacle drivers (Ruby, JS) provide methods to create and send signals. You can also create and send signals manually using cURL or WGET.
Publishers
In order to send a signal to a Binnacle context you need the appropriate credentials. Binnacle introduces the concept of Application level Publishers. A Publisher is simply a named set of BASIC AUTH credentials that you can use to identify, authenticate and authorize a signal publisher / context listener.
For a typical application a couple of publishers will suffice. Binnacle will automatically create one default publisher per application. You can create additional Publishers via your binnacle.io dashboard. For example, you might have a mobile version of your app and could benefit from having a separate publisher or as we recommend you can separate the signal producers from the signal receivers using multiple Publishers.
Provisioning the add-on
Binnacle can be attached to a Heroku application via the CLI:
A list of all plans available can be found here.
$ heroku addons:create binnacle
-----> Adding binnacle to sharp-mountain-4005... done, v18 (free)
Once the Binnacle add-on has been added several settings (environment variables) will be available in the app configuration:
| Setting | Description |
|---|---|
BINNACLE_ENDPOINT |
One of the six available endpoints (apiN.binnacle-api.io) where N is 1..6 |
BINNACLE_APP |
The id of your Binnacle App. |
BINNACLE_CTX |
The id of the context named ‘Default Context’. |
BINNACLE_APP_LOG_CTX |
The id of the context named ‘General Log’. |
BINNACLE_APP_ERR_CTX |
The id of the context named ‘Errors’. |
BINNACLE_API_KEY |
An approved publisher API key for the App |
BINNACLE_API_SECRET |
The API secret for the given API key |
These can be confirmed using the heroku config:get command. For example:
$ heroku config:get BINNACLE_ENDPOINT
api2.binnacle-api.io
After installing Binnacle the application should be configured to fully integrate with the add-on.
Using with Rails 4.x
The Binnacle Ruby client integrates seamlessly with the Ruby on Rails framework to:
- Provide a Pub-Sub client to interact with Binnacle’s Push Service
- Intercepts Rails Logger to log to a Binnacle Context
- Intercepts Errors and Exceptions and logs them to a Binnacle Context
Ruby on Rails applications will need to add the following entry into their Gemfile specifying the Binnacle client library.
gem 'binnacle'
Update application dependencies with bundler.
$ bundle install
Binnacle initializer
Binnacle uses an initializer file (named binnacle.rb in config/initializers) to configure the binnacle client and logger. The Binnacle Initializer can be created using the Rails Generator:
$ rails generate binnacle
By default the Binnacle Ruby client is set to log all incoming and outgoing requests to and from the app to the context identified by BINNACLE_APP_LOG_CTX and to report any exceptions to the context identified by BINNACLE_APP_ERR_CTX.
Binnacle.configure do |config|
  config.intercept_rails_logging = true
  config.report_exceptions = true
end
It is recommended that you use environment variables for all account/identity related configuration fields and relegate the initializer to configure behavioral aspects of the add-on.
Push service
Binnacle push can be accomplished by using the Binnacle JavaScript driver and/or the Binnacle Ruby driver.
Both drivers support the sending of signals to Binnacle and can register to listen to messages on a given context via WebSockets.
The Ruby driver can be use to send a signal as follows:
# given...
api_key = ENV["MY_BINNACLE_CTX"]
api_secret = ENV["BINNACLE_API_SECRET"]
context_id = ENV["MY_BINNACLE_CTX"]

# instatiate the Binnacle Ruby Client
client = Binnacle::Client.new(api_key, api_secret)
# send a signal asynchronously
client.signal_asynch(context_id, event_name, client_id, session_id, log_level, tags, json)
The signal_asynch method of the Binnacle client takes as parameters:
-
context_id: Your default Binnacle Context ID -
event_name: The name of the event -
client_id: Use for system/subsystem/component id/name -
session_id: Use to track a user session across requests/processes -
log_level: UNKNOWN, FATAL, ERROR, WARN, INFO, DEBUG -
tags(optional): An Array of tags, e.g.['accounts', 'refunds', 'dispute'] -
json(optional): A Ruby Hash, e.g.{ message: "there you are!" }representing a payload for the signal
The Binnacle JavaScript client can then be used to listen to signals being broadcasted by the Ruby driver:
# configure the Binnacle JavaScript Client
client = new (Binnacle.Client)(
  contextId: '<%= ENV["MY_BINNACLE_CTX"] %>'
  endPoint: '<%= Binnacle.configuration.url %>'
  apiKey: '<%= ENV["BINNACLE_API_KEY"] %>'
  apiSecret: '<%= ENV["BINNACLE_API_SECRET"] %>'
  onSignal: handleSignal
)

# listen via Comet/WebSockets
client.subscribe()
The coffeescript snippet above assumes that your are using an ERB template and that the Binnacle Ruby Gem has been included and the shown environment variables shown are present
The event handler handleSignal handles the incoming signal:
handleSignal = (event) ->
  console.log("Received event ==> #{event.json}")
A complete example Rails application is available on Github at https://github.com/binnacle-io/binnacle-rails-showcase
Logging
Binnacle drivers can convert log messages into signals. A Binnacle context can be dedicated to your applications’ log messages. You’ll be able to search, and watch your logs live on binnacle.io.
Also, like any other Binnacle context, you can listen to them via WebSockets in your own applications, as well as create notifications based on the payload of the signals.
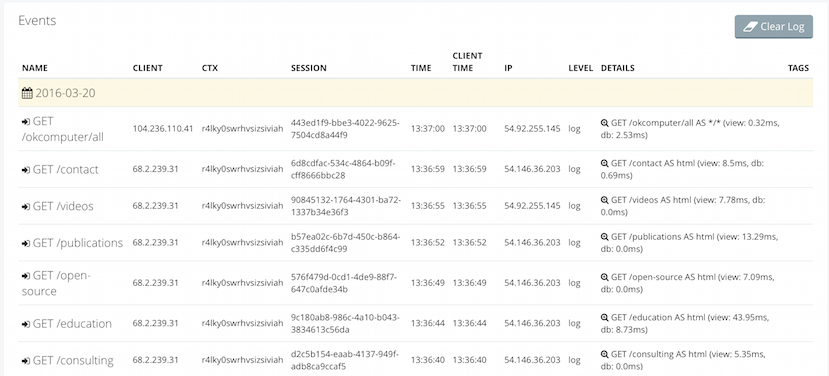
The screenshot below shows the live tail of an application’s log. Each line represents an incoming request to your application or an outgoing request from your application:
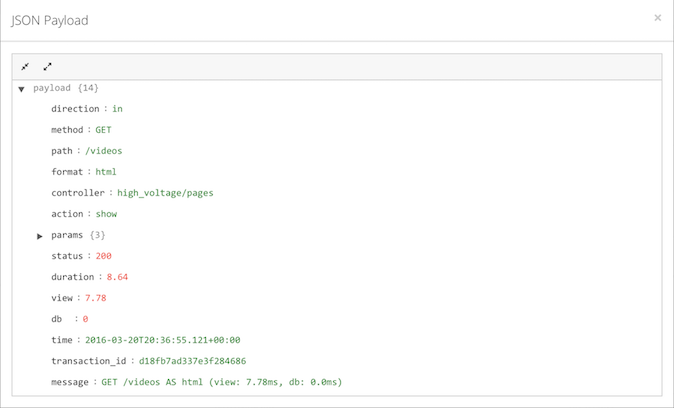
We can look into the detail of the signal and inspect the framework/language specific payload. In the example below we can see details provided from a Ruby on Rails log signal:
By default Binnacle will log all incoming and outgoing HTTP requests from your application. You can also use the Binnacle Logger directly to send signals to Binnacle. The Binnacle Logger conforms to the Ruby Logger class.
You can use the Binnacle Logger from anywhere in your application. These log messages will be captured as signals and sent to Binnacle. The examples below can be seen in the logging_controller.rb of the example app.
Basic logging
Use it just like any other Ruby Logger. You can access it via the class method logger in the Binnacle module:
Binnacle.logger.info("This is an info message")
Log levels
Set the logger’s level with Binnacle.logger.level = Logger::DEBUG:
Binnacle.logger.level = Logger::DEBUG
Binnacle.logger.debug("This is an debug message")
Using Progname
Use the progname attribute to change the name of the event being logged.
By default, Binnacle uses log as the event name. Passing a String will override the event name:
Binnacle.logger.level = Logger::ERROR
Binnacle.logger.error('comm_error') { "Can't reach the service endpoint!" }
Using Progname hash
Passing a Hash as the progname parameter you can then specify a signal’s remaining parameters (session_id, event_name, client_id, tags):
Binnacle.logger.info(context_id: '<%= ENV['BINNACLE_APP_LOG_CTX'] %>', session_id: '8675309', event_name: 'failed_transfer') {
  'transfer failed, bad RTN'
}
Tagged logging
Tagged Logging can be used to apply a tag to a set of logging statements:
Binnacle.logger.tagged("cart") do
  Binnacle.logger.info "Adding Item 123"
  Binnacle.logger.info "Adding Item 234"
end
Multiple tags
You can pass multiple tags to a Tagged Logging statement:
Binnacle.logger.tagged("account", "payments") do
  Binnacle.logger.info 'Added new credit card of type VISA'
  Binnacle.logger.info 'Remove Paypal account'
end
Exceptions
By setting the config.report_exceptions configuration setting to true in the initializer, enables the Ruby client to trap and report all unhandled exceptions thrown by your Rails application.
The example method below (trigger) can be used in a controller to trigger an exception which will be trapped and sent to binnacle.io. The examples below can be seen in the exceptions_controller.rb of the example app.
Exception trapping
The code below triggers one of ten different exceptions:
def trigger
  random_choice = 1 + rand(10)
  case random_choice
  when 1
    1 / 0
  when 2
    [1, 2, 3].first("two")
  when 3
    eval("1+1=2")
  when 4
    "hello".to_ary
  when 5
    [1, 2, 3].first(4, 5)
  when 6
    Float::INFINITY.to_r
  when 7
    puts foo
  when 8
    Regexp.new("?")
  when 9
    [1, 2, 3].drop(1 << 100)
  when 10
    h = {}
    h.fetch("baz") #=> KeyError: key not found: "baz"
  end
end
You can view the error context where exceptions are summarized. Binnacle will also automatically alert you when the exception first occurs and then subsequently on each occurrence that is a multiple of ten (10x, 100x, …)
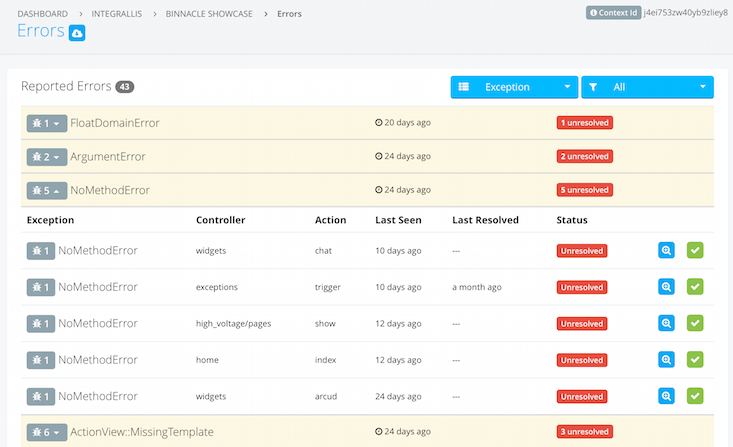
Binnacle uses a dedicated context for errors. The driver turns exceptions into a detailed signal gathering as much information as possible. On binnacle.io you’ll be able to see an aggregated report of the exceptions occurred by exception type, controller and action:
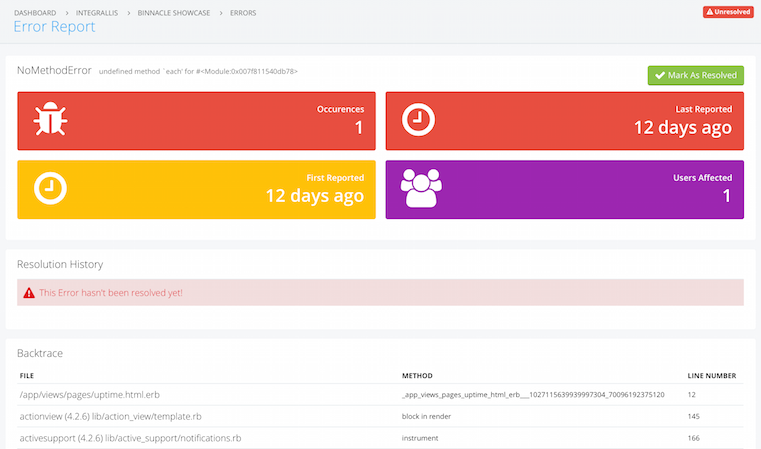
Binnacle also allows you to track the resolution and reoccurrence of errors. For each exception a detailed report is produced:
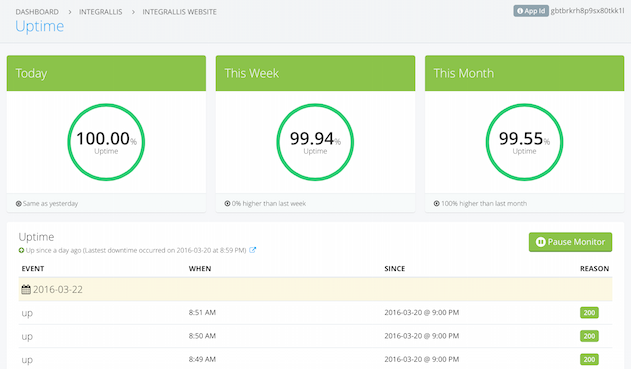
Uptime service
Binnacle provides an uptime service feature that uses a dedicated context to report on the health of your application. Using a gem like okcomputer gem you can provide Binnacle with a health check endpoint that it can check periodically.
Powerful notifications
Binnacle provides a powerful notifications builder. Every context can be associated with a set of notifications. The notifications can have multiple recipients via many different delivery methods, including email, SMS, webhooks or any of the provided integrations like Slack and Twitter amongst many.
Below is an example of a notification triggered on any exception happening in your application by keying on the ‘Log Level’ field of the signal and notify on any signal with the value ‘EXCEPTION’. For the recipients we’ve added a recipient of type ‘slack’ with a custom message.
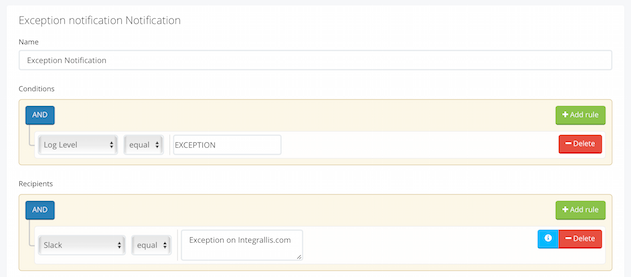
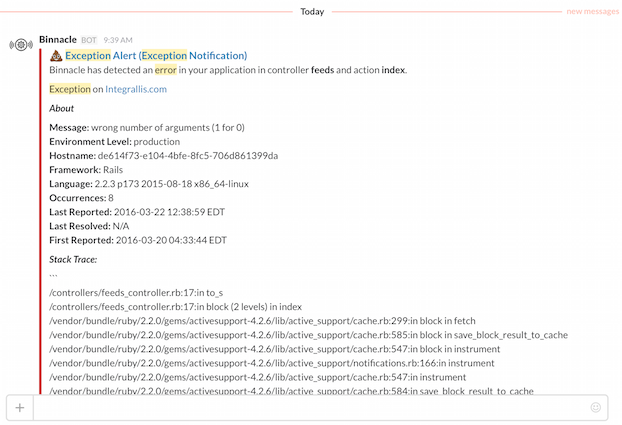
When an exception signal is received by Binnacle, a notification is dispatched to the selected Slack channel configured in the integration:
Dashboard
The Binnacle dashboard allows you to manage your Binnacle App, Contexts, Publishers and Custom Notifications.
The dashboard can be accessed via the CLI:
$ heroku addons:open binnacle
Opening binnacle for sharp-mountain-4005
or by visiting the Heroku Dashboard and selecting the application in question. Select Binnacle from the Add-ons menu.
Migrating between plans
Use the heroku addons:upgrade command to migrate to a new plan.
$ heroku addons:upgrade binnacle:company
-----> Upgrading binnacle:company to sharp-mountain-4005... done, v18 ($49/mo)
       Your plan has been updated to: binnacle:company
Removing the add-on
Binnacle can be removed via the CLI.
This will destroy all associated data and cannot be undone!
$ heroku addons:destroy binnacle
-----> Removing binnacle from sharp-mountain-4005... done, v20 (free)
Support
All Binnacle support and runtime issues should be submitted via one of the Heroku Support channels. Any non-support related issues or product feedback is welcome at Binnacle Support.