Getting Started with Heroku AppLink and Salesforce
Introduction
Heroku AppLink (formerly Heroku Integration) exposes your Heroku apps as API services in Salesforce. This guide helps you set up the Heroku AppLink add-on via the Heroku CLI and the Heroku AppLink CLI plugin. To get some ideas of what you can use Heroku AppLink for, see the Use Cases section.
In this guide, we create and publish a Heroku app and use the external service in Salesforce to execute actions in Salesforce Flow and Apex.
This guide assumes that you have:
- A verified Heroku account
- An Eco dynos plan subscription for non-Enterprise customers or Basic dynos for Heroku Enterprise customers
- All the dependencies based on your language of choice
- A Salesforce developer org, a Salesforce sandbox org, or a scratch org
- (Optional) Install the Salesforce CLI to work with your Salesforce org
Install the Heroku AppLink Plugin
You must have the Heroku CLI installed before adding the Heroku AppLink CLI plugin. See Heroku CLI for instructions.
To install the plugin, run the CLI command:
$ heroku plugins:install @heroku-cli/plugin-applink
View the plugin info with the command:
$ heroku plugins:inspect @heroku-cli/plugin-applink
└─ @heroku-cli/plugin-applink
...
  ├─ commands
   │  ├─ applink:authorizations
   │  ├─ applink:authorizations:info
   │  ├─ applink:connections
   │  ├─ applink:connections:info
   │  ├─ datacloud:authorizations:add
   │  ├─ datacloud:authorizations:jwt:add
   │  ├─ datacloud:authorizations:remove
   │  ├─ datacloud:connect
   │  ├─ datacloud:data-action-target:create
   │  ├─ datacloud:disconnect
   │  ├─ salesforce:authorizations:add
   │  ├─ salesforce:authorizations:jwt:add
   │  ├─ salesforce:authorizations:remove
   │  ├─ salesforce:connect
   │  ├─ salesforce:connect:jwt
   │  ├─ salesforce:disconnect
   │  ├─ salesforce:publications
   │  └─ salesforce:publish
...
Prepare Your App
Create a local copy of the sample app by executing the following commands in your local command shell or terminal. Heroku provides a Node.js and Python sample app for getting started with AppLink.
This Git repository contains a sample Node.js app that uses the Fastify web framework and the Node.js AppLink SDK for Salesforce. To copy a sample Node.js app, run the commands:
$ git clone https://github.com/heroku-reference-apps/applink-getting-started-nodejs
$ cd applink-getting-started-nodejs
This Git repository contains a sample Python app that uses the FastAPI web framework and the Python AppLink SDK for Salesforce. To copy a sample Python app, run the commands:
$ git clone https://github.com/heroku-reference-apps/applink-getting-started-python
$ cd applink-getting-started-python
The Node.js and Python sample apps have the following structure:
| Node.js App | Python App | Description |
|---|---|---|
api-spec.yaml (Required) |
api-spec.yaml (Required) |
This sample API specification file lets you publish the app into Salesforce as an external service. We support OpenAPI 3.0. See External Services and OpenAPI for more info. |
heroku-applink.js |
main.py |
This file is the Salesforce pre-handler that enriches the requests coming in and sets the context about the request. This file provides the Salesforce SDK with the user and org context and helps with handling asynchronous requests. |
package.json |
pyproject.toml |
This file has the dependencies for the SDK that the plugin supports. The SDK provides an easy way to perform DML operations in Salesforce and Data Cloud. |
Procfile |
Procfile |
The Heroku Procfile that defines what’s executed by the app on startup. In the Procfile, heroku-applink-service-mesh starts the app. |
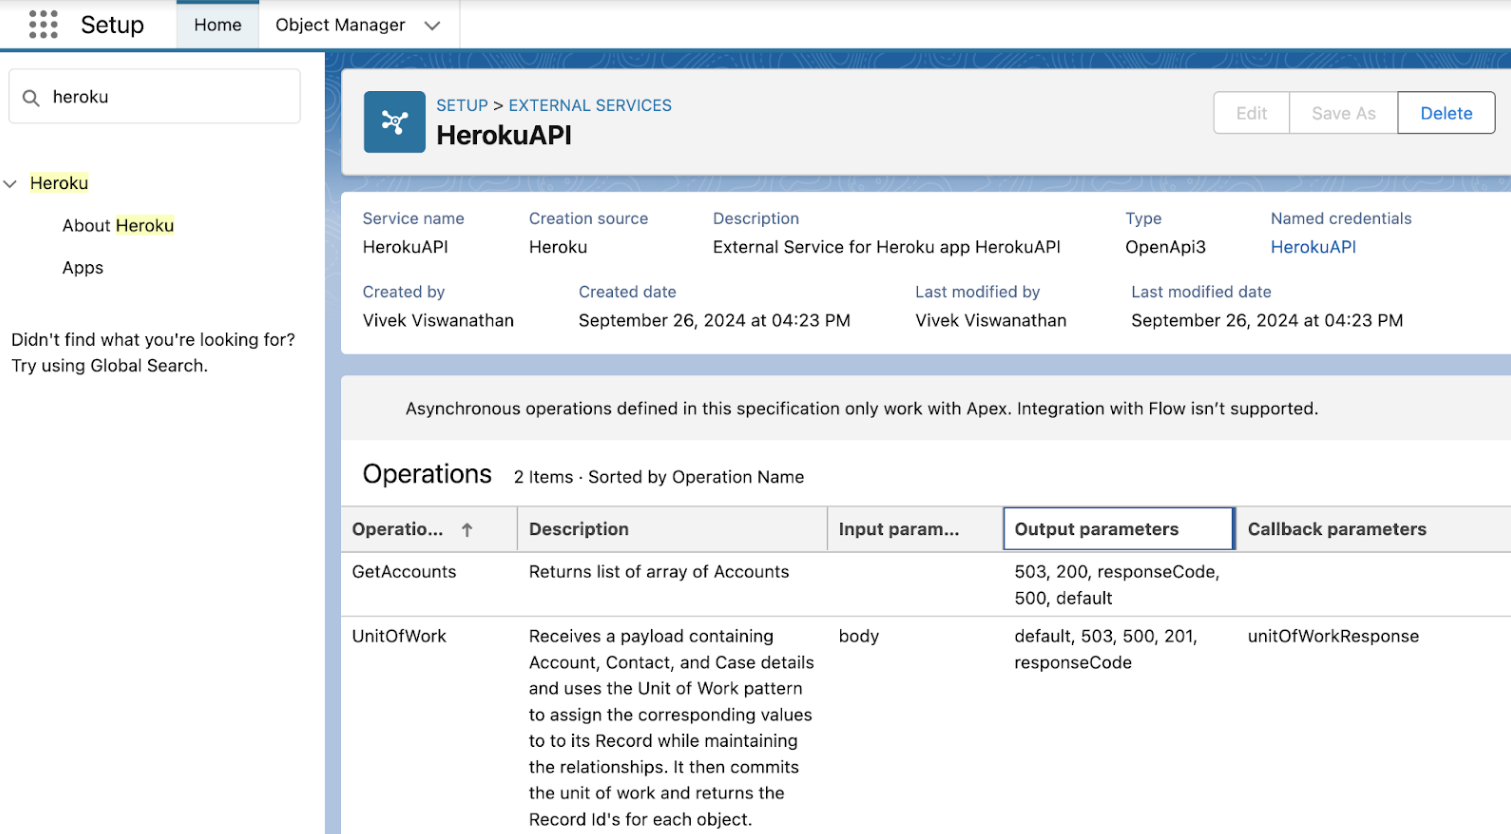
The sample apps have these API operations we use in this tutorial:
| Node.js App | Python App | Description |
|---|---|---|
GetAccounts (accounts) |
GetAccounts (accounts) |
A synchronous GET call that returns a list of arrays of Accounts. |
UnitOfWork (unitofwork) |
An asynchronous POST call that receives a payload containing Account, Contact, and Case details. It uses the Unit of Work pattern to assign the corresponding values to the record while maintaining the relationships. It then commits the unit of work and returns the record IDs for each object. |
Create Your App
Using dynos in this tutorial counts towards your usage. To complete this tutorial, we recommend using our low-cost plans. Eligible students can apply for platform credits through our Heroku for GitHub Students program.
To prepare Heroku to receive your source code, create an app:
$ heroku create
Creating app... done, ⬢ applink-app
http://applink-app.herokuapp.com/ | https://git.heroku.com/applink-app.git
If you don’t specify a name, Heroku generates a random name for your app. In the guide, our app is called applink-app.
Install the Heroku AppLink Buildpack
The Heroku Buildpack for Heroku AppLink Service Mesh installs the Heroku AppLink Service Mesh to handle the authentication and authorization for your app. The service mesh is a proxy in front of your app that intercepts incoming Salesforce and Data Cloud requests to validate and authenticate.
To install, run the command:
$ heroku buildpacks:add heroku/heroku-applink-service-mesh
Additionally, for the nodejs project, set the heroku/nodejs buildpack:
$ heroku buildpacks:add heroku/nodejs
Buildpack added. Next release on applink- will use:
  1. heroku/heroku-applink-service-mesh
  2. heroku/nodejs
Run git push heroku main to create a new release using these buildpacks.
For the python project, set the heroku/python buildpack:
$ heroku buildpacks:add heroku/python
Buildpack added. Next release on applink- will use:
  1. heroku/heroku-applink-service-mesh
  2. heroku/python
Run git push heroku main to create a new release using these buildpacks.
Provision the Heroku AppLink Add-on
To provision the add-on, run the command:
$ heroku addons:create heroku-applink
Creating heroku-applink on ⬢ applink-app... free
Your add-on is being provisioned.
applink-regular-78506 is being created in the background. The app will restart when complete...
Use heroku addons:info applink-regular-78506 to check creation progress
Use heroku addons:docs applink-app to view documentation
After provisioning, the add-on creates these config vars:
HEROKU_APPLINK_URL: contains the base URL for the CLI to make requestsHEROKU_APPLINK_TOKEN: contains the access token
You can get your config vars with the heroku config command:
$ heroku config
=== applink-app Config Vars

HEROKU_APPLINK_API_URL: https://heroku-applink.heroku.com/addons/894792c1-c1e8-4f34-ba32-00000000000
HEROKU_APPLINK_TOKEN: af0a7e7984d4ef28948db6431dc036ae383fcb2f02064cbb0000000000000000
Deploy Your Heroku App
Next, deploy your app:
$ git push heroku main
...
2025-07-07T14:09:33.845077+00:00 heroku[web.1]: State changed from provisioning to starting
2025-07-07T14:09:49.304734+00:00 app[web.1]: time=2025-07-07T14:09:49.304Z level=INFO msg=environment app=applink-app source=heroku-applink-service-mesh go_version:=go1.24.3 os=linux arch=amd64 http_port=31835 version=v0.2.2 environment=local app_host=http://127.0.0.1 app_port=3000
2025-07-07T14:09:49.304754+00:00 app[web.1]: time=2025-07-07T14:09:49.304Z level=INFO msg="Heroku AppLink Service Mesh is up!" app=applink-app source=heroku-applink-service-mesh port=31835
2025-07-07T14:09:49.833835+00:00 app[web.1]:
2025-07-07T14:09:49.833839+00:00 app[web.1]: > applink-app@1.0.0 start
2025-07-07T14:09:49.833840+00:00 app[web.1]: > fastify start -o -a 0.0.0.0 -p $APP_PORT -l debug src/app.js
2025-07-07T14:09:49.833840+00:00 app[web.1]:
2025-07-07T14:09:50.482717+00:00 heroku[web.1]: State changed from starting to up
2025-07-07T14:09:51.111131+00:00 app[web.1]: {"level":30,"time":1751897391110,"pid":63,"hostname":"dyno-bcad42a8-33d4-447f-9adb-0000000000","msg":"Server listening at http://0.0.0.0:3000"}
...
remote: Verifying deploy... done.
To https://git.heroku.com/applink-app.git
 * [new branch]      main -> main
See Deployment for other options for deploying Heroku apps.
Assign User Permissions
See Assigning User Permissions for more information about user permissions.
To perform operations with Heroku AppLink, you must have deploy or operate permissions in Heroku, or be the owner of the Heroku app. You must also have the Heroku AppLink permission in Salesforce. To add the permission in Salesforce, create a permission set:
- From Salesforce Setup, in the
Quick Findbox, enter and selectPermission Sets. - Select
Newand give the permission set a name. - Select
Save. - In the
Find Settings…box, enter and selectManage Heroku AppLink. - At the top of the Systems Permissions page, select
Edit. - Select the checkbox next to
Manage Heroku AppLinkand selectSave, andSaveagain. - On the navigation bar of the Systems Permissions page, select
Manage Assignments. - Select
Add Assignments. - Select the checkbox next to the user you want to add the permission set to, select
Next, thenAssign.
Connect to a Salesforce Org
See Connections on Your App for more information about creating, viewing, and removing connections.
For production orgs, use “https://login.salesforce.com” for the login URL. For sandbox and scratch orgs, use “https://test.salesforce.com” for the login URL.
If you’re already logged into an org, this command attempts to connect to the org you’re already logged into. If you want to connect to a different org, log out from all existing orgs before running this command.
Next, create a connection to your Salesforce org with the command:
$ heroku salesforce:connect applink-org --addon applink-regular-78506 -a applink-app
Opening browser to https://login.salesforce.com/services/oauth2/authorize?client_id=…
Press any key to open up the browser to connect ⬢ applink-app to applink-org, or q to exit:
Connecting Salesforce org applink-org to ⬢ applink-app... Connected
When you connect to your org for the first time, a browser window appears for you to enter your Salesforce credentials. You must accept the access levels to give Heroku.
To view the info on your connection, run the command:
$ heroku applink:connections:info applink-org -a applink-app --addon applink-regular-78506

=== applink-org on ⬢ app applink-app
Connection Type:  Salesforce Org
Created By:       admin@heroku.com
Created Date:     2025-05-30T18:55:42.863808Z
Id:               127291fa-34c6-4a31-9e19-4dbdfed243af
Instance URL:     https://login.test1.my.pc-rnd.salesforce.com
Last Modified:    2025-05-30T18:56:02.282284Z
Last Modified By: admin@heroku.com
Org ID:           00Dbc0000000000000
Status:           Connected
Publish Your Heroku App
See Publish Your App for more information.
As of the Salesforce Spring ’26 release, you can no longer create new connected apps in Salesforce. We’re deprecating using connected apps with Heroku AppLink, and replacing them with external client apps. From now on, use external client apps instead of connected apps with your Heroku AppLink integrations. See Create an External Client App in Your Org to create external client apps in Salesforce. To create external client apps with the --auth-external-client-app-name CLI flag, your Salesforce org must be on the Summer ‘26 release and later.
If you have existing connected apps in your Salesforce org, you can still reference them in the API spec file or migrate them to external client apps.
You can publish your app to Salesforce as an external service and then use those external service actions in Salesforce Flow and Apex. To publish your app, run the command:
$ heroku salesforce:publish api-spec.yaml --client-name HerokuAPI --authorization-external-client-app-name MyAppLinkExternalClientApp --authorization-permission-set-name MyAppLinkPermSet --connection-name applink-org --addon applink-regular-78506

Publishing ⬢ applink-app to applink-org as HerokuAPI via https://applink.herokudev.com/addons/1c6bb699-2a91-47b3-b55e-8f2e37254684/connections/salesforce/applink-org/apps... done
Optionally, you can modify the app’s api-spec.yaml OpenAPI spec file to specify an external client app or permission set in Salesforce to elevate your user’s permission from the default user mode to user-plus mode.
After publishing your app, you can see the app and its input and output parameters from the Salesforce Setup. From the setup page:
- Search for
Herokuin the Quick Find and selectApps. - Select the app you published.

To view the info on your publication, run the command:
$ heroku salesforce:publications -a applink-app
=== Salesforce publications for app ⬢ applink-app
Connection Name	 Org ID			    Created Date		 Created By   	  Last Modified		    Last Modified By
──────────────── ────────────────── ──────────────────── ──────────────── ───────────────────── ────────────
applink-org	     00Dbc0000000000000	2025-05-30T17:34:56Z admin@heroku.com  2025-05-30T17:34:56Z	Admin Heroku
If publishing your app fails, review the Deployment Status in Salesforce Setup for more details.
View Logs
You can view your app’s logs with heroku logs –tail:
$ heroku logs --tail
---
2024-10-28T16:02:15.215250+00:00 app[web.1]: time=2024-10-28T16:02:15.215Z level=INFO msg="Processing request to /accounts..." app=local source=heroku-applink-service-mesh request-id=00Dbc0000000000000-f2f3ed60-2dbd-4edd-b707-9dee97d89c7c
...
2024-10-28T16:02:15.215332+00:00 app[web.1]: time=2024-10-28T16:02:15.215Z level=INFO msg="Authenticating Salesforce request for org 00Dbc0000000000000, domain https://mydomain.demo.my.salesforce.com..." app=local source=heroku-applink-service-mesh request-id=00Dbc0000000000000-f2f3ed60-2dbd-4edd-b707-9dee97d89c7c
...
2024-10-28T16:02:15.398893+00:00 app[web.1]: {"level":30,"time":1730131335396,"pid":37,"hostname":"dyno-f34267e3-3d00-453d-a3b4-a16ab26a773b","reqId":"00Dbc0000000000000-f2f3ed60-2dbd-4edd-b707-9dee97d89c7c","msg":"Querying invoking org (00Dbc0000000000000) Accounts..."}
...
2024-10-28T16:02:15.482442+00:00 app[web.1]: {"level":30,"time":1730131335482,"pid":37,"hostname":"dyno-f34267e3-3d00-453d-a3b4-a16ab26a773b","reqId":"00Dbc0000000000000-f2f3ed60-2dbd-4edd-b707-9dee97d89c7c","res":{"statusCode":200},"responseTime":86.56547299958766,"msg":"request completed"}
Invoke Your Published App Actions with Apex
See Invoking Heroku AppLink Apps for more information.
If you set the --authorizationPermissionSetName flag when you published your app, before you can invoke your published app, you must assign users the permission set generated.
This sample code shows how you can invoke the published Heroku API in Apex classes:
Synchronous Invocation:
public class InvokeHerokuAPI {
	public static void getAccounts() {
        try {
            herokuapplink.HerokuAPI herokuAPI = new herokuapplink.HerokuAPI();
            herokuapplink.HerokuAPI.GetAccounts_Response response = herokuAPI.GetAccounts();
            System.debug(JSON.serializePretty(response));
        } catch (herokuapplink.HerokuAPI.GetAccounts_ResponseException ex) {
            System.debug('FAILED!: ' + ex.responseCode + ' ' + ex.defaultResponse);
        }
    }
}
Asynchronous Invocation:
public class InvokeHerokuAPI {
      public static void postUnitOfWork() {
        try {
            herokuapplink.HerokuAPI_UnitOfWork_IN_body body = new herokuapplink.HerokuAPI_UnitOfWork_IN_body();
            body.accountName = 'Heroku AppLink ' + Datetime.now().getTime();
            body.lastName = 'Smith';
            body.subject = 'New Heroku AppLink Case!';

            herokuapplink.HerokuAPI.UnitOfWork_Request request = new herokuapplink.HerokuAPI.UnitOfWork_Request();
            request.body = body;

            herokuapplink.HerokuAPI HerokuAPI = new herokuapplink.HerokuAPI();

            herokuapplink.HerokuAPI.UnitOfWork_Response response =
                HerokuAPI.UnitOfWork(request, new UnitOfWorkCallback(), Datetime.now().addHours(1));

            System.debug(JSON.serializePretty(response));
        } catch (herokuapplink.HerokuAPI.UnitOfWork_ResponseException ex) {
            System.debug('FAILED!: ' + ex.responseCode + ' ' + ex.defaultResponse);
        } catch (Exception ex) {
            System.debug(ex.getMessage());
        }
    }

    global class UnitOfWorkCallback extends herokuapplink.HerokuAPI.UnitOfWork_Callback {
        global override void unitOfWorkResponse(List<UnitOfWork_unitOfWorkResponse_Callback> callbacks) {
            System.debug(JSON.serialize(callbacks));
        }
    }
}
Use Execute Anonymous from the Developer Console to invoke InvokeHerokuAPI Apex code.
From the menu, select Debug and then Execute Anonymous. Use InvokeHerokuAPI.getAccounts(); to invoke the synchronous GetAccounts API and InvokeHerokuAPI.postUnitOfWork(); to invoke the asynchronous UnitOfWork API.

Invoke Your Published App Actions with Flow
See [Invoking Heroku AppLink Apps for more information.
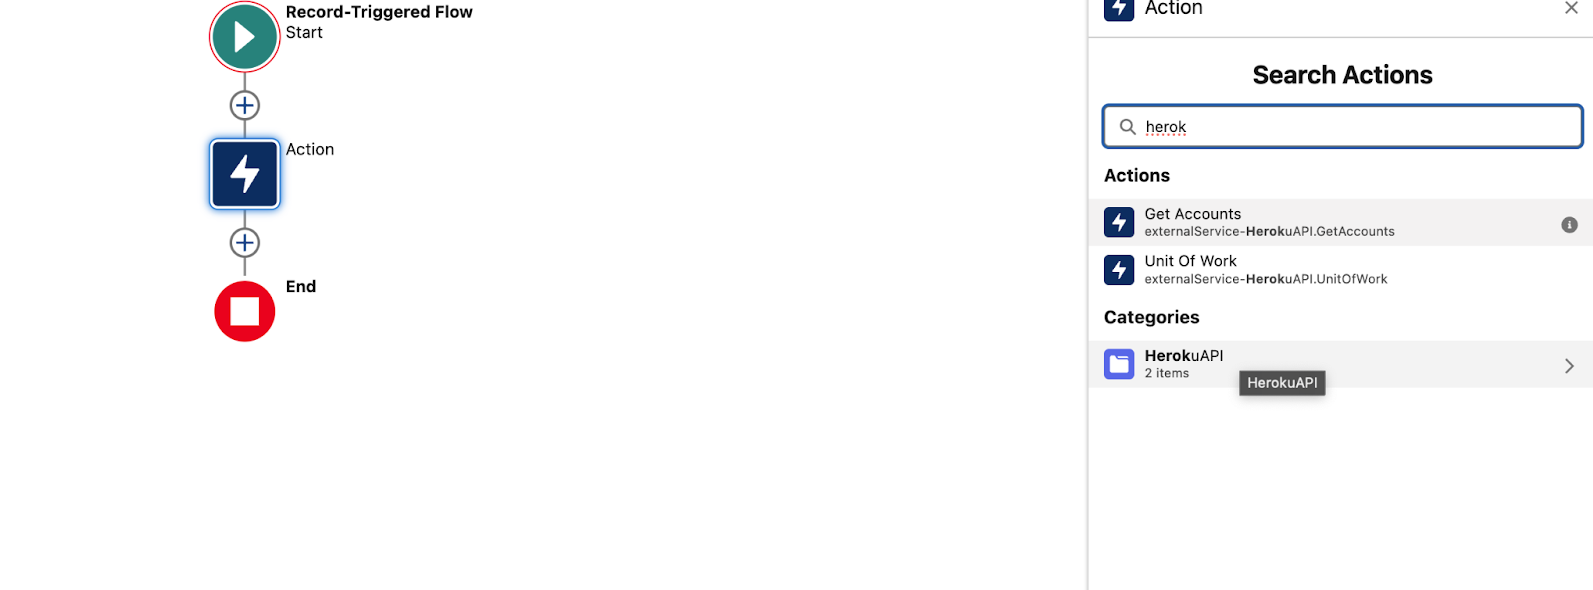
In our example, we create a flow that calls our Heroku app to get a list of accounts when an opportunity is created or updated.
- On the
Flowspage in Salesforce Setup, selectNew Flow. - Select
Start From ScratchthenNext. - Select
Record-Triggered FlowthenCreate. - In the
Configure Startpanel:- Select
Opportunityfor the object. - Select
A record is created or updatedto trigger the flow. - Select
Nonefor the condition requirements. - Select
Actions and Related Recordsto optimize the flow for.
- Select
- Add an element under the start element and select
Action. - In the
Search Actionspanel, search for the name of your published app (HerokuAPI) and select theGet Accountsaction. - Enter a name for your action such as
GetAccountsInvoke. - Select
Save, enter a name for your flow, and selectSaveagain.
Delete Your Connections, Published Apps, and Add-on
Remove Your Connection
This action removes your connection to your org and you can’t undo it.
To remove a connection from a Salesforce org, run the command:
$ heroku salesforce:disconnect applink-org -a applink-app
 ›   Warning: Destructive action
 ›   This command disconnects the connection applink-org from add-on --addon applink-regular-78506 on app ⬢ applink-app.
 ›
To proceed, type applink-org or re-run this command with --confirm applink-org: applink-org

Disconnecting Salesforce org applink-org from applink-app ... done
Delete Your Published App
This action deletes your published app from Salesforce. Make sure no existing code or resource references an app action before deleting it.
Delete your published app from Salesforce by selecting the arrow in the service’s Actions column, and selecting Delete. You can also select Delete on the published app page.
Remove Your Add-on
Removing the add-on removes all the connections, authorizations, and publications. We recommend verifying that you’re not referencing authorizations anywhere in the application before removing the add-on.
To remove your Heroku AppLink add-on, run the command:
$ heroku addons:destroy heroku-applink
Additional Reading
Try our other Heroku AppLink guides:
- Getting Started with Heroku AppLink and Data Cloud
- Getting Started with Heroku AppLink and Agentforce
Here’s some recommended reading: