Heroku AppLink と Agentforce スターターガイド
はじめに
Heroku AppLink は、パイロット版の Heroku Integration アドオンとは別のアドオンです。パイロットに参加した場合は、Heroku AppLink アドオンをプロビジョニングし、Heroku アプリを再公開する必要があります。
Heroku AppLink (旧称 Heroku Integration) は、Heroku アプリを Salesforce の API サービスとして公開します。このガイドは、Heroku CLI および Heroku AppLink CLI プラグインを使用して Heroku AppLink アドオンを設定するのに役立ちます。Heroku AppLink を活用してできることについては、「ユースケース」セクションを参照してください。
このガイドでは、Heroku アプリを作成して Salesforce に公開し、生成されたエージェントアクションを Agentforce で実行します。
このガイドでは、以下を準備していることを前提としています。
- 確認済みの Heroku アカウント
- Enterprise 以外のユーザーは Eco dynos プランのサブスクリプション、Heroku Enterprise ユーザーの場合は Basic dynos
- 選択した言語に基づくすべての依存関係
- Salesforce 開発者組織、Salesforce Sandbox 組織、またはスクラッチ組織
- Salesforce 組織で Agentforce が有効になっている
- (任意) Salesforce CLI をインストールして Salesforce 組織で動作するようにしている
スクラッチ組織を使用する場合は、スクラッチ組織定義ファイル内の Einstein1AIPlatform 機能を有効にする必要があります。
{
 "orgName": "ABC",
 "edition": "Enterprise",
 "features": ["Einstein1AIPlatform"]
}
Heroku AppLink プラグインをインストールする
Heroku AppLink CLI プラグインを追加する前に、Heroku CLI がインストールされている必要があります。手順については、「Heroku CLI」を参照してください。
プラグインをインストールするには、次の CLI コマンドを実行します。
$ heroku plugins:install @heroku-cli/plugin-applink
次のコマンドでプラグイン情報を表示できます。
$ heroku plugins:inspect @heroku-cli/plugin-applink
└─ @heroku-cli/plugin-applink
...
  ├─ commands
   │  ├─ applink:authorizations
   │  ├─ applink:authorizations:info
   │  ├─ applink:connections
   │  ├─ applink:connections:info
   │  ├─ datacloud:authorizations:add
   │  ├─ datacloud:authorizations:remove
   │  ├─ datacloud:connect
   │  ├─ datacloud:data-action-target:create
   │  ├─ datacloud:disconnect
   │  ├─ salesforce:authorizations:add
   │  ├─ salesforce:authorizations:remove
   │  ├─ salesforce:connect
   │  ├─ salesforce:connect:jwt
   │  ├─ salesforce:disconnect
   │  ├─ salesforce:publications
   │  └─ salesforce:publish
...
アプリを準備する
ローカルのコマンドシェルまたはターミナルで次のコマンドを実行して、サンプルアプリのローカルコピーを作成します。
$ git clone https://github.com/heroku-examples/heroku-agentforce-tutorial-java
$ cd heroku-agentforce-tutorial-java
この Git リポジトリには、次の構成のサンプル Java アプリが含まれています。
api-spec.yaml: (必須) このサンプル API 仕様ファイルを使用すると、Salesforce に外部サービスとしてアプリを公開できます。OpenAPI 3.0 をサポートしています。詳細は、「外部サービス」と OpenAPI を参照してください。BadgeCreator.java: このファイルは、ロゴ、回転させたテキストボックス、テキストを含むカスタムバッジを生成する機能を提供します。Procfile: 起動時にアプリによって実行される内容を定義する Heroku Procfile。Procfile ではheroku-applink-service-mesh がアプリを起動します。
アプリを作成する
dyno を使用してこのチュートリアルを完了した場合、使用量としてカウントされます。このチュートリアルを完了するには、低価格プランのご利用をお勧めします。資格のある学生の皆様は、Heroku for GitHub Students プログラムを通じてプラットフォームクレジットを申請できます。
Heroku でソースコードを受け取る準備をするには、アプリを作成します。
$ heroku create
Creating app... done, ⬢ applink-agent-app
http://applink-agent-app.herokuapp.com/ | https://git.heroku.com/applink-agent-app.git
名前を指定しない場合は、Heroku によってアプリの名前がランダムに生成されます。このガイドでのアプリの名前は applink-agent-app です。
Heroku AppLink buildpack をインストールする
Heroku AppLink Service Mesh 用の Heroku buildpack では、アプリの認証と承認を処理するための Heroku AppLink Service Mesh がインストールされます。サービスメッシュはアプリの前にあるプロキシであり、受信した Salesforce および Data Cloud リクエストをインターセプトして検証および認証します。
インストールするには、次のコマンドを実行します。
$ heroku buildpacks:add heroku/heroku-applink-service-mesh
さらに、java プロジェクトでは heroku/java buildpack を設定します。
$ heroku buildpacks:add heroku/java
Buildpack added. Next release on applink- will use:
  1. https://github.com/heroku/heroku-buildpack-heroku-applink-service-mesh
  2. heroku/java
Run git push heroku main to create a new release using these buildpacks.
Heroku AppLink アドオンをプロビジョニングする
アドオンをプロビジョニングするには、次のコマンドを実行します。
$ heroku addons:create heroku-applink
Creating heroku-applink on ⬢ applink-agent-app... free
Your add-on is being provisioned.
applink-regular-78506 is being created in the background. The app will restart when complete...
Use heroku addons:info applink-regular-78506 to check creation progress
Use heroku addons:docs applink-agent-app to view documentation
プロビジョニング後、アドオンは環境設定を作成します。
HEROKU_APPLINK_URL: CLI がリクエストを行うためのベース URL が含まれます。HEROKU_APPLINK_TOKEN: アクセストークンが含まれます。
heroku config コマンドを使用して、環境設定を取得できます。
$ heroku config
=== applink-agent-app Config Vars

HEROKU_APPLINK_API_URL: https://heroku-applink.heroku.com/addons/894792c1-c1e8-4f34-ba32-00000000000
HEROKU_APPLINK_TOKEN: af0a7e7984d4ef28948db6431dc036ae383fcb2f02064cbb0000000000000000
Heroku アプリをデプロイする
次に、アプリをデプロイします。
$ git push heroku main
...
2025-07-07T14:09:33.845077+00:00 heroku[web.1]: State changed from provisioning to starting
2025-07-07T14:09:49.304734+00:00 app[web.1]: time=2025-07-07T14:09:49.304Z level=INFO msg=environment app=applink-app source=heroku-applink-service-mesh go_version:=go1.24.3 os=linux arch=amd64 http_port=31835 version=v0.2.2 environment=local app_host=http://127.0.0.1 app_port=3000
2025-07-07T14:09:49.304754+00:00 app[web.1]: time=2025-07-07T14:09:49.304Z level=INFO msg="Heroku AppLink Service Mesh is up!" app=applink-app source=heroku-applink-service-mesh port=31835
2025-07-07T14:09:49.833835+00:00 app[web.1]:
2025-07-07T14:09:49.833839+00:00 app[web.1]: > applink-app@1.0.0 start
2025-07-07T14:09:49.833840+00:00 app[web.1]: > fastify start -o -a 0.0.0.0 -p $APP_PORT -l debug src/app.js
2025-07-07T14:09:49.833840+00:00 app[web.1]:
2025-07-07T14:09:50.482717+00:00 heroku[web.1]: State changed from starting to up
2025-07-07T14:09:51.111131+00:00 app[web.1]: {"level":30,"time":1751897391110,"pid":63,"hostname":"dyno-bcad42a8-33d4-447f-9adb-0000000000","msg":"Server listening at http://0.0.0.0:3000"}
...
remote: Verifying deploy... done.
To https://git.heroku.com/applink-app.git
 * [new branch]      main -> main
Heroku アプリをデプロイする他の方法については、「デプロイ」を参照してください。
ユーザー権限を割り当てる
ユーザー権限についての詳細は、「ユーザー権限の割り当て」を参照してください。
Heroku AppLinkで操作を実行するには、Heroku で deploy 権限または operate 権限を持っているか、Heroku アプリの所有者である必要があります。Agentforce の設定を行うには、カスタムエージェントアクションを作成するために必要なユーザー権限もユーザーに付与する必要があります。
また、Salesforce で Heroku AppLink 権限を持っている必要があります。Salesforce で権限を追加するには、Salesforce で権限セットを作成します。
- Salesforce の [設定] から、
Quick Find(クイック検索) ボックスにPermission Sets と入力して選択します。 New(新規) を選択し、権限セットに名前を付けます。Save(保存) を選択します。Find Settings…(設定の検索…) ボックスにManage Heroku AppLink と入力して選択します。- [システム権限] ページの上部で、
Edit(編集) を選択します。 Manage Heroku AppLink の横にあるチェックボックスをオンにしてSave(保存) を選択し、もう一度Save(保存) を選択します。- [システム権限] ページのナビゲーションバーで、
Manage Assignments(割り当ての管理) を選択します。 Add Assignments(割り当てを追加) を選択します。- 権限セットを追加するユーザーの横にあるチェックボックスをオンにし、
Next(次へ) を選択してからAssign(割り当て) を選択します。
Salesforce に接続する
接続の作成、表示、削除についての詳細は、「アプリ上の接続」を参照してください。
本番組織の場合は、ログイン URL に “https://login.salesforce.com” を使用します。サンドボックス組織とスクラッチ組織の場合は、ログイン URL に “https://test.salesforce.com” を使用します。
すでに組織にログインしている場合、このコマンドはすでにログインしている組織への接続を試みます。別の組織に接続する場合は、このコマンドを実行する前に既存のすべての組織からログアウトしてください。
次に、次のコマンドを使用して Salesforce 組織への接続を作成します。
$ heroku salesforce:connect agent-org --addon applink-regular-78506 -a applink-agent-app
Opening browser to https://login.salesforce.com/services/oauth2/authorize?client_id=…
Press any key to open up the browser to connect ⬢ applink-agent-app to agent-org, or q to exit:
Connecting Salesforce org agent-org to ⬢ applink-agent-app... Connected
接続に関する情報を表示するには、次のコマンドを実行します。
$ heroku applink:connections:info agent-org -a applink-agent-app --addon applink-regular-78506

=== agent-org on ⬢ app applink-agent-app
Connection Type:  Salesforce Org
Created By:       admin@heroku.com
Created Date:     2025-05-30T18:55:42.863808Z
Id:               127291fa-34c6-4a31-9e19-4dbdfed243af
Instance URL:     https://login.test1.my.pc-rnd.salesforce.com
Last Modified:    2025-05-30T18:56:02.282284Z
Last Modified By: admin@heroku.com
Org ID:           00Dbc0000000000000
Status:           Connected
Heroku アプリを公開する
詳細は、「アプリを公開する」を参照してください。
アプリを外部サービスとして Salesforce に公開し、それらの外部サービスアクションを Agentforce で使用できます。アプリを公開するには、次のコマンドを実行します。
$ heroku salesforce:publish api-spec.json --client-name BadgeService --connection-name agent-org --authorization-connected-app-name BadgeServiceConnectedApp --authorization-permission-set-name BadgeServicePermissions

Publishing ⬢ applink-agent-app to agent-org as BadgeService via https://applink.herokudev.com/addons/1c6bb699-2a91-47b3-b55e-8f2e37254684/connections/salesforce/agent-org/apps... done
--authorization-permission-set-name フラグを指定すると BadgeServicePermissions という名前の権限セットが作成されます。組織からアプリへのアクセスを制御するには、呼び出しを行うユーザーにこの権限セットを割り当てます。
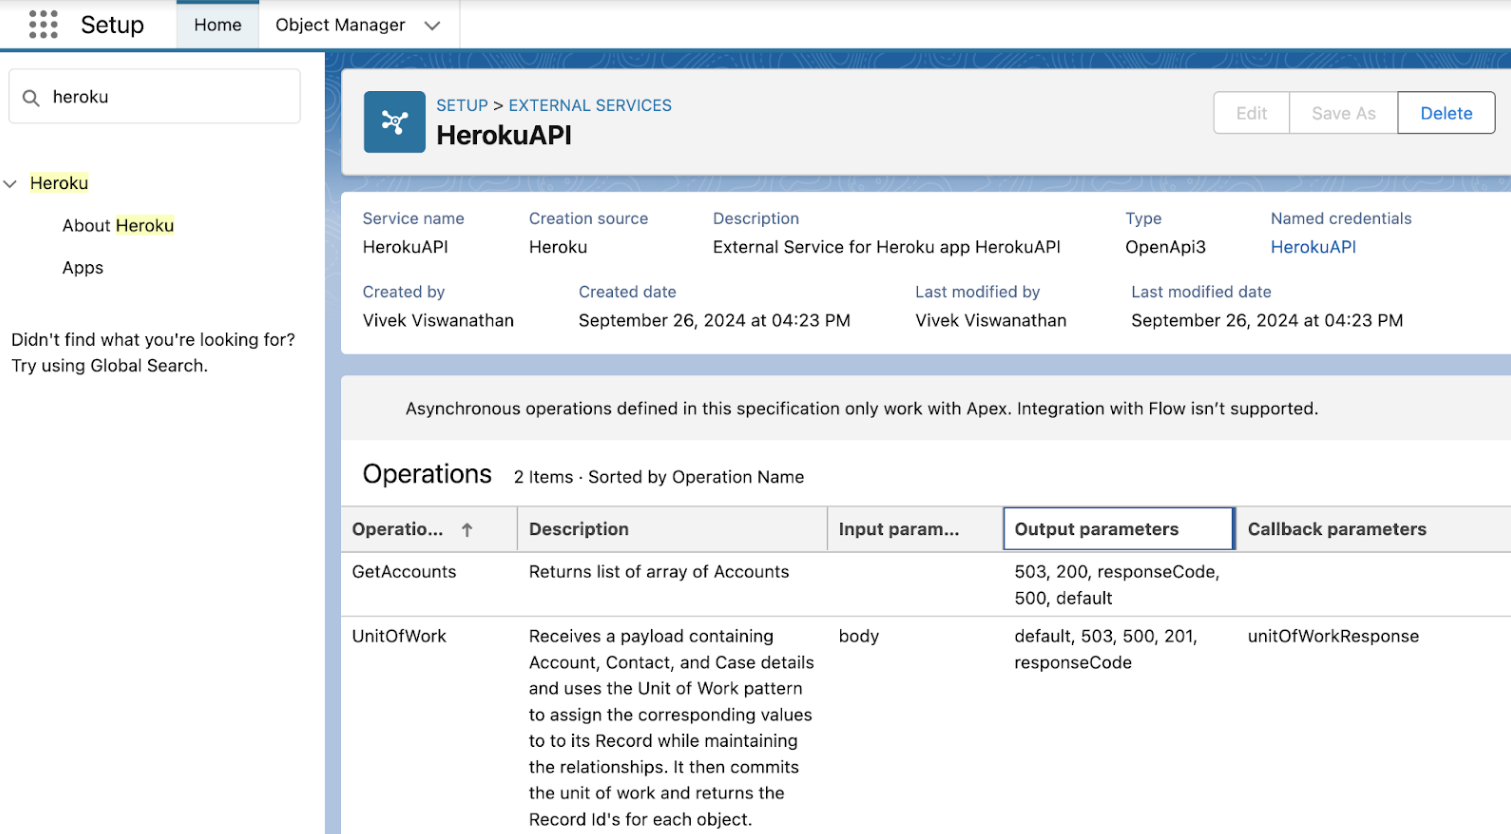
アプリを公開すると、Salesforce の [設定] からアプリとその入力・出力パラメータを確認できます。設定ページで次のことを行います。
- [クイック検索] で
Heroku を検索し、Apps(アプリ) を選択します。 - 公開したアプリを選択します。
![[設定] の Heroku アプリ](https://assets.devcenter.heroku.com/article-images/1750872001-rn_heroku_apps_setup.png)
アプリの公開に失敗した場合は、Salesforce の [設定] の [リリース状況] で詳細を確認してください。
公開に関する情報を表示するには、次のコマンドを実行します。
$ heroku salesforce:publications -a applink-agent-app
=== Salesforce publications for app ⬢ applink-agent-app
Connection Name  Org ID             Created Date          Created By      Last Modified         Last Modified By
──────────────── ────────────────── ──────────────────── ──────────────── ───────────────────── ────────────
agent-org            00Dbc0000000000000 2025-05-30T17:34:56Z  admin@heroku.com  2025-05-30T17:34:56Z    Admin Heroku
ログを表示する
アプリのログは heroku logs –tail で確認できます。
$ heroku logs --tail
---
2024-10-28T16:02:15.215250+00:00 app[web.1]: time=2024-10-28T16:02:15.215Z level=INFO msg="Processing request to /accounts..." app=local source=heroku-applink-service-mesh request-id=00Dbc0000000000000-f2f3ed60-2dbd-4edd-b707-9dee97d89c7c
...
2024-10-28T16:02:15.215332+00:00 app[web.1]: time=2024-10-28T16:02:15.215Z level=INFO msg="Authenticating Salesforce request for org 00Dbc0000000000000, domain https://mydomain.demo.my.salesforce.com..." app=local source=heroku-applink-service-mesh request-id=00Dbc0000000000000-f2f3ed60-2dbd-4edd-b707-9dee97d89c7c
...
2024-10-28T16:02:15.398893+00:00 app[web.1]: {"level":30,"time":1730131335396,"pid":37,"hostname":"dyno-f34267e3-3d00-453d-a3b4-a16ab26a773b","reqId":"00Dbc0000000000000-f2f3ed60-2dbd-4edd-b707-9dee97d89c7c","msg":"Querying invoking org (00Dbc0000000000000) Accounts..."}
...
2024-10-28T16:02:15.482442+00:00 app[web.1]: {"level":30,"time":1730131335482,"pid":37,"hostname":"dyno-f34267e3-3d00-453d-a3b4-a16ab26a773b","reqId":"00Dbc0000000000000-f2f3ed60-2dbd-4edd-b707-9dee97d89c7c","res":{"statusCode":200},"responseTime":86.56547299958766,"msg":"request completed"}
Agentforce アクションを作成する
詳細は、「Heroku AppLink アプリの呼び出し」を参照してください。
この手順を完了するには、Salesforce 組織で Agentforce を有効にする必要があります。Agentforce を有効にする手順を参照してください。
エージェントアクションを作成するには次の手順を実行します。
- Salesforce の [設定] の
Quick Find(クイック検索) ボックスにAgentforce Actions(Agentforce アクション) と入力して選択します。 Actions(アクション) タブを選択し、New Agent Action(新しいエージェントアクション) を選択します。以下の項目と値を使用してアクションを構成し、
Next(次へ) を選択します。Field Value Reference Action Type API Reference Action Category Heroku Reference Action Generate Badge Agent Action Label Generate Badge Agent Action API Name Generate_Badge 指示ウィンドウで、以下の項目に入力します。
Field Value Agent Action Instructions Use this action in response to requests for a Heroku badge with a name on it. Input - Instructions Name to be placed on the badge.Input - Collect data from user Selected Output - Instructions This is the Heroku badge the user requested. Output - Filter from agent action Deselected Output - Show in conversation Selected Output - Output Rendering Rich Text Finish(完了) を選択します。

Agentforce で公開した App アクションを呼び出す
次に、作成したアクションをエージェントに追加します。
- Salesforce の [設定] の
Quick Find(クイック検索) ボックスにAgentforce Agents(Agentforce エージェント) と入力して選択します。 Enable the Agentforce (Default) Agent(Agentforce (デフォルト) エージェントを有効にする) セクションで、切り替えボタンをオンにしてデフォルトのAgentforce (Default) エージェントを有効にします。Agentforce (Default) エージェントのドロップダウンを開いてOpen in Builder(ビルダーで開く) を選択します。- ウィンドウの右上に
Deactivate(無効化) がある場合は、それを選択します。 Topics(トピック) タブで、New(新規) とAdd from Asset Library(アセットライブラリから追加) を選択します。General CRM トピックを検索して追加し、Finish(完了) を選択します。General CRM(一般的な CRM) トピックを選択し、New Version(新しいバージョン) を選択します。Topic Configuration(トピックの設定) タブを選択し、現在のClassification Description(分類の説明) 項目にAlso including requests for badges. を追加して、Save(保存) を選択します。This Topic's Actions(このトピックのアクション) タブを選択し、New(新規) とAdd from Asset Library(アセットライブラリから追加) を選択します。- 作成したアクション
Generate Badge を検索して追加し、Finish(完了) を選択します。 - 画面の右上にある
Activate(有効化) を選択します。
これで、エージェントでアクションをテストできるようになりました。Conversation Preview (会話のプレビュー) パネルに Generate a badge for Astro と入力するか、独自の指示を入力してテストします。

接続、承認、公開済みアプリ、アドオンを削除する
接続を削除する
この操作を行うと組織への接続が削除され、元に戻すことはできません。
Salesforce 組織から接続を削除するには、次のコマンドを実行します。
$ heroku salesforce:disconnect agent-org -a applink-agent-app
 ›   Warning: Destructive action
 ›   This command disconnects the connection agent-org from add-on applink-regular-78506 on app ⬢ applink-agent-app.
 ›
To proceed, type agent-org or re-run this command with --confirm agent-org: agent-org

Disconnecting Salesforce org agent-org from applink-agent-app ... done
公開したアプリを削除する
この操作を行うと、Salesforce から公開されたアプリが削除されます。アプリアクションを削除する前に、既存のコードまたはリソースがアプリアクションを参照していないことを確認してください。
サービスの [アクション] 列の矢印をクリックし、Delete (削除) を選択して、Salesforce から公開したアプリを削除します。公開されたアプリのページで Delete (削除) を選択することもできます。
アドオンを削除する
アドオンを削除すると、すべての接続、承認、パブリケーションが削除されます。アドオンを削除する前に、アプリケーション内で承認が参照されている場所がないことを確認するようお勧めします。
Heroku AppLink アドオンを削除するには、次のコマンドを実行します。
$ heroku addons:destroy heroku-applink
その他の資料
その他の Heroku AppLink ファーストステップガイドもご覧ください。
お勧めのリソースを以下に紹介します。